You know that annoying feeling when a photo is almost perfect… but not quite? The subject is great, the moment is right, yet the image still looks a little soft, a little noisy, a little “meh.” And the worst part: when you try to fix it fast, you either get harsh sharpening halos or you upscale it and accidentally make the grain look even bigger.
In 2026, the cleanest workflow is simple and surprisingly satisfying: enhance the photo naturally first, then upscale it to a crisp 4K-ready size. When you do it in that order, your images don’t just get bigger—they get cleaner, sharper, and genuinely more premium.
Try the two-step flow here (each link appears once):
(Free AI Photo Enhancer)
(upscale image to 4k)
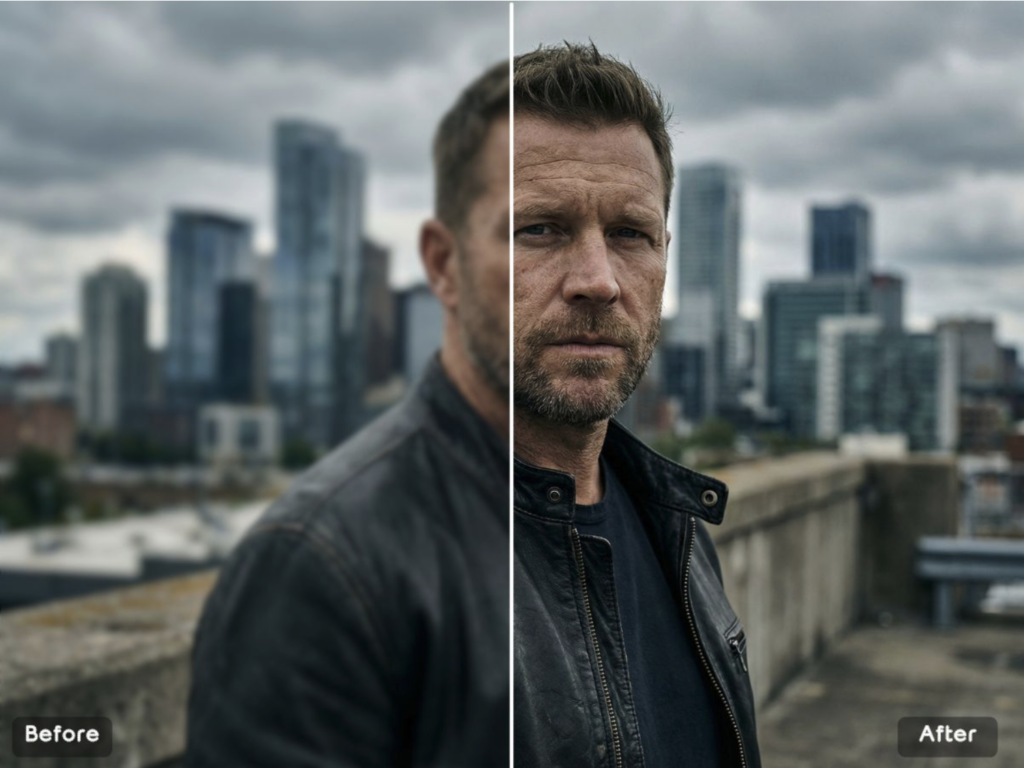
Step 1: Photo Enhancing That Looks Natural (Not “Overcooked”)
A good enhancer doesn’t try to turn your photo into plastic. It should lift micro-detail in hair, fabric, and product texture, reduce noise, and nudge lighting toward a cleaner balance—without changing the vibe of the shot.
Competitor Comparison: Photo Enhancers
| Tool | Strength | Common Limitation | Why this approach stands out |
|---|---|---|---|
| Remini | Fast facial enhancement | Can look over-smoothed | More natural texture retention |
| Lightroom | Great for color work | Not built for real detail recovery | One-click clarity + cleanup |
| Photoshop | Total control | Slow + skill-heavy | No complicated workflow |
| Mobile “sharpen” apps | Quick and easy | Halos and crunchy edges | Cleaner, realistic finish |
| Topaz (desktop) | Strong reconstruction | Paid + installation | Web-based speed and simplicity |
Step 2: Upscaling to 4K Without Turning Noise Into a Problem
Classic resizing stretches pixels. AI upscaling is meant to rebuild edge structure and stabilize textures, so the final output holds up on big screens, ads, and even light print use.
Competitor Comparison: AI Upscalers
| Tool | Strength | Common Limitation | Why this approach stands out |
|---|---|---|---|
| Topaz Gigapixel | Excellent detail | Paid + desktop install | No install, faster iteration |
| Upscayl | Free/open-source | Depends on your hardware | Works smoothly on any device |
| Let’s Enhance | Easy cloud upscale | Credit/limits | More “just upload” friendly |
| Icons8 Upscaler | Simple | Can over-sharpen | Balanced edges and texture |
| Photoshop resize | Controlled sizing | Doesn’t recover true detail | AI-first clarity improvement |
3 Quick Case Scenarios
- E-commerce product photos
You’ve got supplier images that look dull and soft. Enhance for clean texture, then upscale so zoomed-in product views look trustworthy. - Social posts that get compressed
Your photo looks okay on your phone, but platforms crush it. Enhance first to clean noise, then upscale to preserve clarity after compression. - Slides, banners, and pitch decks
Low-res screenshots and old photos look rough on a projector. This workflow turns “blurry” into “boardroom-ready.”
3 Pro Tips (Small Moves, Big Results)
- Tip 1: Enhance before you upscale.
If you upscale first, you may enlarge noise and artifacts. Clean the image first, then expand it. - Tip 2: Don’t chase extreme sharpness.
“Premium” clarity looks natural. Over-sharpening screams “edited.” - Tip 3: Prioritize what viewers notice first.
For portraits: eyes + hairline. For products: logo + edges + texture. For screenshots: text readability.
There’s something genuinely relieving about watching a tired, low-quality photo turn into something you’re proud to share. Not because you spent hours editing—but because you finally used a workflow that respects your time. In 2026, that’s the real flex: clean results, fast, and a final image that looks like it was always meant to be sharp.