Picture this: You want to run a beast of a model like LLaMA 3.1 405B or the new DeepSeek R1. Usually, you have two choices: bleed money on cloud API costs (hello, OpenAI bills) or drop the price of a small car on a rig with multiple NVIDIA H100s. Neither option is particularly “home lab” friendly.
But what if I told you that the hardware you currently have—that M2 MacBook Air you work on, the gaming PC gathering dust with an RTX 3060, and even the Raspberry Pi in your drawer—could team up to run these massive models?
Welcome to the world of Exo.
Exo is an open-source project that is quietly revolutionizing local AI. It allows you to stitch together everyday devices into a unified AI cluster. It’s distributed computing made accessible. As a tech enthusiast who loves squeezing every drop of performance out of hardware, I’ve spent time playing with Exo, and honestly, it feels like magic.
In this deep-dive guide, we are going to walk through exactly how to set this up. We aren’t skipping steps. Whether you are a developer, a researcher, or just a geek like me, by the end of this article, you’ll have your own AI cluster running in your living room.
What is Exo really?
At its core, Exo is an open-source framework that turns the “centralized server” model on its head. Instead of needing one massive supercomputer, Exo utilizes a peer-to-peer (P2P) architecture. It allows devices to talk directly to one another, sharing the load of running an AI model.
Think of it like a potluck dinner. Instead of one person cooking the entire feast (the central server), everyone brings a dish (a layer of the neural network). Together, you have a full meal.
Key technical concepts behind the magic
To understand why Exo is special, we need to look under the hood:
- Distributed inference: Exo doesn’t just run the model on one machine; it splits the neural network. One device might calculate the first 10 layers, pass the data (tensors) to the next device over your Wi-Fi or Ethernet, which calculates the next 10 layers, and so on. This allows you to run models that simply do not fit in the VRAM of a single consumer card.
- Dynamic model partitioning: This is the “secret sauce.” You don’t need to manually calculate which device does what. Exo analyzes your cluster’s topology (RAM, GPU power, network speed) and automatically slices the model to fit.
- Device equality: There is no “Master Node” that acts as a bottleneck. It’s a true P2P network. If one node goes down, the system is designed to be resilient (though obviously, you need enough total RAM to keep the model running).
What can you actually run?
This isn’t just for toy models. Exo supports the heavy hitters:
- LLMs: LLaMA (from 3B up to the massive 405B), Mistral, Qwen, and DeepSeek.
- Vision Models: LLaVA for analyzing images.
- Specialized Models: Coding assistants and reasoning models like DeepSeek R1.
Why Exo matters: Solving real problems
Before we start typing commands, let’s understand why you should bother setting this up.
1. The cost barrier
If you are hitting the OpenAI API frequently, you know the pain. GPT-4 level tokens add up. With Exo, your only running cost is electricity. Once you download the model, it’s yours to run forever, for free.
2. Privacy is paramount
This is the big one for me. When you use ChatGPT or Claude, you are sending your data to their servers. With Exo, the data never leaves your local network (or your private VPN). This is critical for medical data, proprietary code, or personal journals.
3. No vendor lock-in
Cloud providers change their ToS, deprecate models, and hike prices. Your local Llama 3.1 file isn’t going anywhere. You own the infrastructure.
4. Utilizing “E-Waste”
We all have old laptops or previous-gen GPUs lying around. Exo gives them a second life. A 4-year-old laptop might not run a 70B model alone, but it can certainly contribute 16GB of RAM to the cluster.
Prerequisites and hardware requirements
Let’s get your environment ready. The beauty of Exo is that the hardware requirements are “whatever you have,” as long as the combined memory is enough.
Software checklist
- Python: You need Python 3.12.0 or higher. This is critical because Exo relies heavily on
asyncioimprovements found in newer Python versions. - OS: macOS, Linux, or Windows (via WSL).
- For NVIDIA Users: If you are on Linux with NVIDIA cards, ensure you have:
- NVIDIA drivers installed (
nvidia-smito check). - CUDA Toolkit (
nvcc --version). - cuDNN library.
- NVIDIA drivers installed (
Hardware examples (The “Can I run it?” section)
Here are some real-world combos that work:
- Llama 3.2 3B: A single 8GB MacBook Air (Easy mode).
- Llama 3.1 8B: Two older laptops with 8GB RAM each (16GB total cluster).
- Llama 3.1 70B: Two gaming PCs with RTX 3090/4090s.
- Llama 3.1 405B: The “Frankenstein” cluster—combining Mac Studios, gaming PCs, and high-RAM CPU servers to hit 800GB+ combined RAM.
Network notes
Devices need to see each other.
- Local Network: Same Wi-Fi or Ethernet switch is best for latency.
- Remote: Use Tailscale. Exo works beautifully over Tailscale’s VPN overlay, letting you cluster your home PC with your laptop at a coffee shop.
Step-by-Step installation and setup
Let’s get our hands dirty. Follow these steps precisely.
Step 1: Verify Python version
Open your terminal. Do not skip this.
python3 --versionIf it says 3.10 or 3.11, stop. You need to upgrade.
On macOS (using Homebrew):
brew install [email protected]On Ubuntu/Debian:
sudo apt-get update
sudo apt-get install python3.12 python3.12-venv
Step 2: Clone and install Exo
We will install Exo from the source to get the latest features.
# Clone the repository
git clone https://github.com/exo-explore/exo.git
cd exo

# Pro Tip: Always use a virtual environment to avoid messing up your system Python
python3.12 -m venv venv
source venv/bin/activate

# Install the package (this might take 5-10 mins)
pip install -e .
# Alternatively, you can use the provided script:
# source install.sh
Step 3: macOS-specific optimization (Apple Silicon Users)
If you are running on an M1, M2, or M3 Mac, you have a superpower called Unified Memory. Exo utilizes MLX (Apple’s machine learning framework) to tap into this. You need to configure it for maximum efficiency.
Run this script included in the repo:
./configure_mlx.shNote: This script optimizes how memory is allocated, preventing your Mac from choking when loading large model shards.
Step 4: Launch Exo on your first device
Time to start the engine. On your main machine (the one you want to use as the entry point), run:
exoWhat happens next?
- Exo creates a default home directory.
- It downloads a default model (usually a smaller Llama model to start).
- It starts the web server on port
52415. - It begins broadcasting via UDP: “Hello? Are there any other computers out there?”
Step 5: Add additional devices
This is where Exo shines. Go to your second computer (e.g., your old laptop), follow Steps 1 & 2 to install Exo, and then simply run:
exoThat’s it. You don’t need to edit a config.yaml file with IP addresses. As long as they are on the same network, they will find each other and handshake. Your terminal on Device 1 will likely show a log entry indicating a new peer has joined the cluster.
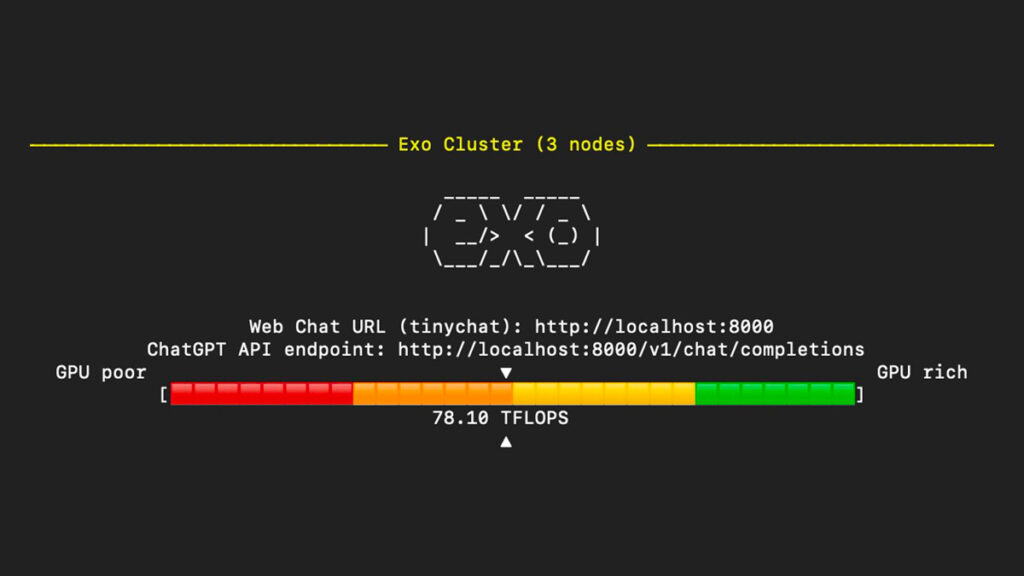
Step 6: Access the Web Interface
Open your browser on Device 1 and go to:
http://localhost:52415You will see a clean, ChatGPT-style interface. Type “Hello” and watch your cluster work.
Bonus:
exo ships a macOS app that runs in the background on your Mac.
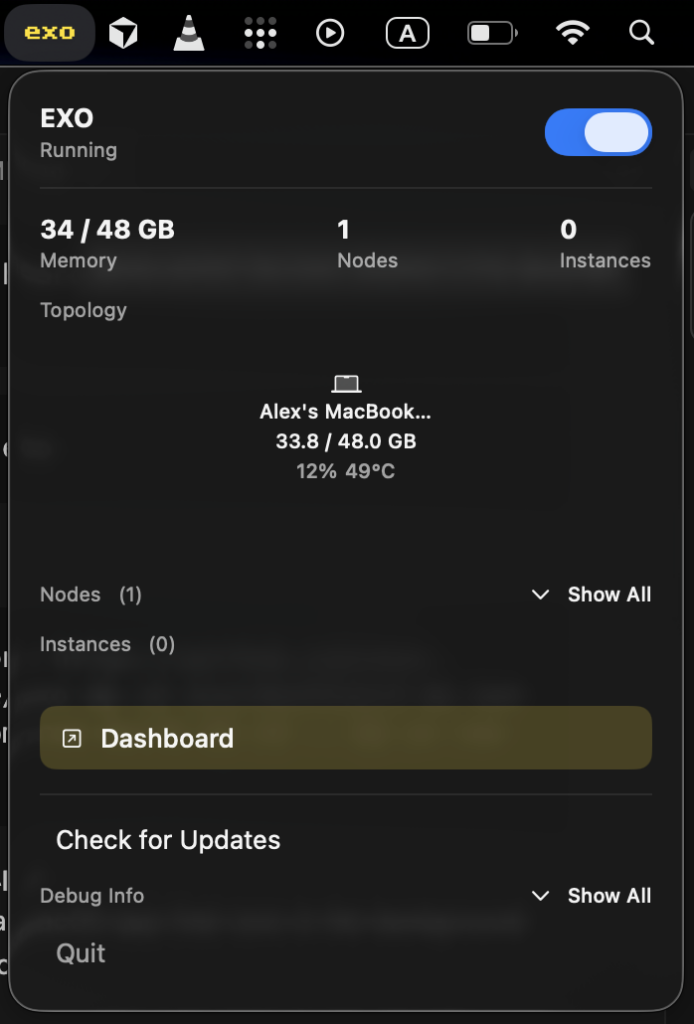
The macOS app requires macOS Tahoe 26.2 or later.
Download the latest build here: EXO-latest.dmg.
The app will ask for permission to modify system settings and install a new Network profile. Improvements to this are being worked on.
Using Exo: Practical examples
Exo isn’t just a chatbot UI; it’s a full API server.
Example 1: The API (For Developers)
Exo exposes an endpoint that is compatible with the OpenAI SDK. This means you can point your existing apps (like LangChain or AutoGen) to your local cluster just by changing the base_url.
Query Llama 3.2 3B via curl:
curl http://localhost:52415/v1/chat/completions \
  -H "Content-Type: application/json" \
  -d '{
    "model": "llama-3.2-3b",
    "messages": [{"role": "user", "content": "Explain quantum computing in simple terms"}],
    "temperature": 0.7
  }'
Query the monster DeepSeek R1:
Note: Make sure your cluster has enough RAM for this!
curl http://localhost:52415/v1/chat/completions \
  -H "Content-Type: application/json" \
  -d '{
    "model": "deepseek-r1",
    "messages": [{"role": "user", "content": "Solve this calculus problem..."}],
    "temperature": 0.7
  }'
Example 2: Vision capabilities
Want to build an app that “sees”? Exo supports LLaVA. You can send an image URL and ask questions about it.
curl http://localhost:52415/v1/chat/completions \
  -H "Content-Type: application/json" \
  -d '{
    "model": "llava-1.5-7b-hf",
    "messages": [{
      "role": "user",
      "content": [
        {"type": "text", "text": "What objects do you see in this image?"},
        {"type": "image_url", "image_url": {"url": "http://images.cocodataset.org/val2017/000000039769.jpg"}}
      ]
    }],
    "temperature": 0.0
  }'
Example 3: CLI quick run
If you don’t want the server running permanently, use the one-off run command:
exo run llama-3.2-3b --prompt "Write a haiku about distributed computing"Performance tips and optimization
Running distributed AI introduces a new bottleneck: Network Latency. Here is how to keep things fast.
1. Wired is King
Wi-Fi works, but Ethernet is vastly superior. The constant swapping of tensor data between devices requires high bandwidth and low latency. If you can, plug your devices into a switch.
2. Maximize inference speed
- Apple Silicon: Update to macOS Sequoia. The MLX team constantly optimizes drivers in the OS updates.
- Heterogeneous Clusters: If you have one device with a powerful GPU and one with just a CPU, Exo tries to balance this, but try to ensure the “primary” node (where you send requests) is the most powerful one.
3. Manage model storage
LLMs are huge. A 70B model can take up 40GB+. By default, Exo saves to ~/.cache/exo/downloads. If your boot drive is small, move this to an external SSD:
export EXO_HOME=/Volumes/ExternalSSD/exo_data
exo
4. Handling restricted internet
If you are in a region where Hugging Face is blocked or slow, use a mirror:
HF_ENDPOINT=https://hf-mirror.com exoTroubleshooting common issues
Things might break. Here is how to fix the common stuff.
Issue: “Python version too old”
Fix: You are likely calling the system python. Be explicit:
python3.12 -m pip install -e .Issue: SSL Certificate errors on macOS
Fix: Python on macOS sometimes doesn’t link to the system certificates. Run the included install command:
/Applications/Python\ 3.12/Install\ Certificates.commandIssue: Devices not discovering each other
Fix:
- Are they on the same Wi-Fi?
- Firewall: Windows Defender or macOS Firewall might block UDP packets. Temporarily disable them to test.
- Tailscale: If using Tailscale, run
exo --tailscaleto force it to bind to the VPN interface.
Issue: Out of Memory (OOM)
Fix: Just because you can split a model doesn’t mean you have infinite RAM. If you crash, try a smaller quantization (e.g., Q4 instead of FP16) or add another device to the cluster.
The Exo ecosystem and community
Exo is exploding in popularity right now. It has over 32,000 stars on GitHub, which is a massive signal of trust in the open-source world.
There is a vibrant ecosystem forming:
- Bounties: If you can code, you can earn money by fixing issues listed on their GitHub.
- Discord: The community is very active. It’s a great place to ask, “Will my specific hardware combo work?”
The future of Home AI
We are moving away from the era where AI was something that happened “in the cloud.” Exo proves that we can own our infrastructure. Imagine a future where an entire small office shares a cluster of Mac Minis to run a private, secure coding assistant for their team. That future is basically here today.
Exo democratizes high-end AI. It proves you don’t need a data center budget to run data center models.
Here is your homework:
- Go to https://github.com/exo-explore/exo and star the repo to support the devs.
- Gather your devices—even the old ones.
- Spend 30 minutes following this guide.
- Run your first prompt on your own, private cluster.
The feeling of seeing your old laptop and your new PC working together to write a poem or solve a math problem is incredibly satisfying. Good luck, and happy clustering!