In today’s interconnected world, developers and system administrators frequently face a common challenge: how do you securely expose a local server behind a NAT or firewall to the internet without complex VPN setups? Whether you’re testing webhooks, demonstrating a project to clients, or accessing your home lab remotely, traditional port forwarding often falls short due to security concerns, ISP restrictions, or simply not having a static public IP address.
Enter FRP (Fast Reverse Proxy) – an open-source, high-performance reverse proxy tool built in Go that elegantly solves this problem. Unlike conventional reverse proxies like Nginx or Apache, FRP is specifically designed for intranet penetration, allowing you to expose local servers to the internet through a secure tunnel. With support for TCP, UDP, HTTP, HTTPS protocols, and even peer-to-peer connections, FRP has become the go-to solution for developers who need quick, reliable, and secure remote access without the overhead of enterprise VPN solutions.
In this comprehensive guide, we’ll walk you through everything you need to know about FRP: what it is, why you should use it, how to install it across different platforms, configuration essentials, real-world usage examples, and troubleshooting tips. By the end of this tutorial, you’ll be able to confidently deploy FRP for your secure tunneling needs.
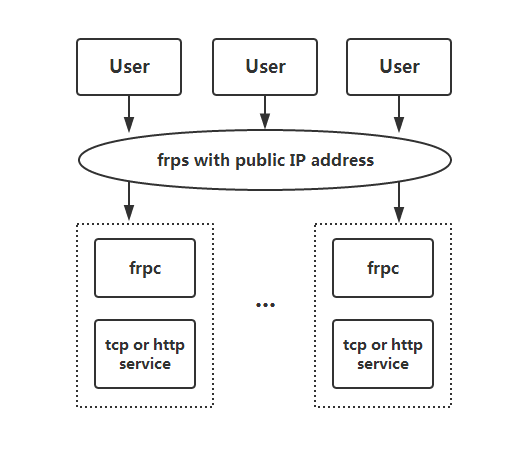
Simplified FRP architecture showing users connecting through an FRP server with a public IP to backend services via frpc clients
What is FRP?
The Fundamentals
FRP (Fast Reverse Proxy) is a fast reverse proxy application that allows you to expose a local server located behind a NAT or firewall to the Internet. Unlike traditional reverse proxies that require your server to have a public IP address, FRP uses a client-server architecture where:
- frps (FRP Server) runs on a machine with a public IP address
- frpc (FRP Client) runs on your local machine behind a NAT/firewall
- The client establishes an outbound connection to the server
- Traffic from the internet flows through the server to your local service via this established tunnel
This ingenious architecture means you never need to open inbound ports on your firewall or configure complex port forwarding rules. The client maintains a persistent connection to the server, and all traffic is proxied through this secure channel.
Key Features That Set FRP Apart
- Protocol Support: FRP currently supports TCP, UDP, HTTP, and HTTPS protocols, enabling requests to be forwarded to internal services via domain names.
- P2P Mode: For large data transfers, FRP offers a peer-to-peer mode (xtcp) that transmits data directly between clients after initial negotiation through the server, significantly reducing latency and server load.
- Multiple Configuration Formats: Since v0.52.0, FRP supports TOML, YAML, and JSON for configuration (INI is deprecated).
- Advanced Security: Token-based and OIDC authentication, TLS encryption enabled by default (since v0.50.0), compression support using snappy algorithm, and encryption using AES-128-CFB.
- Monitoring and Management: Built-in web dashboards for both server and client, Prometheus integration for metrics, hot-reloading configuration without restarting the client.
- Load Balancing and Health Checks: Distribute traffic across multiple backend services with automatic health checking and failover.
- Rich Feature Set: Port multiplexing, bandwidth limiting, connection pooling, custom domains, URL routing, HTTP header manipulation, and more.
FRP vs. Other Tunneling Solutions
As the comparison shows, FRP excels when you need full control, self-hosting capabilities, and advanced features without recurring costs. While Ngrok is easier for quick demos and Cloudflare Tunnel integrates well with Cloudflare’s ecosystem, FRP offers the perfect balance of features, performance, and cost-effectiveness for serious developers.
Why Choose FRP?
Common Use Cases
- Remote Development Access: Access your development environment from anywhere without exposing your local network.
- Webhook Testing: Test webhook integrations from services like GitHub, Stripe, or Slack that require public URLs.
- IoT Device Management: Securely manage IoT devices behind NAT without complex networking.
- Home Lab Access: Access home servers and services remotely without a static IP or VPN.
- Client Demonstrations: Show work-in-progress projects to clients without deploying to production.
- Multi-Site Connectivity: Connect multiple office locations or data centers through secure tunnels.
- Bypassing Network Restrictions: Access internal services when port forwarding is not available or allowed by your ISP.
Real-World Success Stories
The FRP community has been using the tool successfully for years. As one Reddit user shared: “I’ve been using FRP for a few months now, and it’s been rock-solid for my remote access needs. It might not have the bells and whistles of Cloudflare tunnels, but in terms of speed and reliability, it’s been great for me”.
Another developer noted the practical advantages: “FRP allows you to expose your service to users outside your local network even if you can modify your router settings”, making it invaluable in situations where you don’t have administrative access to network equipment.
Installation Guide
Prerequisites
Before installing FRP, ensure you have:
- A server with a public IP address (for running frps) – this can be a VPS from providers like DigitalOcean, Linode, AWS, or Oracle Cloud’s free tier
- A local machine behind NAT/firewall (for running frpc) – your development machine, Raspberry Pi, or any device running your service
- Basic command-line knowledge for your operating system
- Open firewall ports on your public server (typically port 7000 for frps communication, plus any ports you want to expose)
IMPORTANT NOTE:
Some antivirus software may flag frpc as malware due to its reverse proxy capabilities. This is a false positive – you may need to whitelist frpc in your antivirus settings.
Installation on Linux
Step 1: Download FRP
Visit the FRP releases page and download the latest version for your architecture. As of this writing, the latest stable version is available from the repository.
# Download the latest version (replace version number as needed)
wget https://github.com/fatedier/frp/releases/download/v0.65.0/frp_0.65.0_linux_amd64.tar.gz

# Extract the archive
tar -xzf frp_0.65.0_linux_amd64.tar.gz

# Navigate to the extracted directory
cd frp_0.65.0_linux_amd64
The extracted folder contains both server (frps) and client (frpc) binaries along with example configuration files.
Step 2: Install the Server (frps)
On your public server, move the server binary to a system directory:
# Move the server binary
sudo mv frps /usr/local/bin/

# Verify installation
frps --version
Create a systemd service file for automatic startup:
sudo nano /etc/systemd/system/frps.serviceAdd the following content:
[Unit]
Description=Fast Reverse Proxy Server
After=network.target
ConditionPathExists=/etc/frps.toml
ConditionPathExists=/usr/local/bin/frps

[Service]
Type=simple
Restart=always
RestartSec=5s
ExecStart=/usr/local/bin/frps -c /etc/frps.toml
LimitNOFILE=1048576

[Install]
WantedBy=multi-user.target
Enable and start the service:
sudo systemctl daemon-reload
sudo systemctl enable frps
sudo systemctl start frps
sudo systemctl status frps
Step 3: Install the Client (frpc)
On your local machine, perform similar steps:
# Move the client binary
sudo mv frpc /usr/local/bin/

# Verify installation
frpc --version
For automatic startup, create a systemd service:
sudo nano /etc/systemd/system/frpc.serviceAdd this content:
[Unit]
Description=Fast Reverse Proxy Client
After=network.target
ConditionPathExists=/etc/frpc.toml
ConditionPathExists=/usr/local/bin/frpc

[Service]
Type=simple
Restart=always
RestartSec=5s
User=your-username
ExecStart=/usr/local/bin/frpc -c /etc/frpc.toml
LimitNOFILE=1048576

[Install]
WantedBy=multi-user.target
Replace your-username with your actual username, then enable the service:
sudo systemctl daemon-reload
sudo systemctl enable frpc
sudo systemctl start frpc
sudo systemctl status frpc
Installation on macOS
Installation on macOS is straightforward:
# Using Homebrew (recommended)
brew install frp

# Or download manually from GitHub releases
wget https://github.com/fatedier/frp/releases/download/v0.65.0/frp_0.65.0_darwin_amd64.tar.gz
tar -xzf frp_0.65.0_darwin_amd64.tar.gz
cd frp_0.65.0_darwin_amd64

# For Apple Silicon Macs, use darwin_arm64 version
wget https://github.com/fatedier/frp/releases/download/v0.65.0/frp_0.65.0_darwin_arm64.tar.gz
Move binaries to your PATH:
sudo cp frps /usr/local/bin/
sudo cp frpc /usr/local/bin/
Installation on Windows
- Download the Windows version from the releases page (e.g.,
frp_0.65.0_windows_amd64.zip) - Extract the ZIP file to a directory (e.g.,
C:\frp) - Open Command Prompt or PowerShell as Administrator
- Navigate to the FRP directory
To run as a Windows service, you can use NSSM (Non-Sucking Service Manager):
# Download and install NSSM
# Then create a service for frpc
nssm install frpc "C:\frp\frpc.exe" "-c" "C:\frp\frpc.toml"
nssm start frpc
Basic Configuration
FRP uses a simple configuration file format. Since v0.52.0, TOML, YAML, and JSON are supported (INI format is deprecated).
Server Configuration (frps.toml)
Create the server configuration file at /etc/frps.toml:
# Server bind port for client connections
bindPort = 7000

# Optional: Configure dashboard
[webServer]
addr = "0.0.0.0"
port = 7500
user = "admin"
password = "your_secure_password"

# Optional: Enable Prometheus metrics
[webServer]
enablePrometheus = true

# Authentication - use a strong token
[auth]
method = "token"
token = "your_very_secure_token_here"

# Optional: Restrict allowed ports to prevent abuse
[[allowPorts]]
start = 2000
end = 3000

[[allowPorts]]
single = 8080

[[allowPorts]]
single = 8443

# Optional: Configure vhost ports for HTTP/HTTPS
vhostHTTPPort = 8080
vhostHTTPSPort = 8443

# Optional: Enable TLS (recommended for production)
[transport.tls]
force = true
certFile = "/path/to/server.crt"
keyFile = "/path/to/server.key"
Key Configuration Parameters:
- bindPort: The port frps listens on for frpc connections (default: 7000)
- auth.token: Shared secret for authentication – make this strong and unique
- webServer: Enables the web dashboard for monitoring
- vhostHTTPPort/vhostHTTPSPort: Ports for HTTP/HTTPS virtual hosting
- allowPorts: Restrict which ports clients can use to prevent abuse
Client Configuration (frpc.toml)
Create the client configuration file at /etc/frpc.toml:
# Server address and port
serverAddr = "your_server_ip"
serverPort = 7000

# Authentication token (must match server)
[auth]
method = "token"
token = "your_very_secure_token_here"

# Optional: Enable client admin UI
[webServer]
addr = "127.0.0.1"
port = 7400
user = "admin"
password = "admin"

# Optional: Use environment variables
# serverAddr = "{{ .Envs.FRP_SERVER_ADDR }}"

# Example proxy configurations will be added below
Start the server and client:
# On the server
./frps -c ./frps.toml

# On the client
./frpc -c ./frpc.toml
If everything is configured correctly, you should see connection messages indicating successful communication.
Real-World Usage Examples
Example 1: Exposing SSH Access
One of the most common use cases is accessing your local machine via SSH from anywhere in the world.
Add this to your frpc.toml:
[[proxies]]
name = "ssh"
type = "tcp"
localIP = "127.0.0.1"
localPort = 22
remotePort = 6000
This configuration:
- Exposes your local SSH service (port 22)
- Makes it accessible on your public server’s port 6000
- Uses TCP protocol for reliable connection
To connect:
ssh -p 6000 username@your_server_ipExample 2: Exposing a Web Application
For web applications, HTTP/HTTPS proxies with custom domains are ideal.
Server configuration (frps.toml):
vhostHTTPPort = 8080Client configuration (frpc.toml):
[[proxies]]
name = "web"
type = "http"
localPort = 3000
customDomains = ["myapp.example.com"]
DNS Setup: Point myapp.example.com A record to your server’s public IP.
Access: Visit http://myapp.example.com:8080 to reach your local web app running on port 3000.
Example 3: Secure Private Access with STCP
For services you want to share privately (not publicly accessible), use Secret TCP (STCP) mode.
Server on Machine A (exposing the service):
[[proxies]]
name = "secret_ssh"
type = "stcp"
secretKey = "use_a_strong_secret_here"
localIP = "127.0.0.1"
localPort = 22
Visitor on Machine B (accessing the service):
[[visitors]]
name = "secret_ssh_visitor"
type = "stcp"
serverName = "secret_ssh"
secretKey = "use_a_strong_secret_here"
bindAddr = "127.0.0.1"
bindPort = 6000Access: On Machine B, connect to localhost:6000 which securely tunnels to Machine A’s port 22. Only users with the correct secretKey can access the service.
Example 4: Load Balancing Multiple Backends
FRP supports load balancing across multiple backend services for high availability.
Client 1:
[[proxies]]
name = "web1"
type = "tcp"
localPort = 8080
remotePort = 80

[proxies.loadBalancer]
group = "web"
groupKey = "secure_group_key"
Client 2:
[[proxies]]
name = "web2"
type = "tcp"
localPort = 8081
remotePort = 80

[proxies.loadBalancer]
group = "web"
groupKey = "secure_group_key"
Traffic to port 80 on the server will be randomly distributed between the two backend services.
Example 5: HTTP File Server with Authentication
Expose a simple file server with password protection:
[[proxies]]
name = "file_server"
type = "tcp"
remotePort = 6000

[proxies.plugin]
type = "static_file"
localPath = "/home/user/shared_files"
stripPrefix = "static"
httpUser = "admin"
httpPassword = "secure_password"Access: Visit http://your_server_ip:6000/static/ and enter credentials to browse files.
Example 6: Encryption and Compression
For sensitive data or slow connections, enable encryption and compression:
[[proxies]]
name = "secure_web"
type = "tcp"
localPort = 8080
remotePort = 8080

[proxies.transport]
useEncryption = true
useCompression = trueNOTE:
With TLS enabled globally (default since v0.50.0), per-proxy encryption is less critical but still useful for additional security layers.Advanced Features
Hot-Reloading Configuration
You can update proxy configurations without restarting frpc:
# Edit your frpc.toml file
nano /etc/frpc.toml

# Verify configuration
frpc verify -c /etc/frpc.toml

# Reload configuration
frpc reload -c /etc/frpc.toml
Wait about 10 seconds for changes to take effect. Note that global parameters won’t be modified.
Environment Variables in Configuration
Use environment variables for dynamic configuration:
serverAddr = "{{ .Envs.FRP_SERVER_ADDR }}"
serverPort = 7000

[[proxies]]
name = "ssh"
type = "tcp"
localIP = "127.0.0.1"
localPort = 22
remotePort = {{ .Envs.FRP_SSH_REMOTE_PORT }}
Set variables before starting:
export FRP_SERVER_ADDR=203.0.113.10
export FRP_SSH_REMOTE_PORT=6000
./frpc -c ./frpc.toml
URL Routing for HTTP Services
Route different URL paths to different backend services:
[[proxies]]
name = "web_main"
type = "http"
localPort = 80
customDomains = ["example.com"]
locations = ["/"]

[[proxies]]
name = "web_blog"
type = "http"
localPort = 81
customDomains = ["example.com"]
locations = ["/blog", "/posts"]
Requests to example.com/blog or example.com/posts go to port 81, all others to port 80.
Health Checks for High Availability
Configure automatic health checking to remove unhealthy backends:
[[proxies]]
name = "web_ha"
type = "http"
localPort = 8080
customDomains = ["app.example.com"]

[proxies.healthCheck]
type = "http"
path = "/health"
timeoutSeconds = 3
maxFailed = 3
intervalSeconds = 10
If the health check fails 3 times consecutively, the proxy is removed from load balancing until it recovers.
Common Issues and Solutions
Issue 1: Connection Refused or Timeout
Symptoms: Client cannot connect to server; “connection refused” or timeout errors.
Solutions:
- Verify server is running:
systemctl status frps - Check firewall rules: Ensure port 7000 (or your bindPort) is open
- Verify server IP address in client config
- Check if the server has a valid public IP (not behind NAT)
- Test connectivity:
telnet your_server_ip 7000
Issue 2: Authentication Failed
Symptoms: “authentication failed” error in client logs.
Solutions:
- Ensure
auth.tokenmatches exactly in both server and client configs - Check for extra spaces or special characters in token
- Verify both configs use the same authentication method
Issue 3: Port Already in Use
Symptoms: “bind: address already in use” error.
Solutions:
- Check what’s using the port:
lsof -i :7000(Linux/macOS) ornetstat -ano | findstr :7000(Windows) - Stop the conflicting service or choose a different port
- Verify no other FRP instances are running
Issue 4: Service Not Accessible
Symptoms: FRP connection works but cannot access the proxied service.
Solutions:
- Verify the local service is running:
curl http://localhost:local_port - Check
localIPandlocalPortin proxy config - Review logs:
journalctl -u frpc -for check web dashboard - Ensure DNS is configured correctly for HTTP/HTTPS proxies
- Test direct connection to remote port:
telnet your_server_ip remote_port
Issue 5: Slow Performance
Symptoms: High latency or slow transfer speeds.
Solutions:
- Enable compression for text-based traffic:
transport.useCompression = true - Consider KCP or QUIC protocol for better performance over lossy networks
- Check server bandwidth and CPU usage
- Use P2P mode (xtcp) for large data transfers
- Ensure TCP multiplexing is enabled (default)
Security Best Practices
Use Strong Authentication Tokens: Generate cryptographically random tokens, not simple passwords.
# Generate a strong token
openssl rand -base64 32
Enable TLS Encryption: Protect data in transit with TLS (enabled by default since v0.50.0).
[transport.tls]
enable = true
force = true  # Reject non-TLS connections
Restrict Allowed Ports: Prevent abuse by limiting which ports clients can use.
[[allowPorts]]
start = 2000
end = 3000
Use OIDC for Enterprise: Implement OpenID Connect authentication for better access control.
Enable Dashboard Authentication: Always protect dashboards with strong passwords.
Regular Updates: Keep FRP updated to the latest version for security patches.
Monitor Access Logs: Regularly review logs for suspicious activity.
Use STCP for Sensitive Services: For private services, use Secret TCP mode with strong secret keys.
Implement Firewall Rules: On the server, only allow necessary ports and IP ranges.
Bandwidth Limiting: Prevent resource exhaustion by setting bandwidth limits.
[[proxies]]
name = "limited_web"
type = "tcp"
localPort = 8080
remotePort = 8080

[proxies.transport]
bandwidthLimit = "1MB"
bandwidthLimitMode = "server"
Performance Optimization Tips
Enable TCP Multiplexing: Reduces connection overhead (enabled by default).
Use Connection Pooling: Pre-establish connections for faster response.
# Server config
[transport]
maxPoolCount = 5

# Client config
[transport]
poolCount = 1
Choose the Right Protocol: Use KCP for low-latency needs, QUIC for modern networks.
Optimize Health Checks: Balance between quick detection and resource usage.
Use Compression Wisely: Compress text-based traffic but avoid for already-compressed data.
Monitor Resource Usage: Use Prometheus metrics to identify bottlenecks.
Configuration Best Practices
Use TOML Format: More readable and less error-prone than INI.
Split Configurations: Use includes directive to organize proxies.
# frpc.toml
serverAddr = "x.x.x.x"
serverPort = 7000
includes = ["./confd/*.toml"]
Document Your Configuration: Add comments explaining each proxy’s purpose.
Version Control: Store configs in Git for tracking changes and rollback.
Test Before Deployment: Use frpc verify -c ./frpc.toml to catch errors.
Use Descriptive Proxy Names: Makes troubleshooting easier.
Backup Configurations: Regularly backup both server and client configs.
Monitoring and Management
Server Dashboard
Access the FRP server dashboard to monitor connected clients and proxy statistics:
- Navigate to
http://your_server_ip:7500(or your configured port) - Log in with credentials from your config
- View active proxies, traffic statistics, and client connections
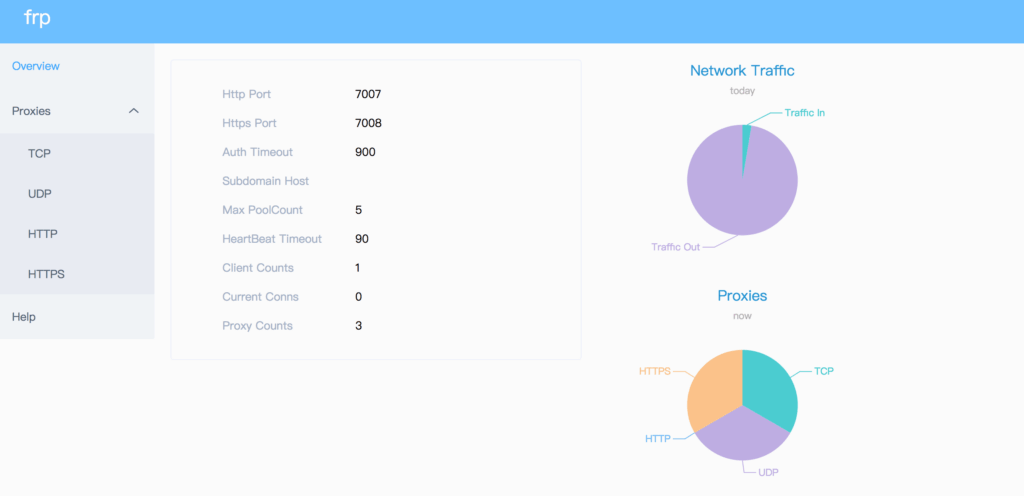
Client Admin UI
Monitor client status and manage proxies:
- Navigate to
http://localhost:7400(or your configured port) - Check proxy status, view logs, and reload configuration
Prometheus Integration
For advanced monitoring, integrate with Prometheus:
# frps.toml
[webServer]
enablePrometheus = true
Metrics are available at http://your_server_ip:7500/metrics.
Checking Proxy Status
Get real-time status of all proxies:
frpc status -c ./frpc.tomlThis displays the current state of each configured proxy.
Conclusion
FRP (Fast Reverse Proxy) stands out as a powerful, flexible, and cost-effective solution for secure tunneling and remote access. Whether you’re a solo developer testing webhooks, a DevOps engineer managing infrastructure, or a team needing reliable remote access, FRP provides the tools and features you need without the complexity or cost of enterprise solutions.
Key Takeaways
Full Control: Unlike SaaS solutions, you own your infrastructure and data.
Cost-Effective: Free and open-source with no usage limits or recurring fees.
Feature-Rich: Load balancing, health checks, P2P mode, and extensive protocol support.
Flexible Configuration: TOML/YAML/JSON formats with environment variable support.
Production-Ready: Used successfully by thousands of developers and organizations worldwide.
Active Development: Regular updates and a supportive community.
Next Steps
Now that you understand how to install and configure FRP, here are some suggested next steps:
- Start Simple: Begin with a basic SSH or web proxy to familiarize yourself with the workflow
- Experiment with Features: Try P2P mode, load balancing, or health checks
- Secure Your Setup: Implement TLS, strong authentication, and firewall rules
- Monitor Performance: Set up the dashboard and Prometheus metrics
- Scale Up: Add more proxies and explore advanced features as needs grow
- Contribute: Join the community, report issues, or contribute code
Useful Resources
- Official GitHub Repository: https://github.com/fatedier/frp
- Official Documentation: https://gofrp.org/en/
- Release Notes: https://github.com/fatedier/frp/releases
- Community Discussions: GitHub Issues and Discussions
- Plugin Repository: https://github.com/gofrp/plugin
- Awesome Tunneling: https://github.com/anderspitman/awesome-tunneling
Final Thoughts
In an era where cloud services dominate with vendor lock-in and subscription fatigue, FRP reminds us that open-source tools can be just as powerful, if not more so, than commercial alternatives. The ability to self-host, customize, and maintain full control over your tunneling infrastructure is invaluable for security-conscious teams and privacy-focused individuals.
Whether you’re bypassing CGNAT to access your home lab, testing webhook integrations for your SaaS product, or building a distributed system across multiple sites, FRP provides the foundation for secure, reliable, and performant remote access. Its active development, comprehensive documentation, and supportive community ensure that FRP will continue to evolve and meet the needs of modern developers.
So go ahead – download FRP, spin up your first tunnel, and experience the freedom of true self-hosted remote access. Your journey to secure, flexible networking starts here.