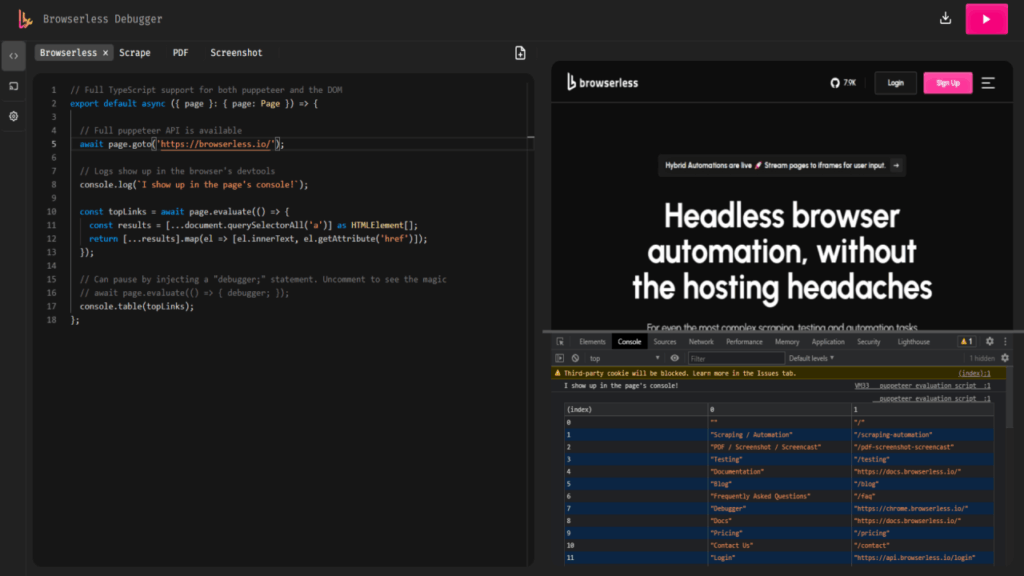
Imagine needing to automate browser tasks at scale—generating PDFs, scraping data, taking screenshots, or running end-to-end tests—but without the headache of managing Chrome binaries, system dependencies, or infrastructure complexity. This is exactly the challenge that Browserless solves.
Browserless is an open-source, Docker-based service that transforms browser automation from a complicated infrastructure problem into a simple API call. Instead of wrestling with Chrome installations, missing system fonts, or resource management, developers can spin up a containerized headless browser service and connect to it remotely via WebSocket or REST APIs.
Whether you’re building a SaaS product, running automated tests, or extracting data from websites, Browserless eliminates the friction that makes browser automation frustrating. It’s free for non-commercial use, actively maintained on GitHub, and battle-tested by thousands of developers worldwide.
In this guide, you’ll learn how to install Browserless, understand its architecture, and implement practical automation tasks with real code examples. By the end, you’ll be able to deploy a production-ready browser automation service in minutes.
What is Browserless?
Architecture and Core Concept
Browserless is essentially a browser-as-a-service infrastructure. Instead of running Chrome directly in your application, you run it as an isolated Docker container that listens for incoming requests. Your code connects to this service via WebSocket (for libraries like Puppeteer and Playwright) or REST API endpoints, sends commands, and receives results.
Think of it like a database service—you don’t install PostgreSQL inside your application; you connect to it remotely. Browserless works the same way for browser automation.
How It Works
When you start a Browserless container, it:
- Listens for connections on a WebSocket endpoint (default:
ws://localhost:3000) - Spawns Chrome instances on-demand when clients connect
- Proxies requests from your code directly into Chrome
- Manages resources automatically (session cleanup, memory management)
- Closes sessions once complete and prepares for the next request
This architecture offers several advantages: you can upgrade Chrome independently, use any client library (Puppeteer, Playwright, etc.), scale horizontally, and avoid embedding browser logic in your application code.
Key Features
General Features (Open Source)
- Built-in request queuing and concurrency control
- WebSocket and REST API support
- Support for Puppeteer and Playwright (unforked versions)
- Automatic font and emoji support
- Session health checks and auto-recovery
- Debug viewer for inspecting live sessions
- Works on Linux, macOS, and Windows (including M1 Macs)
Cloud-Only Features (paid plans available)
- BrowserQL (stealth-first automation)
- REST APIs for HTML, PDFs, and Lighthouse metrics
- Built-in residential proxies
- Session persistence and reconnection APIs
Real-World Use Cases
1. PDF and Screenshot Generation
Automatically convert web pages into PDFs or PNG images at scale. Perfect for reports, invoicing, or document archival.
2. Web Scraping
Extract structured data from websites without dealing with Chrome binary management or dependency hell.
3. Automated Testing
Run end-to-end tests across multiple browser instances with better resource isolation and scaling than traditional setups.
4. Performance Monitoring
Schedule regular Lighthouse audits or performance checks on your web properties.
5. Content Extraction
Render JavaScript-heavy websites and extract text, metadata, or structured data.
Why Use Browserless?
Problems It Solves
Traditional Browser Automation Challenges:
- Managing Chrome binaries and system dependencies
- Missing fonts, libraries, or locale data
- Resource constraints (memory, CPU)
- Scaling issues in production
- Session isolation and cleanup
- Version management and updates
Browserless Advantages:
- Pre-configured Docker image with all dependencies included
- Single command deployment (truly “just works”)
- Automatic resource management and scaling
- Separates browser infrastructure from application code
- Easy to upgrade without touching your application
- Free for non-commercial use, affordable cloud hosting available
- Active community and excellent documentation
Installation Guide
Prerequisites
Before installing Browserless, ensure you have:
- Docker installed (version 20.10 or later). How to Install Docker on Ubuntu: A Step-By-Step Guide
- Basic command-line experience
- Port 3000 available (or ability to map to a different port)
- At least 512MB RAM (1GB+ recommended for concurrent sessions)
Step 1: Pull the Browserless Docker Image
Run this command to download the latest Browserless image:
docker pull ghcr.io/browserless/chromiumThis fetches the Chromium-based image. Alternatives include:
ghcr.io/browserless/chromefor Google Chromeghcr.io/browserless/firefoxfor Firefoxghcr.io/browserless/multifor all browsers in one image
Step 2: Run Browserless Locally
Start a Browserless container with a single command:
docker run -p 3000:3000 ghcr.io/browserless/chromiumWhat this does:
-p 3000:3000: Maps port 3000 from the container to your host machineghcr.io/browserless/chromium: Uses the Chromium image
You should see output confirming Browserless is running. Visit http://localhost:3000/docs in your browser to view the interactive API documentation.
Step 3: Verify Installation
Open your browser and navigate to:
http://localhost:3000You should see a page with documentation, debugging tools, and connection instructions. The /docs endpoint provides interactive OpenAPI documentation for all available endpoints.
Step 4: Configuration (Optional)
You can customize Browserless behavior with environment variables:
docker run \
  -p 3000:3000 \
  -e CONCURRENT=10 \
  -e TOKEN=your-secret-token \
  -e TIMEOUT=30000 \
  ghcr.io/browserless/chromium
Common Configuration Options:
| Variable | Description | Default |
|---|---|---|
CONCURRENT | Max concurrent browser sessions | 10 |
TOKEN | API authentication token | (none) |
TIMEOUT | Session timeout in milliseconds | 30000 |
KEEP_ALIVE | Keep browser alive between requests | false |
MAX_QUEUE_LENGTH | Maximum queued requests | 100 |
Troubleshooting Installation
Issue: Port 3000 already in use
Map to a different port:
docker run -p 3001:3000 ghcr.io/browserless/chromium
# Now access at http://localhost:3001
Issue: Insufficient memory
Allocate more resources:
docker run -p 3000:3000 -m 2g ghcr.io/browserless/chromiumIssue: Can’t reach localhost:3000
Check if the container is running:
docker ps | grep browserlessIf not running, check logs:
docker logs <container-id>Hands-On Usage Examples
Now that Browserless is running, let’s explore practical examples. All examples use Puppeteer Core (the lightweight version without bundled Chrome).
Setup: Install Puppeteer Core
npm init -y
npm install puppeteer-core
Example 1: Connect and Take a Screenshot
This example connects to Browserless and captures a screenshot:
const puppeteer = require('puppeteer-core');

(async () => {
  try {
    // Connect to Browserless
    const browser = await puppeteer.connect({
      browserWSEndpoint: 'ws://localhost:3000'
    });

    console.log('✓ Connected to Browserless');

    // Create a new page
    const page = await browser.newPage();
    await page.setViewport({ width: 1280, height: 720 });

    // Navigate to a website
    await page.goto('https://example.com', { waitUntil: 'networkidle2' });
    console.log('✓ Page loaded');

    // Take a screenshot
    await page.screenshot({ path: 'screenshot.png' });
    console.log('✓ Screenshot saved to screenshot.png');

    // Close the browser session
    await browser.close();
    console.log('✓ Session closed');

  } catch (error) {
    console.error('Error:', error.message);
  }
})();
Run it:
node screenshot.jsExpected output:
✓ Connected to Browserless
✓ Page loaded
✓ Screenshot saved to screenshot.png
✓ Session closed
Example 2: Generate a PDF
Generate a PDF from any webpage:
const puppeteer = require('puppeteer-core');

(async () => {
  try {
    const browser = await puppeteer.connect({
      browserWSEndpoint: 'ws://localhost:3000'
    });

    const page = await browser.newPage();

    // Navigate to the page
    await page.goto('https://example.com', { waitUntil: 'networkidle2' });

    // Generate PDF with custom options
    await page.pdf({
      path: 'document.pdf',
      format: 'A4',
      margin: { top: '1cm', right: '1cm', bottom: '1cm', left: '1cm' },
      printBackground: true,
      scale: 1
    });

    console.log('✓ PDF generated: document.pdf');

    await browser.close();

  } catch (error) {
    console.error('Error:', error.message);
  }
})();
PDF Options Explained:
format: Page size (A4, Letter, A3, etc.)margin: Space around contentprintBackground: Include background colors/imagesscale: Zoom level (1.0 = 100%)
Example 3: Extract Data from a Page
Scrape structured data using JavaScript evaluation:
const puppeteer = require('puppeteer-core');

(async () => {
  try {
    const browser = await puppeteer.connect({
      browserWSEndpoint: 'ws://localhost:3000'
    });

    const page = await browser.newPage();
    await page.goto('https://example.com', { waitUntil: 'networkidle2' });

    // Wait for elements to be available
    await page.waitForSelector('h1');

    // Extract data using page.evaluate()
    const data = await page.evaluate(() => {
      return {
        title: document.querySelector('h1')?.innerText,
        paragraphs: Array.from(document.querySelectorAll('p'))
          .map(p => p.innerText),
        links: Array.from(document.querySelectorAll('a'))
          .map(a => ({ text: a.innerText, href: a.href }))
      };
    });

    console.log('✓ Extracted data:', JSON.stringify(data, null, 2));

    await browser.close();

  } catch (error) {
    console.error('Error:', error.message);
  }
})();
What this does:
- Waits for the
h1element to load - Extracts page title
- Collects all paragraph text
- Gathers all links with URLs
- Returns structured JSON
Example 4: Emulate Mobile Devices
Test your site on mobile devices:
const puppeteer = require('puppeteer-core');

(async () => {
  try {
    const browser = await puppeteer.connect({
      browserWSEndpoint: 'ws://localhost:3000'
    });

    const page = await browser.newPage();

    // Define mobile device profile
    const mobileDevice = {
      name: 'iPhone 12',
      userAgent: 'Mozilla/5.0 (iPhone; CPU iPhone OS 14_0 like Mac OS X)',
      viewport: { width: 390, height: 844, deviceScaleFactor: 3 },
      isMobile: true,
      hasTouch: true
    };

    // Apply mobile emulation
    await page.emulate(mobileDevice);
    await page.goto('https://example.com', { waitUntil: 'networkidle2' });

    // Take mobile screenshot
    await page.screenshot({ path: 'mobile-screenshot.png' });
    console.log('✓ Mobile screenshot saved');

    await browser.close();

  } catch (error) {
    console.error('Error:', error.message);
  }
})();
Best Practices and Advanced Tips
Production Deployment
Use Docker Compose for Multi-Instance Setup:
version: '3.8'
services:
  browserless:
    image: ghcr.io/browserless/chromium:latest
    container_name: browserless
    ports:
      - "3000:3000"
    environment:
      CONCURRENT: 20
      TOKEN: your-secret-token-here
      TIMEOUT: 60000
    restart: unless-stopped
    deploy:
      resources:
        limits:
          memory: 4G
        reservations:
          memory: 2G
Run with:
docker-compose up -dSecurity Best Practices
- Always use authentication tokens in production:
docker run -e TOKEN=your-strong-token -p 3000:3000 ghcr.io/browserless/chromium- Connect via HTTPS/WSS:
Use a reverse proxy (Nginx) to add SSL/TLS encryption - Restrict access:
- Run behind a firewall
- Use IP whitelisting
- Implement rate limiting
Scaling with Kubernetes
For large-scale deployments, run multiple Browserless pods:
apiVersion: apps/v1
kind: Deployment
metadata:
  name: browserless
spec:
  replicas: 5
  selector:
    matchLabels:
      app: browserless
  template:
    metadata:
      labels:
        app: browserless
    spec:
      containers:
      - name: browserless
        image: ghcr.io/browserless/chromium:latest
        ports:
        - containerPort: 3000
        env:
        - name: CONCURRENT
          value: "10"
        resources:
          requests:
            memory: "1Gi"
            cpu: "500m"
          limits:
            memory: "2Gi"
            cpu: "1000m"
Performance Optimization
- Increase concurrency for your use case:
docker run -e CONCURRENT=50 -p 3000:3000 ghcr.io/browserless/chromium- Use connection pooling to reuse browser sessions:
const browser = await puppeteer.connect({ browserWSEndpoint });
// Reuse 'browser' for multiple pages instead of reconnecting- Set appropriate timeouts:
page.goto(url, { timeout: 30000 }) // 30-second timeoutAdvanced: Using Playwright
If you prefer Playwright over Puppeteer:
import pw from 'playwright-core';

(async () => {
  const browser = await pw.chromium.connect(
    'ws://localhost:3000'
  );

  const page = await browser.newPage();
  await page.goto('https://example.com');
  await page.screenshot({ path: 'playwright-screenshot.png' });
  await browser.close();
})();
Conclusion
Browserless transforms browser automation from a complex infrastructure challenge into a manageable, scalable service. Whether you’re automating screenshots, generating PDFs, or extracting data at scale, it provides a production-ready foundation without the operational headache.
Key Takeaways
- Easy Deployment: One Docker command gets you started
- Any Library: Works with Puppeteer, Playwright, and more
- Scalable: Run multiple instances with load balancing
- Open Source: Free for non-commercial use with active community support
- Production Ready: Built-in queueing, health checks, and resource management
Next Steps
- Install Browserless locally and experiment with the examples in this guide
- Explore the documentation at
http://localhost:3000/docs - Join the community on GitHub
- Consider cloud hosting for production workloads (browserless.io offers managed hosting)
Browser automation doesn’t have to be painful. Give Browserless a try, and experience how seamless it can be.