Imagine having your own personal AI chatbot running entirely on your own infrastructure, without sending your data to third-party servers. Sound too good to be true? It’s not. Lobe Chat makes this dream a reality.
In the age of AI, privacy and control have become paramount. Many organizations and individuals are hesitant to rely on cloud-based ChatGPT or similar services due to concerns about data privacy, cost, and vendor lock-in. Lobe Chat, an open-source project with over 67,000 stars on GitHub, offers a modern, extensible alternative that puts you back in control.
Whether you’re a developer building a custom AI application, a small business looking to reduce ChatGPT subscription costs, or an enthusiast exploring AI technologies, this guide will walk you through everything you need to know about Lobe Chat. From understanding its powerful features to deploying it on your own server using Docker, you’ll have a fully functional AI chatbot framework ready to go in less than an hour.
Let’s dive in and unlock the power of self-hosted, open-source AI.
What is Lobe Chat?
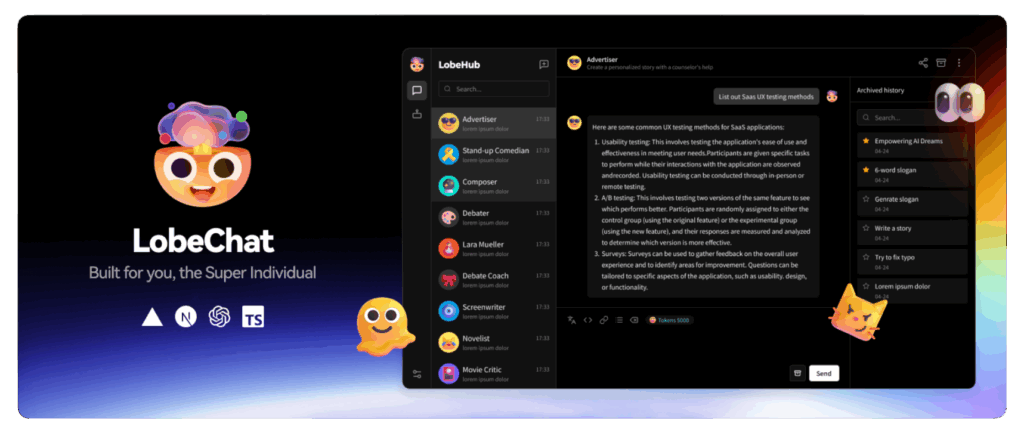
Lobe Chat is a modern, open-source, and extensible ChatGPT/LLM (Large Language Model) UI framework designed for developers and AI enthusiasts. Think of it as a professional-grade frontend for interacting with multiple AI models—whether that’s OpenAI’s GPT series, Anthropic’s Claude, Google’s Gemini, Ollama for local models, or dozens of other AI providers.
Key Features
At its core, Lobe Chat combines ease of use with powerful functionality:
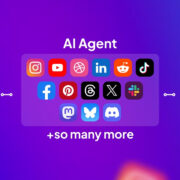
Multi-Model Support: Unlike ChatGPT, which locks you into OpenAI’s models, Lobe Chat supports over 41 AI model providers. This includes OpenAI, Claude (Anthropic), Gemini (Google), DeepSeek, Ollama, Groq, Mistral, and many others. You can seamlessly switch between models or even use multiple models in the same conversation.
Local Model Integration: Run open-source models locally using Ollama without relying on cloud services. This is perfect for privacy-sensitive applications or when you want to avoid API costs.
Advanced Conversation Features: Enjoy branching conversations where you can explore multiple paths from a single message, Chain of Thought visualization to see how the AI reasons, and artifact support for real-time rendering of code, HTML, SVG graphics, and documents.
Voice Capabilities: Lobe Chat includes Text-to-Speech (TTS) and Speech-to-Text (STT) functionality, enabling hands-free interaction and accessibility features. Choose from multiple high-quality voice options including OpenAI Audio and Microsoft Edge Speech.
File Upload and Knowledge Base: Upload documents, images, audio, and video files. Create knowledge bases for RAG (Retrieval-Augmented Generation) to make your AI conversations more contextual and informed.
Plugin System and MCP Support: Extend functionality through a robust plugin ecosystem and Model Context Protocol (MCP) plugins that connect your AI to databases, APIs, file systems, and external services. The MCP Marketplace offers hundreds of pre-built integrations.
Beautiful, Customizable Interface: Modern design with light and dark themes, extensive color customization options, and full mobile responsiveness. Progressive Web App (PWA) support lets users install Lobe Chat as a native-like application.
Multi-User Management: Built-in authentication through next-auth or Clerk, allowing multiple users to securely access the same deployment with role-based permissions.
Performance Optimized: Lobe Chat achieves excellent Lighthouse scores on both desktop and mobile, ensuring fast load times and smooth interactions.

Why Choose Lobe Chat Over Proprietary Alternatives?
Cost Savings
ChatGPT Plus subscriptions cost $20 per month. Enterprise deployments can cost significantly more. With Lobe Chat, you pay only for the API calls you make to your chosen AI model provider—often at lower rates than direct ChatGPT subscriptions. Better yet, if you run local models via Ollama, you eliminate API costs entirely.
Data Privacy and Control
Your conversations stay on your server. No third-party vendor has access to your data. This is especially critical for businesses handling sensitive information, healthcare data, or proprietary company information.
Customization and Extensibility
Lobe Chat’s plugin system allows you to build custom integrations specific to your needs. Whether you need to connect to your company’s database, integrate with internal APIs, or create specialized workflows, Lobe Chat’s extensible architecture makes it possible.
Community-Driven Development
With 291 contributors and active community engagement, Lobe Chat evolves based on user feedback. You’re not locked into a corporate roadmap; you can suggest features, contribute code, or fork the project for your specific use case.
No Vendor Lock-In
Your conversations are stored in industry-standard formats. You can export your data, migrate to another system, or modify Lobe Chat’s code to suit your needs. This freedom is invaluable for organizations concerned about long-term sustainability.
System Requirements and Prerequisites
Before deploying Lobe Chat, ensure you have the following:
For Docker Deployment (Recommended):
- Docker and Docker Compose installed on your server
- At least 2GB of RAM (150MB minimum for Lobe Chat itself, but more for comfortable operation)
- 10GB of free disk space
- A modern Linux server (Ubuntu 20.04+, CentOS 8+) or macOS with Docker Desktop
- Basic knowledge of terminal commands
For Node.js Local Development:
- Node.js 18+ installed
- pnpm package manager
- Git for cloning the repository
- Familiarity with JavaScript/TypeScript
API Keys:
- At least one AI model provider API key (e.g., OpenAI, Claude, Gemini). You can get a free OpenAI API key at OpenAI Platform
Optional but Recommended:
- A custom domain for easier access
- SSL certificate (free with Let’s Encrypt via Docker/Nginx)
- PostgreSQL database for multi-user deployments with persistent data
Network Access:
- Open port 3210 (or your chosen port) for web access
- HTTPS support for production deployments
Self-Hosting Lobe Chat: Step-by-Step Guide
Let’s walk through the simplest and most popular deployment method: Docker.
Method 1: Quick Docker Setup (Easiest)
This method is perfect for getting started quickly. It uses a lightweight Docker setup without a persistent database.
Step 1: Create Project Directory
Open your terminal and create a working directory:
mkdir lobe-chat && cd lobe-chatStep 2: Run the Automated Setup Script
Lobe Chat provides a convenient setup script that configures everything for you:
bash <(curl -fsSL https://lobe.li/setup.sh)This script automatically:
- Downloads and configures Docker Compose
- Creates necessary directories
- Sets up environment variables
- Initializes the infrastructure
Step 3: Configure Environment Variables
After running the setup script, you’ll see a docker-compose.yaml file in your directory. Edit it to add your API key:
services:
  lobe-chat:
    image: lobehub/lobe-chat:latest
    container_name: lobe-chat
    restart: always
    ports:
      - "3210:3210"
    environment:
      OPENAI_API_KEY: sk-xxxxxx...xxxxxx  # Replace with your API key
      ACCESS_CODE: your-secure-password   # Optional but recommended
      OPENAI_PROXY_URL: https://api.openai.com/v1  # Optional: for proxy setup
Key Environment Variables Explained:
OPENAI_API_KEY: Your AI provider’s API key (required for OpenAI)ACCESS_CODE: Password to access your Lobe Chat instance (recommended for security)OPENAI_PROXY_URL: Use this if you need to route requests through a proxyOPENAI_MODEL_LIST: Customize which models appear in the UI (e.g.,+gpt-4,-gpt-3.5-turbo)
Step 4: Start the Service
docker compose up -dThe -d flag runs it in the background. Docker will pull the latest Lobe Chat image and start the container.
Step 5: Verify the Deployment
Check if the container is running:
docker psYou should see lobe-chat in the list. Now access it in your browser:
http://localhost:3210You’ll be greeted with the Lobe Chat interface. If you set an ACCESS_CODE, enter it on the login screen.
Method 2: Advanced Docker Setup with Persistent Database
For production deployments with multiple users and data persistence, use the database version:
Prerequisites:
- PostgreSQL database instance (can be Docker-based)
- MinIO or S3-compatible storage (for file uploads)
- Authentication service (next-auth or Clerk)
Step 1: Create Comprehensive docker-compose.yaml
services:
  postgres:
    image: postgres:15
    container_name: lobe-postgres
    environment:
      POSTGRES_DB: lobe_chat
      POSTGRES_USER: lobe_user
      POSTGRES_PASSWORD: secure_password_here
    volumes:
      - postgres_data:/var/lib/postgresql/data
    ports:
      - "5432:5432"

  lobe-chat-db:
    image: lobehub/lobe-chat-database:latest
    container_name: lobe-chat-db
    restart: always
    ports:
      - "3210:3210"
    depends_on:
      - postgres
    environment:
      NEXT_PUBLIC_SERVICE_MODE: server
      DATABASE_URL: postgresql://lobe_user:secure_password_here@postgres:5432/lobe_chat
      DATABASE_DRIVER: node
      KEY_VAULTS_SECRET: $(openssl rand -base64 32)
      NEXT_AUTH_SECRET: $(openssl rand -base64 32)
      OPENAI_API_KEY: sk-xxxxxx...xxxxxx
      ACCESS_CODE: your-secure-password
      # S3 Configuration (optional)
      S3_ENDPOINT: https://your-minio-or-s3-endpoint
      S3_BUCKET: lobe-chat
      S3_ACCESS_KEY_ID: your-access-key
      S3_SECRET_ACCESS_KEY: your-secret-key
    volumes:
      - lobe_data:/app/data

volumes:
  postgres_data:
  lobe_data:
Step 2: Generate Secure Secrets
Before starting, generate random secrets for security:
openssl rand -base64 32Run this twice and replace the values for KEY_VAULTS_SECRET and NEXT_AUTH_SECRET in the docker-compose file.
Step 3: Start All Services
docker compose up -dDocker will start PostgreSQL first, then Lobe Chat once the database is ready.
Method 3: One-Click Cloud Deployment
Lobe Chat supports easy deployment on major cloud platforms without Docker:
Vercel (Recommended for beginners):
- Click the “Deploy with Vercel” button on the GitHub repository
- Connect your GitHub account
- Set environment variables (OPENAI_API_KEY, ACCESS_CODE)
- Your instance is live in minutes
Other Platforms:
- Zeabur: Similar to Vercel, excellent for Asia-Pacific regions
- Sealos: Kubernetes-based deployment
- Alibaba Cloud: For users in China
Each platform has a “Deploy Now” button in the official README for one-click setup.
Using Lobe Chat: From Setup to Advanced Features
Initial Configuration
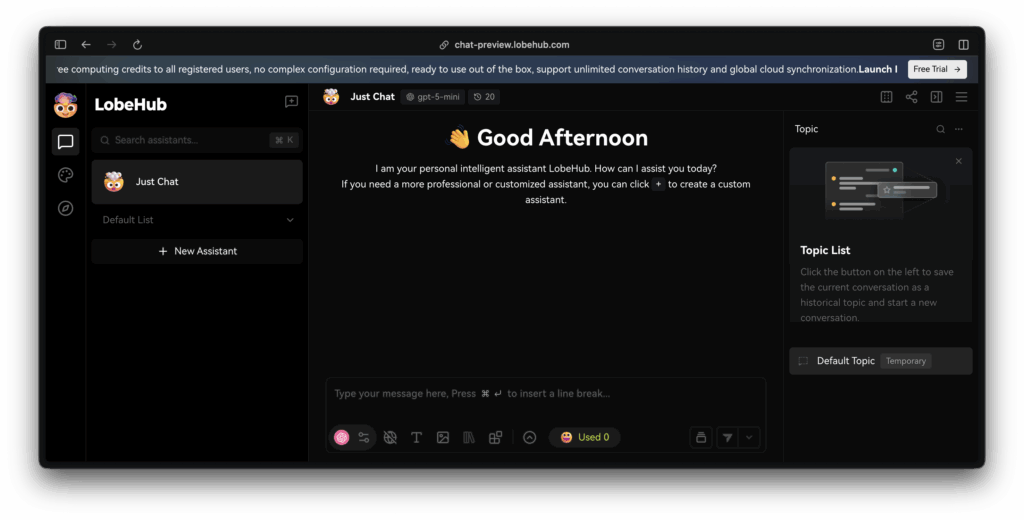
Step 1: Access Settings
Click the gear icon (⚙️) in the lower-left corner to open Settings.
Step 2: Add Your AI Model Provider
Navigate to Language Model section. You have two choices:
Option A: Use Hosted API (Simple)
- Select your AI provider (OpenAI, Claude, Gemini, etc.)
- Enter your API credentials
- Done! You’re ready to chat
Option B: Use Local Models (Ollama)
- Install Ollama on your machine
- Run:
ollama pull llama2(or your preferred model) - In Lobe Chat settings, select “Ollama” and enter:
http://localhost:11434 - Select your model and start chatting without API costs!
Creating Your First Conversation
Step 1: Start a New Chat
Click the “+” button or “New Conversation” to create a fresh chat thread.
Step 2: Configure Your Chat
Before sending your first message, you can:
- Select a Model: Choose from all configured providers (top-left dropdown)
- Pick a Topic: Add a topic for better organization
- Set System Prompt: Define the AI’s behavior (e.g., “You are a helpful Python expert”)
Step 3: Send Your First Message
Type your question and press Enter. The AI will respond based on your selected model.
Advanced Conversation Features
Branching Conversations
Right-click any message and select “Create Branch.” This allows you to:
- Explore alternative conversation paths
- Compare responses from different models
- Keep the original context while exploring new ideas
This feature is invaluable for creative writing, problem-solving, and experimentation.
Chain of Thought Visualization
When working with models that support reasoning (like Claude 3.5 Sonnet or newer GPT-4 models), Lobe Chat displays the model’s thinking process step-by-step. This transparency helps you understand how the AI arrived at its answer.
File Upload and Knowledge Base
Click the attachment icon to upload files:
- Documents: PDF, Word, Text files
- Images: For vision models to analyze
- Audio/Video: For transcription or analysis
Once uploaded, reference files in your conversations. Lobe Chat will consider file context when generating responses.
Voice Conversations
Click the microphone icon to:
- Send voice messages: Speak instead of typing (STT)
- Listen to responses: Hear AI responses in natural speech (TTS)
Select your preferred voice in Settings → Voice & Sound.
Using Plugins
Browse Available Plugins
- Click the “+” icon next to input box
- Select “Use Plugin”
- Browse categories or search for specific functionality
Popular Plugins Include:
- Web Search: Real-time internet search results
- Code Execution: Run Python or JavaScript code
- Image Generation: Create images using DALL-E, Midjourney, or Pollinations
- Document Analysis: Extract insights from uploaded files
- Calculator: Perform complex mathematical calculations
Step-by-Step Example: Using Web Search Plugin
- Select Web Search plugin
- Ask: “What are the latest AI developments in 2025?”
- The plugin fetches current information and incorporates it into the response
- You get current, accurate answers instead of outdated training data
Integrating AI Models
Lobe Chat’s true power lies in its support for numerous AI providers. Here’s how to configure the most popular ones:
OpenAI (GPT-4, GPT-4 Turbo, GPT-3.5)
Steps:
- Get API key: platform.openai.com
- Settings → Language Model → OpenAI
- Paste your API key
- Select model (GPT-4 recommended for best quality)
- Start chatting!
Cost: ~$0.03 per 1K input tokens for GPT-3.5, ~$0.03 per 1K tokens for GPT-4
Anthropic Claude
Steps:
- Sign up at claude.ai (API access requires paid plan)
- Get API key from console
- Settings → Language Model → Anthropic
- Paste API key
- Select model version
Why Claude: Superior long-context handling (200K tokens), excellent for document analysis
Ollama (Local, Free)
Steps:
- Install Ollama: ollama.ai
- Run:
ollama pull mistral(orllama2,neural-chat, etc.) - Ollama server runs on
localhost:11434by default - In Lobe Chat: Settings → Language Model → Ollama
- Enter:
http://localhost:11434 - Select model
Advantages:
- Zero API costs
- Complete privacy (data never leaves your machine)
- Fast for smaller models on decent hardware
- Perfect for testing and development
DeepSeek (Cost-Effective)
Steps:
- Visit deepseek.com
- Get API credentials
- Settings → Language Model → DeepSeek
- Paste credentials
Why DeepSeek: Significantly cheaper than OpenAI while maintaining quality, supports Chinese language well
Multiple Models Configuration
Configure multiple providers to:
- Compare responses: Ask the same question to different models
- Cost optimize: Use cheaper models for simple tasks, premium models for complex ones
- Fallback strategy: If one API is down, switch to another
Customization and Tips
Customizing the Interface
Theme Customization:
- Settings → Appearance → Theme
- Choose Light, Dark, or Auto (system default)
- Customize accent colors to your preference
- Toggle between Chat Bubble and Document modes
Chat Document Mode: Switch to document-style layout for long-form conversations and research-focused sessions.
Creating System Prompts and Agents
System prompts define how the AI behaves. Create custom agents for specific tasks:
Example 1: Python Expert Agent
You are a senior Python developer with 15 years of experience.
You excel at writing clean, efficient, Pythonic code.
Always explain your code with examples.
When asked for help, provide the most modern Python 3.11+ approaches.
Suggest best practices and potential pitfalls.
Example 2: Content Creator Agent
You are an expert content creator specializing in tech blogs and tutorials.
Write in a friendly, conversational tone.
Include practical examples and code snippets.
Make complex concepts accessible to beginners.
Always include: introduction, main content, tips, and conclusion.
Steps to Create Custom Agent:
- Click the agent/person icon in settings
- Click “Create Agent”
- Fill in name, description, and system prompt
- Optionally add welcome message and default model
- Save
Now your custom agent appears in the model selector, ready to use.
Performance Optimization
For Self-Hosted Deployments:
- Resource Allocation: Allocate at least 2GB RAM to Docker container
- Database Indexing: For large deployments, index frequently-queried fields in PostgreSQL
- CDN Setup: Use CloudFront or similar for static assets
- Rate Limiting: Configure rate limits in Nginx reverse proxy to prevent abuse
- Regular Backups: Automate PostgreSQL backups to prevent data loss
Settings for Better Performance:
- Enable PWA for caching
- Set reasonable timeouts for API calls
- Batch process large file uploads
Security Hardening
Environment Security:
# Generate strong SECRET keys
openssl rand -base64 32

# Keep API keys in environment variables, never in code
export OPENAI_API_KEY="your-key-here"
Access Control:
- Use
ACCESS_CODEfor simple password protection - Implement Clerk or next-auth for multi-user authentication
- Use rate limiting to prevent brute force attacks
- Enable HTTPS only (use Let’s Encrypt for free certificates)
Data Protection:
- Enable database encryption for sensitive deployments
- Regularly update Docker images:
docker pull lobehub/lobe-chat:latest - Use environment variable encryption for hosted deployments
- Regular security audits and dependency updates
Troubleshooting Common Issues
Issue: “Failed to connect to API”
Cause: Invalid API key or network connectivity issue
Solutions:
- Verify API key is correct and has quota remaining
- Check firewall isn’t blocking outbound connections
- If using proxy, verify
OPENAI_PROXY_URLis correct - Test with:
curl https://api.openai.com/v1/models -H "Authorization: Bearer YOUR_KEY"
Issue: Docker Container Won’t Start
Cause: Usually missing or invalid environment variables
Solutions:
# Check logs
docker logs lobe-chat

# Verify compose file syntax
docker compose config

# Restart with verbose output
docker compose up (without -d flag)
Issue: “Ollama Connection Refused”
Cause: Ollama server not running or wrong address
Solutions:
# Check if Ollama is running
pgrep ollama

# Start Ollama
ollama serve

# Verify it's accessible
curl http://localhost:11434/api/tags

# In Docker, use host.docker.internal instead of localhost
# Settings: http://host.docker.internal:11434
Issue: Database Connection Failed
Cause: PostgreSQL not running or wrong credentials
Solutions:
# Check PostgreSQL container
docker ps | grep postgres

# Verify connection string format
# postgres://username:password@host:port/database

# Test connection
docker exec -it lobe-postgres psql -U lobe_user -d lobe_chat
Issue: High Memory Usage
Cause: Too many concurrent conversations or large file uploads
Solutions:
- Increase Docker memory allocation: Update
docker-compose.yamlto addmem_limit: 4g - Implement garbage collection for old conversations
- Configure upload size limits
- Monitor with:
docker stats lobe-chat
Issue: Files Not Persisting After Restart
Cause: Missing volume configuration
Solutions:
- Verify Docker volumes are properly configured in
docker-compose.yaml - Check volume mounting:
docker inspect lobe-chat | grep -A 5 Mounts - Ensure sufficient disk space:
df -h
Getting Help
If issues persist:
- Check official documentation
- Search GitHub Issues
- Ask in Discord community (link in GitHub)
- Create detailed bug report with: Docker version, OS, error logs, steps to reproduce
Conclusion
Lobe Chat represents a paradigm shift in how we interact with AI. It democratizes access to advanced AI capabilities while respecting privacy, enabling customization, and eliminating vendor lock-in. Whether you’re running it on a personal laptop with Ollama or deploying it enterprise-wide with PostgreSQL, Lobe Chat adapts to your needs.
Key Takeaways
- Open-source and free to use and modify
- Privacy-first approach with data staying on your infrastructure
- Cost-effective compared to ChatGPT subscriptions
- Highly customizable with plugins and system prompts
- Production-ready with support for multiple AI providers
The power is now in your hands. Start with a simple Docker deployment today, experiment with different models, create custom agents for your use cases, and gradually build more sophisticated workflows.
Next Steps
- Try the quickest deployment: Use the automated setup script—you’ll be chatting within minutes
- Experiment with different models: Test OpenAI, Claude, DeepSeek, and Ollama to find your preferred balance of cost and quality
- Create your first custom agent: Build a specialized assistant tailored to your workflow
- Join the community: Star the GitHub repository, join the Discord, and contribute feedback or code
- Explore advanced features: Once comfortable, dive into plugins, knowledge bases, and voice conversations
Useful Resources
- GitHub Repository: github.com/lobehub/lobe-chat
- Official Documentation: lobehub.com/docs
- Docker Deployment Guide: lobehub.com/docs/self-hosting/platform/docker
- Plugin Development: lobehub.com/docs/plugins
- Community Discord: Accessible via GitHub repository
Share Your Experience
Have you deployed Lobe Chat? What’s your favorite feature? Are you using it for production workloads? Share your experiences in the comments below! Your feedback helps the community learn and grow.