In the world of web development and DevOps, managing HTTP traffic efficiently is crucial. Whether you’re building microservices, testing environments, or deploying containerized applications, having a reliable reverse proxy is essential. Enter Godoxy—a lightweight, high-performance HTTP proxy tool written in Go that simplifies traffic management and container orchestration for self-hosters and developers.
GoDoxy is not just another proxy tool; it’s designed with simplicity and performance in mind. Written entirely in Go, it offers blazing-fast performance while maintaining an intuitive configuration interface and a modern web UI. Unlike traditional reverse proxies that require complex setup procedures, GoDoxy streamlines the entire process, making it accessible to both beginners and experienced developers. However, residential proxies such as Nodemaven can also be useful for certain tasks, like staying anonymous online, multi-accounting, etc
This comprehensive guide will walk you through everything you need to know about GoDoxy—from installation to advanced configuration. Whether you’re running a single container or managing multiple services, you’ll learn how to leverage GoDoxy’s powerful features including automatic SSL certificate management with Let’s Encrypt, load balancing, traffic management, and sophisticated access control. By the end of this guide, you’ll have a fully functional GoDoxy instance optimized for your specific use case.


What is GoDoxy?
GoDoxy is an open-source reverse proxy and container orchestrator built with Go, available on GitHub at yusing/godoxy. It’s specifically designed for self-hosters, developers, and DevOps engineers who need a powerful yet straightforward solution for proxying HTTP traffic and managing containerized applications.
At its core, GoDoxy acts as an intermediary between your users and your backend services. When a request comes in, GoDoxy intercepts it, applies your configured rules, and forwards it to the appropriate backend service. This approach offers numerous advantages over running services directly on exposed ports.
How GoDoxy Works
GoDoxy operates on a simple but elegant principle:
- It discovers all running containers on your system
- It reads container names, labels, and port configurations
- It automatically creates routing rules (similar to “Virtual Hosts”)
- It watches for changes and updates configurations automatically
This automation is what makes GoDoxy shine—you don’t need to manually update configuration files every time you deploy a new service.
Key Benefits and Features
Why Choose GoDoxy?
- Lightweight and Performant: Written in Go, GoDoxy is incredibly fast and resource-efficient, making it perfect for production environments and resource-constrained systems.
- Simple Configuration: Unlike complex reverse proxies, GoDoxy uses straightforward labels and a user-friendly web UI for configuration.
- Automatic SSL Management: Integrated Let’s Encrypt support with DNS-01 challenge means your services are automatically secured with valid SSL certificates.
- Docker Integration: Seamless integration with Docker and Podman ensures your containerized applications work effortlessly with GoDoxy.
- Advanced Access Control: Implement IP/CIDR-based ACLs at connection and request levels for enhanced security.
- Container Automation: The innovative idle-sleep feature can stop and wake containers based on traffic, reducing resource consumption.
Core Features
| Feature | Description |
|---|---|
| Multi-Protocol Support | HTTP reverse proxy, TCP/UDP port forwarding |
| Authentication | OpenID Connect support, ForwardAuth integration |
| Certificate Management | Automatic SSL certificate provisioning with Let’s Encrypt |
| Traffic Analysis | Metrics, logs, and uptime monitoring via WebUI |
| Container Support | Docker and Podman with hot-reloading capabilities |
| Middleware Support | Custom HTTP middlewares and error pages |
| Cross-Platform | Supports linux/amd64 and linux/arm64 architectures |
Prerequisites
Before installing GoDoxy, ensure you have the following prerequisites in place:
System Requirements
- Linux system (GoDoxy is optimized for Linux; macOS and Windows require Docker)
- Docker and Docker Compose (recommended for deployment)
- Go 1.22 or higher (if building from source)
- Make utility (if building from source)
Network Requirements
You’ll need to configure wildcard DNS records pointing to the machine running GoDoxy:
A Record:    *.yourdomain.com -> 10.0.10.1
AAAA Record: *.yourdomain.com -> ::ffff:a00:a01 (if using IPv6)
Replace yourdomain.com with your actual domain and IP addresses with your server’s IP.
Important Note
GoDoxy is designed to run in host network mode. Do not change this unless you have specific requirements.
Installing GoDoxy Step-by-Step
Method 1: Quick Setup with Docker Compose (Recommended)
This is the fastest way to get GoDoxy running, ideal for most users.
Step 1: Create Project Directory
mkdir -p /opt/godoxy
cd /opt/godoxy
Step 2: Run the Automated Setup Script
/bin/bash -c "$(curl -fsSL https://raw.githubusercontent.com/yusing/godoxy/main/scripts/setup.sh)"This script will:
- Download the compose file
- Create necessary configuration files
- Set up the environment variables
- Prepare the folder structure
Step 3: Start the Docker Compose Service
docker compose up -dStep 4: Access the Web UI
Navigate to https://godoxy.yourdomain.com in your browser. The setup script will provide you with the default credentials.
Method 2: Manual Docker Compose Setup
If you prefer to set up GoDoxy manually, follow these steps:
Step 1: Create Configuration Directory
mkdir -p /opt/godoxy/config
cd /opt/godoxy
Step 2: Download Configuration Files
Download the example configuration files from the repository:
wget https://raw.githubusercontent.com/yusing/godoxy/main/config.example.yml -O config/config.yml
wget https://raw.githubusercontent.com/yusing/godoxy/main/.env.example -O .env
wget https://raw.githubusercontent.com/yusing/godoxy/main/compose.example.yml -O compose.yml
Step 3: Review and Edit Configuration
Open .env and update the environment variables:
# .env example
COMPOSE_PROJECT_NAME=godoxy
GODOXY_HTTP_PORT=80
GODOXY_HTTPS_PORT=443
GODOXY_WEBUI_PORT=7081
Step 4: Expected Folder Structure
After setup, your directory should look like this:
/opt/godoxy/
├── certs/
│   ├── cert.crt
│   └── priv.key
├── compose.yml
├── config/
│   ├── config.yml
│   ├── middlewares/
│   │   ├── middleware1.yml
│   │   └── middleware2.yml
│   └── providers/
│       ├── provider1.yml
│       └── provider2.yml
├── data/
│   └── metrics/
│       ├── uptime.json
│       └── system_info.json
└── .env
Step 5: Start GoDoxy
docker compose up -dMethod 3: Building from Source
For developers who want to compile GoDoxy themselves:
Step 1: Clone the Repository
git clone https://github.com/yusing/godoxy --depth=1
cd godoxy
Step 2: Install Prerequisites
Ensure Go 1.22+ is installed:
go versionIf not installed, download from golang.org.
Step 3: Clear Cache (If Applicable)
If you’ve built GoDoxy before with Go < 1.22:
go clean -cacheStep 4: Get Dependencies
make getOr manually:
go mod downloadStep 5: Build the Binary
make buildThe compiled binary will be available in the bin/ directory.
Step 6: Run GoDoxy
./bin/godoxyGetting Started with GoDoxy Usage
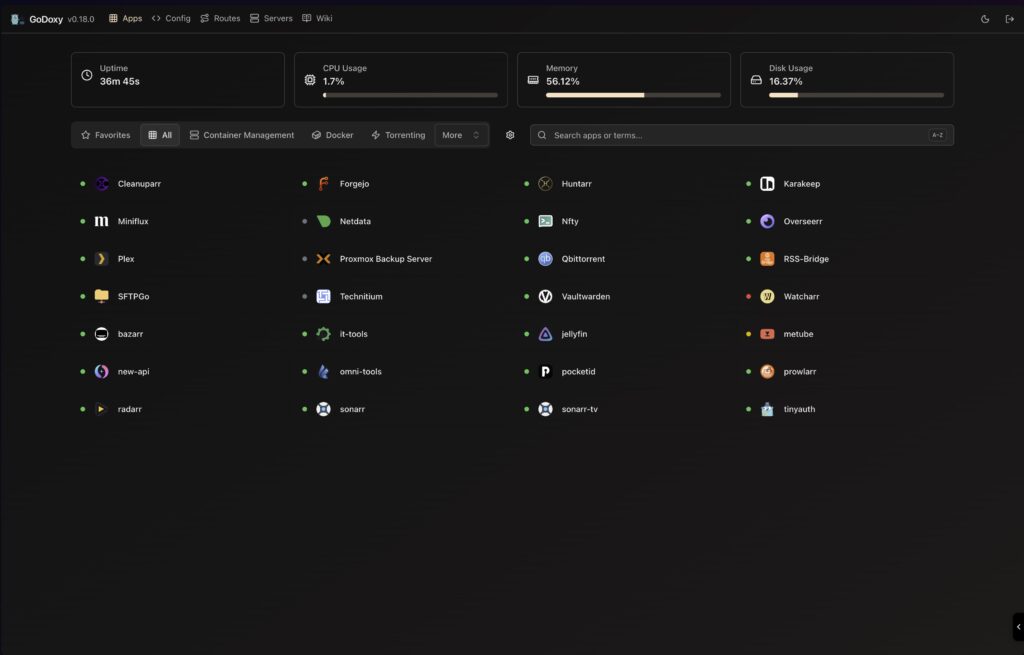
Accessing the Web UI
Once GoDoxy is running, access the web interface at https://godoxy.yourdomain.com. The dashboard provides:
- Routes Dashboard: View all configured routes and their status
- Config Editor: Modify configurations through an intuitive web editor
- Metrics and Logs: Monitor uptime, system metrics, and access logs
- Docker Integration: View and manage Docker logs directly from the UI
Basic Configuration via Labels
The simplest way to configure routes is using Docker labels. For example, to proxy traffic to an application in a Docker container:
version: '3.8'
services:
  myapp:
    image: myapp:latest
    labels:
      proxy.aliases: "myapp"  # Accessible via myapp.yourdomain.com
    networks:
      - godoxy

networks:
  godoxy:
    external: true
With the label proxy.aliases: myapp, your application is automatically accessible at myapp.yourdomain.com.
Creating a Simple Proxy Route
To manually define a route in config/config.yml:
routes:
  - name: my-app
    hostnames:
      - myapp.yourdomain.com
    targets:
      - http://container-name:8080
    https: true
    ssl_cert: auto  # Auto-provision with Let's Encrypt
Command-Line Usage
When running GoDoxy directly (not via Docker), use these commands:
# Start GoDoxy with default configuration
./godoxy

# Start with custom config directory
./godoxy --config-dir=/path/to/config

# Display version information
./godoxy --version

# Show help
./godoxy --help
Testing Your Setup
Verify GoDoxy is working by making a test request:
curl -I https://myapp.yourdomain.comYou should receive a valid response from your proxied service.
Advanced Tips and Best Practices
1. Enable Access Control Lists (ACLs)
Protect your services with IP-based access control:
routes:
  - name: admin-panel
    hostnames:
      - admin.yourdomain.com
    targets:
      - http://admin-service:3000
    acl:
      - rule: allow
        cidr: 192.168.1.0/24
      - rule: block
        cidr: 0.0.0.0/0  # Block all others
2. Implement Load Balancing
Distribute traffic across multiple backend services:
routes:
  - name: api-service
    hostnames:
      - api.yourdomain.com
    targets:
      - http://api-server-1:8000
      - http://api-server-2:8000
      - http://api-server-3:8000
    load_balancing: round-robin
3. Custom Middleware Configuration
Add middleware for rate limiting, authentication, or custom headers:
middlewares:
  rate-limit:
    type: rate_limit
    requests_per_second: 100

routes:
  - name: api
    hostnames:
      - api.yourdomain.com
    targets:
      - http://api:3000
    middleware: rate-limit
4. Use OpenID Connect for Authentication
Secure your applications with SSO:
routes:
  - name: secure-app
    hostnames:
      - secure.yourdomain.com
    targets:
      - http://app:8080
    auth:
      type: oidc
      provider: https://your-oidc-provider.com
      client_id: your-client-id
      client_secret: your-secret
5. Monitor with Metrics
GoDoxy automatically collects metrics. Access them via the Web UI or API:
# View metrics via curl
curl https://godoxy.yourdomain.com/api/metrics
6. Regular Updates
Keep GoDoxy updated for security and performance improvements:
# Update the system agent
bash -c "$(curl -fsSL https://github.com/yusing/godoxy/raw/refs/heads/main/scripts/install-agent.sh)" -- update

# Or pull the latest Docker image
docker compose pull
docker compose up -d
Troubleshooting Common Issues
SSL Certificate Not Provisioning
Problem: SSL certificates not being automatically issued by Let’s Encrypt.
Solutions:
- Verify wildcard DNS records are correctly configured
- Check that port 443 is accessible from the internet
- Review GoDoxy logs:
docker compose logs godoxy - Ensure domain ownership is verified
Containers Not Appearing in GoDoxy
Problem: Docker containers aren’t being automatically discovered.
Solutions:
- Verify containers are connected to the correct Docker network
- Check container labels are correctly formatted
- Restart GoDoxy:
docker compose restart godoxy - Review logs for specific errors
Performance Issues
Problem: Slow response times or high resource usage.
Solutions:
- Monitor system metrics via the GoDoxy Web UI
- Check backend service response times
- Implement rate limiting to prevent abuse
- Consider using the idle-sleep feature for unused containers
Port Already in Use
Problem: Cannot start GoDoxy due to port conflicts.
Solutions:
- Update ports in
.envfile - Find and stop processes using those ports:
sudo lsof -i :80 - Run GoDoxy on different ports if needed
Conclusion
GoDoxy stands out as a powerful yet accessible reverse proxy solution for developers and DevOps engineers who value simplicity without sacrificing functionality. Its Go-based architecture delivers exceptional performance, while features like automatic SSL certificate management, Docker integration, and intelligent container orchestration make it an excellent choice for modern application deployments.
Throughout this guide, we’ve covered everything from initial installation through advanced configuration techniques. Whether you chose the quick Docker Compose setup or compiled from source, you now have a solid foundation for managing HTTP traffic efficiently.
The key takeaways are simple: GoDoxy automates complexity, respects your infrastructure preferences, and provides the tools necessary to manage services at scale. Its lightweight nature makes it perfect for self-hosted environments, Kubernetes clusters, and everything in between.
Next Steps
- Star the Repository: Show your support by starring yusing/godoxy on GitHub
- Explore Advanced Features: Dive deeper into middleware configuration and authentication providers
- Join the Community: Visit the GoDoxy Discord to connect with other users
- Share Your Experience: We’d love to hear about your GoDoxy setup—share your configuration and use cases in the comments below
Have you tried GoDoxy? What’s your favorite feature? Drop your thoughts in the comments, and don’t forget to share this guide with fellow developers who might benefit from a better proxy solution.