Tired of hunting through your Pictures folder for screenshots? Windows saves all your screen captures in a default location, but what many users don’t realize is that you can easily customize where these important files are stored. This simple yet powerful customization can dramatically improve your workflow, especially when working across multiple projects or when you need quick access to your captures.
In this comprehensive guide, you’ll learn exactly how to change the default screenshot folder location in Windows, why this small tweak matters, and additional tips to optimize your screenshot workflow.
Step-by-Step: Changing Your Windows Screenshot Destination Folder
Customizing where Windows saves your screenshots requires no third-party software or complex registry edits. Microsoft has built this functionality directly into the operating system, making it accessible for users of all technical levels. Follow these straightforward steps:
1. Ensure Your Screenshots Folder Exists
Before making any changes, you’ll need to verify that the Screenshots folder has been created in your system:
- Press Win + Print Screen or Win + Shift + S to capture a screenshot
- This action will automatically create the Screenshots folder if it doesn’t already exist
This step is crucial because Windows only generates this special folder after you’ve taken at least one screenshot using the system’s built-in tools.
2. Locate Your Current Screenshots Folder
Next, you’ll need to find where Windows currently stores your screenshots:
- Open File Explorer (using Win + E or by clicking the folder icon in the taskbar)
- Navigate to your Pictures folder in the Quick Access menu or under This PC
- Look for the Screenshots subfolder within Pictures
This is the default location where Windows automatically saves all screenshots taken with the Print Screen key combinations.
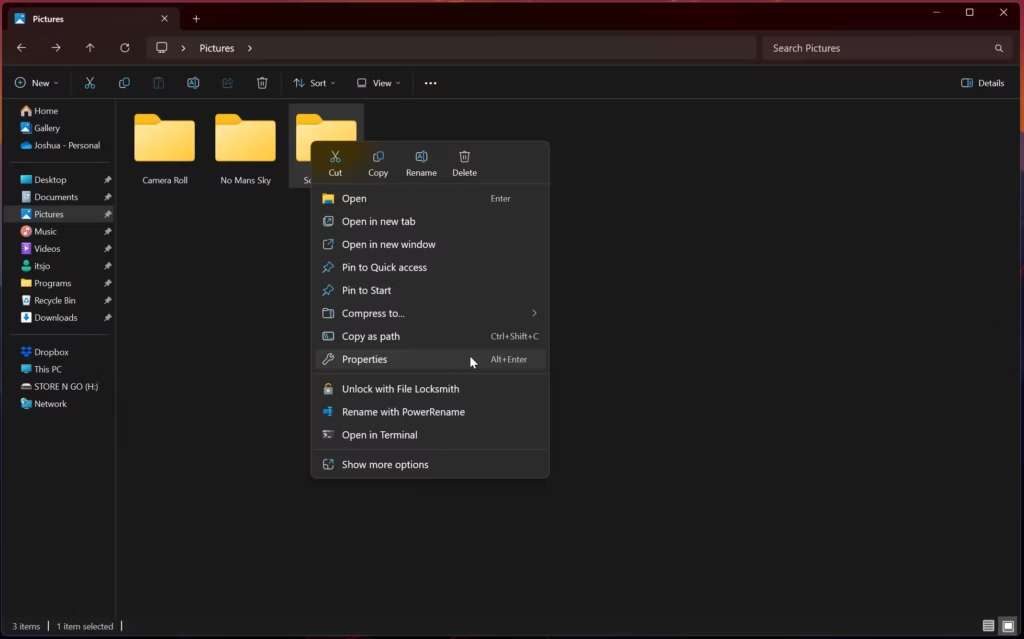
3. Access the Folder Properties
To modify where screenshots are saved, you’ll need to access the folder’s properties:
- Right-click on the Screenshots folder
- Select Properties from the context menu that appears
4. Navigate to the Location Settings
The Properties dialog box contains several tabs with different settings:
- Click on the Location tab
- This section shows the current file path where your screenshots are being saved
- You’ll see options to restore the default location or move the folder
The Location tab is specifically designed for special Windows folders like Screenshots, Documents, and Downloads, allowing you to redirect them while maintaining their system functionality.
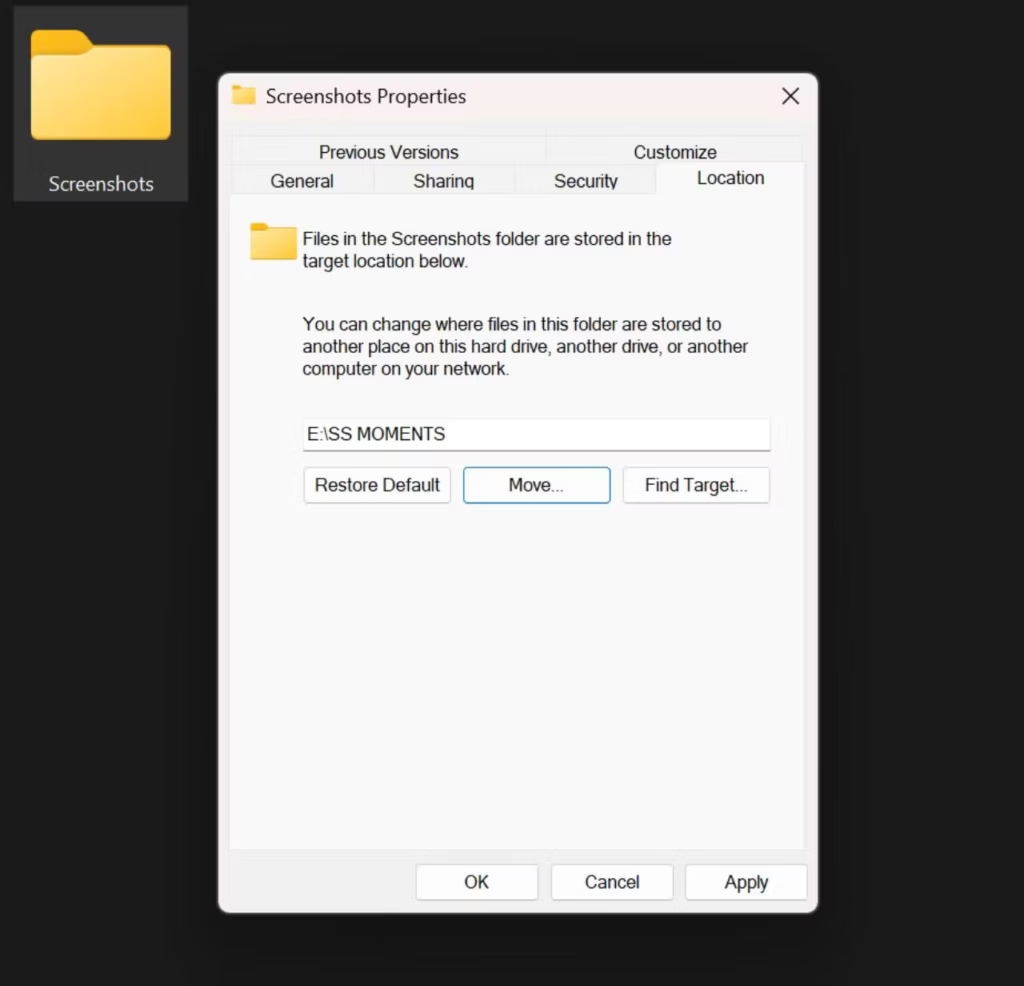
5. Choose Your New Screenshot Destination
Now you can select where you want your screenshots to be saved:
- Click the Move button
- Browse to your preferred location on your computer
- You can select an existing folder or create a new one by clicking New folder
- Once you’ve chosen your destination, click Select Folder
Consider choosing a location that makes sense for your workflow—perhaps on your desktop for immediate access, in a cloud-synced folder for automatic backup, or on a secondary drive to save space on your system drive.
6. Apply Your Changes
To finalize the new screenshot save location:
- Click Apply in the bottom right corner of the Properties window
- A confirmation dialog will appear asking if you want to move all files from the old location
- Select Yes to transfer existing screenshots to the new location, or No to leave them in the original folder
TIP:
If your new destination already has a folder named "Screenshots," Windows will merge the contents rather than creating a nested folder structure. This is important to remember if you're trying to maintain separate collections.
Benefits of Customizing Your Screenshot Save Location
While this may seem like a minor adjustment, changing your screenshot save location offers several significant advantages:
Streamlined Project Organization
When working on multiple projects, having screenshots automatically saved to project-specific folders eliminates the need to manually sort files later:
- Create dedicated folders for each client or project
- Switch the save location when moving between projects
- Keep all related materials together for easier reference
This organization system is particularly valuable for designers, developers, technical writers, and anyone who relies heavily on visual documentation.
Improved Workflow Efficiency
Customizing your screenshot location reduces unnecessary steps in your workflow:
- Eliminate the need to search through your Pictures folder
- Access your screenshots instantly where you need them
- Reduce the time spent organizing files after capturing them
These small time savings add up significantly over days and weeks of work.
Optimized Storage Management
Strategic screenshot storage helps manage your computer’s disk space:
- Save screenshots directly to external drives to free up internal storage
- Store screenshots in cloud-synced folders for automatic backup
- Keep your Pictures folder clean and uncluttered for personal photos
This approach is especially useful for users with limited SSD storage on their primary drive.
Cross-Device Accessibility
By directing screenshots to a cloud-synced folder (like OneDrive, Dropbox, or Google Drive):
- Access your screenshots from any device
- Share captures instantly without additional steps
- Maintain an automatic backup of important visual information
This integration creates a seamless experience across your desktop, laptop, tablet, and smartphone.
Advanced Screenshot Management Tips
Beyond changing the save location, consider these additional strategies to enhance your screenshot workflow:
Create Seasonal or Monthly Folders
For those who take numerous screenshots, implementing a time-based organization system can prevent folders from becoming overcrowded:
- Change your screenshot location monthly or quarterly
- Use a naming convention like “Screenshots-2025-March”
- Archive older screenshot folders to external storage when no longer needed
This approach makes finding recent screenshots easier while maintaining a comprehensive archive.
Consider Upgrading Your Screenshot Tool
While Windows’ built-in screenshot capability works well for basic needs, third-party tools offer enhanced functionality:
- ShareX provides advanced capture options, annotations, and automatic uploads
- Snagit offers comprehensive editing and organization features
- Greenshot combines simplicity with powerful annotation tools
These applications often allow for more granular control over save locations, including the ability to set different destinations based on the type of capture.
Use Keyboard Shortcuts Effectively
Familiarize yourself with Windows’ built-in screenshot keyboard shortcuts:
- Win + Print Screen: Captures the entire screen and saves to your Screenshots folder
- Win + Shift + S: Opens the Snipping Tool for selecting a specific area to capture
- Alt + Print Screen: Captures only the active window (saved to clipboard)
Combining these shortcuts with your custom save location creates a powerful and efficient screenshot workflow.
Conclusion: Small Change, Big Impact
Customizing where Windows saves your screenshots may seem like a minor adjustment, but it’s one of those small changes that can significantly improve your daily computer experience. By taking a few minutes to set up a personalized screenshot destination, you’ll create a more organized, efficient workflow that saves time and reduces frustration.
Whether you’re a professional who relies on screenshots for work, a student documenting research, or simply someone who wants a more organized system, this simple Windows customization is worth implementing today.
Remember that the best organization system is one that works with your specific needs and habits. Experiment with different locations and folder structures until you find the perfect setup for your unique workflow.