Umami is an open-source, privacy-focused, and lightweight web analytics tool built on JavaScript (Next.js) and runs in a Node.js environment. It’s an excellent alternative to traditional analytics platforms like Google Analytics, offering full control over your data and user privacy.
With Umami, you get:
- Real-time traffic analysis
- Privacy-focused tracking
- Easy self-hosting with minimal configuration
- Customizable settings tailored to your needs
This guide will walk you through self-hosting Umami using Docker Compose for both single-server and Docker Swarm environments.
Prerequisites
Before you begin, make sure you have:
- A website to monitor
- Docker & Docker Compose installed
- A domain name for public access (e.g., analytics.example.com)
- (Optional) Docker Swarm configured for scalability
NOTE: This guide assumes you already have a reverse proxy like Traefik set up for SSL and domain routing.
Folder Structure
Create a dedicated folder for your Umami deployment:
mkdir ~/umami
cd ~/umami
Your folder structure will look like this:
umami/
|-- .env
|-- docker-compose.yml
Environment Variables (.env)
Create a .env file in your ~/umami folder:
DATABASE_URL=postgresql://umami_user:umami_pass@db:5432/umami_db
DATABASE_TYPE=postgresql
HASH_SALT=generate_a_random_salt

POSTGRES_DB=umami_db
POSTGRES_USER=umami_user
POSTGRES_PASSWORD=umami_pass
Replace generate_a_random_salt with a secure random string:
openssl rand -base64 64Docker Compose Configuration (docker-compose.yml)
Create a docker-compose.yml file in your ~/umami folder:
Single-Server Deployment Example
version: '3.7'

services:
  umami:
    image: ghcr.io/umami-software/umami:postgresql-latest
    env_file: .env
    environment:
      TRACKER_SCRIPT_NAME: tracker
      APP_SECRET: replace-me-with-a-random-string
    labels:
      - traefik.enable=true
      - traefik.http.routers.umami.rule=Host(`analytics.example.com`)
      - traefik.http.routers.umami.entrypoints=https
      - traefik.http.routers.umami.tls=true
      - traefik.http.services.umami.loadbalancer.server.port=3000
    networks:
      - traefik-public
      - default
    depends_on:
      - db
    restart: always

  db:
    image: postgres:15-alpine
    env_file: .env
    networks:
      - default
    volumes:
      - db:/var/lib/postgresql/data
    restart: always

volumes:
  db:

networks:
  traefik-public:
    external: true
  default:
    external: false
Key Points Explained:
- TRACKER_SCRIPT_NAME: Customizes the tracker script URL to avoid ad blockers.
- traefik-public: Connects Umami to your Traefik reverse proxy for SSL and routing.
- db volume persists database data.
Deployment
1. Set Primary Domain (Optional):
export PRIMARY_DOMAIN=analytics.example.com2. Start Containers:
docker-compose up -d3. Access Umami Dashboard:
Open your browser and visit: https://analytics.example.com
4. Default Login:
Username: admin
Password: umami
5. Stop Containers (Optional):
docker-compose downDocker Swarm Deployment (Optional)
For Docker Swarm setups, modify your docker-compose.yml:
version: '3.7'

services:
  umami:
    image: ghcr.io/umami-software/umami:postgresql-latest
    env_file: .env
    environment:
      TRACKER_SCRIPT_NAME: tracker
      APP_SECRET: replace-me-with-a-random-string
    deploy:
      labels:
        - traefik.enable=true
        - traefik.http.routers.umami.rule=Host(`analytics.example.com`)
        - traefik.http.routers.umami.entrypoints=https
        - traefik.http.routers.umami.tls=true
        - traefik.http.services.umami.loadbalancer.server.port=3000
    networks:
      - traefik-public
      - default
    depends_on:
      - db
    restart: always

  db:
    image: postgres:15-alpine
    env_file: .env
    deploy:
      placement:
        constraints:
          - node.labels.umami.db == true
    networks:
      - default
    volumes:
      - db:/var/lib/postgresql/data
    restart: always

volumes:
  db:

networks:
  traefik-public:
    external: true
  default:
    external: false
Deploy Stack in Swarm:
1. Label the node:
docker node update --label-add umami.db=true NODE_ID2. Deploy the stack:
docker stack deploy -c docker-compose.yml umami3. Remove the stack (if needed):
docker stack rm umamiPost-Installation Steps
1. Secure Your Admin Account:
Change the default admin credentials.
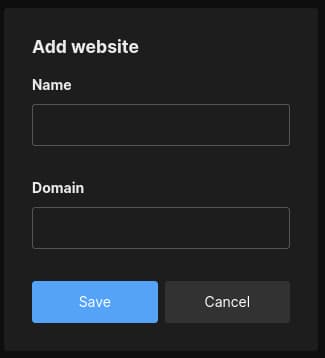
2. Add a Site for Tracking:
In the Umami dashboard, click Add Site.
3. Insert Tracking Script:

Add this script to your website’s <head> tag:
<script async src="https://analytics.example.com/tracker" data-website-id="YOUR_WEBSITE_ID"></script>
Why Choose Umami?
- User Privacy: No personal data tracking.
- Open-Source: Full transparency and control.
- Easy Deployment: Simple Docker-based setup.
- Customizable Dashboard: Tailored analytics experience.
Conclusion
You’ve successfully self-hosted Umami Analytics using Docker Compose. With a privacy-first design, real-time insights, and a straightforward deployment process, Umami is a powerful tool for website analytics without compromising user trust.
Take full control of your analytics today and optimize your online presence effectively! 🚀
For further configurations and updates, visit the official Umami GitHub Repository.
Let me know if you’d like me to refine any section further! 😊


