Venmo has become a go-to app for quick and easy money transfers, whether you’re splitting a dinner bill or paying a freelancer. However, its social feed feature, which can inadvertently make your transactions public, has raised concerns about privacy. If you’re not careful, your Venmo activity could be visible to the world—or worse, to people you’d rather keep in the dark.

In this guide, we’ll walk you through the steps to keep your Venmo account private, secure, and free from unwanted scrutiny. From adjusting privacy settings to understanding Venmo’s default behaviors, you’ll learn how to safeguard your financial transactions and personal information effectively.
Why Venmo Privacy Matters
Before diving into the how-to, it’s essential to understand why protecting your Venmo account is crucial. Venmo’s default settings are designed to be social, encouraging users to share their transactions with others. While this can be fun for splitting costs with friends, it can also expose sensitive information to a broader audience.
For instance, a high-profile example involves national security adviser Michael Waltz, whose public Venmo account revealed the names of hundreds of personal and professional associates. This kind of exposure isn’t just embarrassing—it can also pose security risks.
Whether you’re a casual user or rely on Venmo for business purposes, ensuring your account is private is a must.
Step 1: Check and Adjust Your Privacy Settings
The first step to securing your Venmo account is reviewing and modifying your privacy settings. Here’s how to do it:
- Open the Venmo App: Tap on the three horizontal lines (☰) in the top-right corner to access the menu.
- Navigate to Settings: Scroll down and select “Settings.”
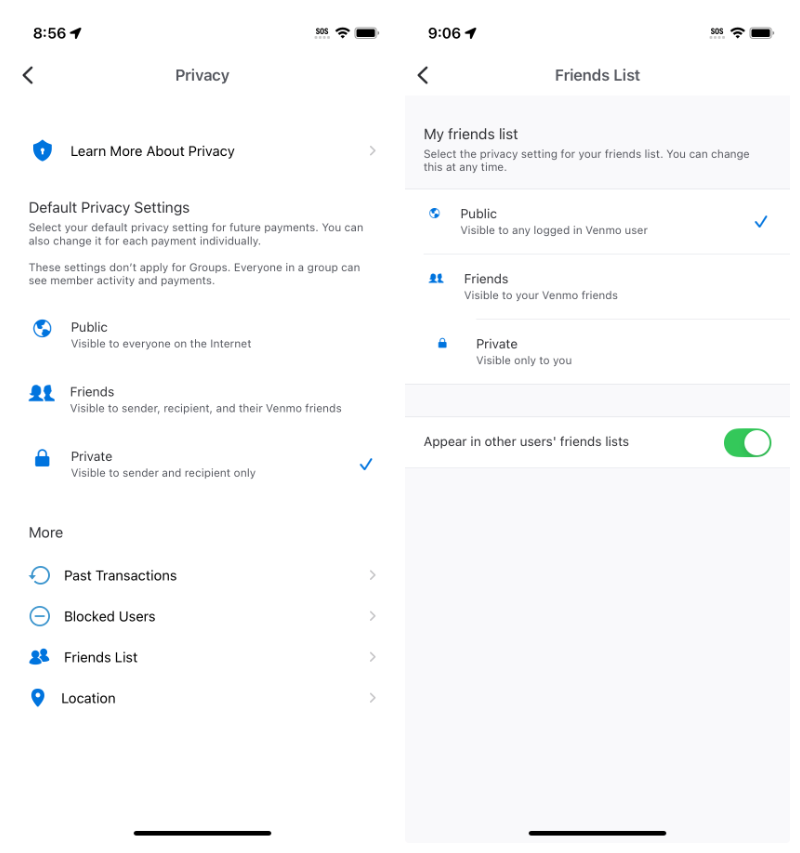
- Privacy Settings: Tap on “Privacy” to view your current preferences.
By default, Venmo sets your transactions to “Public,” meaning anyone on the platform can see your payments. To change this:
- Set Default Privacy to Private: Under the “Default Privacy Setting,” switch from “Public” to “Private.” This ensures all future transactions are visible only to you and the recipient.
- Review Past Transactions: If you’ve made public transactions in the past, you can change their privacy settings individually. Go to your transaction history, tap on a payment, and adjust its visibility.
TIP:
Venmo’s privacy settings are “recipient-centric.” If you mark a payment as public, but the recipient has their default privacy set to private, the transaction will remain private.
Step 2: Manage Venmo Groups
Venmo allows users to create groups for shared expenses, like splitting rent or organizing events. However, transactions made within these groups are visible to all members by default.
- Limit Group Access: When creating a Venmo group, ensure it includes only trusted individuals.
- Monitor Group Activity: Regularly review transactions within the group to ensure no sensitive information is shared.
If you’re uncomfortable with the level of visibility, consider using alternative methods for group payments or switching to private transactions.
Step 3: Hide Your Contacts
Venmo’s interface can inadvertently expose your contact list, making it easier for others to track your connections. To protect your privacy:
- Avoid Adding Unnecessary Contacts: Only add people you actively transact with.
- Review Your Contacts: Periodically check your contact list and remove individuals you no longer interact with.
By keeping your contact list streamlined, you reduce the risk of your network being exposed to unwanted audiences.
Step 4: Strengthen Account Security
Beyond privacy settings, it’s essential to secure your Venmo account against unauthorized access. Here are some additional steps:
- Enable Two-Factor Authentication (2FA): Add an extra layer of security by requiring a verification code for logins.
- Use a Strong Password: Create a unique, complex password for your Venmo account. Avoid reusing passwords from other platforms.
- Monitor Account Activity: Regularly check your transaction history for any unusual or unauthorized payments.
Pro Tip: Avoid linking Venmo to public Wi-Fi networks, as they can be vulnerable to hacking.
Step 5: Educate Yourself on Venmo’s Features
Understanding how Venmo works can help you make informed decisions about your privacy. For example:
- Transaction Descriptions: Be mindful of the descriptions you add to payments. Avoid including sensitive or identifiable information.
- Friend Emojis: Venmo uses emojis to represent transactions on the public feed. While this adds a fun element, it can also reveal details about your spending habits.
By staying informed, you can use Venmo’s features without compromising your privacy.
Final Thoughts: Take Control of Your Venmo Privacy
Venmo’s convenience shouldn’t come at the expense of your privacy. By following the steps outlined above, you can ensure your transactions, contacts, and personal information remain confidential.
Remember, online security is an ongoing process. Regularly review your privacy settings, stay informed about updates to Venmo’s policies, and adopt best practices to protect your account. Whether you’re a casual user or a business professional, taking control of your Venmo privacy is a small but impactful step toward safeguarding your digital life.
By implementing these strategies, you can enjoy the convenience of Venmo without worrying about unwanted exposure. Stay private, stay secure, and keep your financial life under your control.