
In modern software development, background jobs are essential. Whether you’re sending confirmation emails, processing videos, generating scheduled reports, or syncing data with third-party services—these tasks must run reliably in the background without disrupting the user experience.
Trigger.dev is an open-source framework designed to simplify background job handling with a strong focus on developer experience (DX). It offers a modern alternative to complex systems like Celery and BullMQ by making it easy to build, manage, and monitor long-running jobs and scheduled tasks.
Self-hosting Improvements
- Simplified Docker Setup: Just run
docker compose up—no more complex startup scripts. - Built-in Services: Comes with an integrated registry, object storage, and monitoring.
- Auto Container Cleanup: Automatically removes unused containers to save resources.
- Better Resource Management: Enforces resource limits by default for stability.
- Enhanced Security: A Docker Socket Proxy and network isolation are enabled by default.
System Requirements (2025 Update)
Minimum Requirements for Production
Webapp Server:
- CPU: 4+ vCPU (8+ vCPU recommended)
- RAM: 8+ GB (16+ GB recommended)
- Storage: 50+ GB SSD
- OS: Ubuntu 22.04 LTS or 24.04 LTS
Worker Server:
- CPU: 8+ vCPU (16+ vCPU recommended)
- RAM: 16+ GB (32+ GB recommended)
- Storage: 100+ GB SSD
- OS: Ubuntu 22.04 LTS or 24.04 LTS
Required Software
- Docker: 24.0.0+ (25.0.0+ recommended)
- Docker Compose: 2.20.0+ (2.38.0+ recommended)
- Git: 2.34.0+
- Node.js: 18.0.0+ (for the CLI)
- Python: 3.9+ (for the Python extension)
Preparing the Ubuntu 24.04 LTS Environment
Step 1: Update System and Install Dependencies
# Update system packages
sudo apt update && sudo apt upgrade -y

# Install essential packages
sudo apt install -y \
    apt-transport-https \
    ca-certificates \
    curl \
    gnupg \
    lsb-release \
    software-properties-common \
    git \
    htop \
    nano \
    ufw \
    fail2ban \
    unzip \
    wget \
    jq \
    tree

# Install Node.js 20 LTS
curl -fsSL https://deb.nodesource.com/setup_20.x | sudo -E bash -
sudo apt-get install -y nodejs

# Verify installations
node --version
npm --version
Step 2: Install the Latest Docker Engine
# Remove old Docker installations
sudo apt-get remove -y docker docker-engine docker.io containerd runc

# Add Docker's official GPG key
sudo mkdir -p /etc/apt/keyrings
curl -fsSL https://download.docker.com/linux/ubuntu/gpg | sudo gpg --dearmor -o /etc/apt/keyrings/docker.gpg

# Add Docker repository
echo \
  "deb [arch=$(dpkg --print-architecture) signed-by=/etc/apt/keyrings/docker.gpg] https://download.docker.com/linux/ubuntu \
  $(lsb_release -cs) stable" | sudo tee /etc/apt/sources.list.d/docker.list > /dev/null

# Install Docker Engine
sudo apt-get update
sudo apt-get install -y docker-ce docker-ce-cli containerd.io docker-buildx-plugin docker-compose-plugin

# Add user to the docker group to run Docker without sudo
sudo usermod -aG docker $USER
newgrp docker

# Enable and start the Docker service
sudo systemctl enable docker
sudo systemctl start docker

# Verify installation
docker --version
docker compose version
Step 3: Configure Docker for Production
# Create Docker daemon configuration for production
sudo mkdir -p /etc/docker
sudo tee /etc/docker/daemon.json > /dev/null <<EOF
{
  "log-driver": "json-file",
  "log-opts": {
    "max-size": "10m",
    "max-file": "3"
  },
  "storage-driver": "overlay2",
  "storage-opts": [
    "overlay2.override_kernel_check=true"
  ],
  "live-restore": true,
  "userland-proxy": false,
  "experimental": false,
  "metrics-addr": "127.0.0.1:9323",
  "exec-opts": ["native.cgroupdriver=systemd"],
  "default-ulimits": {
    "nofile": {
      "name": "nofile",
      "hard": 65536,
      "soft": 65536
    }
  }
}
EOF

# Restart Docker to apply changes
sudo systemctl restart docker

# Test the Docker installation
docker run --rm hello-world
Step 4: Install the Trigger.dev v4 CLI
# Install the CLI globally using npm
npm install -g @trigger.dev/cli@v4-beta

# Verify the installation
npx trigger.dev@v4-beta --version

# Set up shell completion (optional but recommended)
npx trigger.dev@v4-beta completion >> ~/.bashrc
source ~/.bashrc
Production-Ready Trigger.dev v4 Installation
Step 1: Create the Directory Structure
# Create the main directory structure
sudo mkdir -p /opt/trigger.dev/{webapp,worker,shared,backups,logs,ssl}
sudo chown -R $USER:$USER /opt/trigger.dev
cd /opt/trigger.dev

# Clone the official repository
git clone --depth=1 https://github.com/triggerdotdev/trigger.dev
cd trigger.dev/hosting/docker
Step 2: Configure Webapp Environment Variables
cd webapp
cp .env.example .env
nano .env
Complete Production .env File (webapp/.env):
# =============================================================================
# TRIGGER.DEV WEBAPP CONFIGURATION - PRODUCTION READY
# =============================================================================

# Application Settings
APP_ORIGIN=https://trigger.yourdomain.com
LOGIN_ORIGIN=https://trigger.yourdomain.com
APP_ENV=production
LOG_LEVEL=info
NODE_ENV=production

# Database Configuration (PostgreSQL 15+)
DATABASE_URL=postgresql://trigger_user:your_secure_db_password@postgres:5432/trigger_production

# Redis Configuration
REDIS_URL=redis://redis:6379/0

# Security Keys (Generate with: openssl rand -base64 64)
SECRET_KEY_BASE=your-super-secure-secret-key-base-64-chars-minimum-change-this-immediately
ENCRYPTION_KEY=your-32-char-encryption-key-here
SESSION_SECRET=your-session-secret-here-change-this

# Docker Registry Configuration
REGISTRY_URL=registry.yourdomain.com:5000
REGISTRY_USERNAME=trigger_registry
REGISTRY_PASSWORD=your_very_secure_registry_password

# Object Storage (MinIO/S3)
STORAGE_ENDPOINT=https://storage.yourdomain.com
STORAGE_ACCESS_KEY=your_minio_access_key
STORAGE_SECRET_KEY=your_minio_secret_key
STORAGE_BUCKET=trigger-packets
STORAGE_REGION=us-east-1
STORAGE_PUBLIC_HOST=https://storage.yourdomain.com

# Email Configuration - Production SMTP
EMAIL_TRANSPORT=smtp
[email protected]
[email protected]
SMTP_HOST=smtp.yourdomain.com
SMTP_PORT=587
SMTP_SECURE=false
[email protected]
SMTP_PASSWORD=your_smtp_password

# GitHub OAuth (Optional but recommended)
AUTH_GITHUB_CLIENT_ID=your_github_oauth_client_id
AUTH_GITHUB_CLIENT_SECRET=your_github_oauth_client_secret

# Access Control (Regex pattern for allowed emails)
WHITELISTED_EMAILS="admin@yourdomain\.com|team@yourdomain\.com|.*@yourdomain\.com"

# Multi-Factor Authentication (New in July 2025)
MFA_ENABLED=true
MFA_ISSUER="Trigger.dev - yourdomain.com"
MFA_REQUIRED_FOR_ADMIN=true

# Docker Image Configuration
TRIGGER_IMAGE_TAG=v4.0.0-beta.22

# Monitoring and Telemetry
TRIGGER_TELEMETRY_DISABLED=false
OTEL_EXPORTER_ENABLED=true
OTEL_ENDPOINT=http://jaeger:14268/api/traces

# Performance Settings
WORKER_CONCURRENCY=20
MAX_TASK_DURATION=3600000
TASK_HEARTBEAT_INTERVAL=30000

# processKeepAlive (Experimental - New feature)
PROCESS_KEEP_ALIVE_ENABLED=true
PROCESS_KEEP_ALIVE_TIMEOUT=300000

# Realtime Configuration (New features)
REALTIME_ENABLED=true
REALTIME_SKIP_COLUMNS=created_at,updated_at,internal_metadata

# Security Headers
SECURITY_HEADERS_ENABLED=true
CONTENT_SECURITY_POLICY="default-src 'self'; script-src 'self' 'unsafe-inline'; style-src 'self' 'unsafe-inline'"

# Rate Limiting
RATE_LIMITING_ENABLED=true
RATE_LIMIT_REQUESTS_PER_MINUTE=100

# Backup Configuration
BACKUP_ENABLED=true
BACKUP_SCHEDULE="0 2 * * *"
BACKUP_RETENTION_DAYS=30
Step 3: Configure Worker Environment
cd ../worker
cp .env.example .env
nano .env
Worker .env File (worker/.env):
# =============================================================================
# TRIGGER.DEV WORKER CONFIGURATION - PRODUCTION READY
# =============================================================================

# Supervisor Configuration
SUPERVISOR_URL=https://trigger.yourdomain.com
SUPERVISOR_API_KEY=your_supervisor_api_key_here

# Worker Token (Will be generated after webapp startup)
# TRIGGER_WORKER_TOKEN=tr_wgt_will_be_generated_after_webapp_starts

# Docker Registry Configuration
REGISTRY_URL=registry.yourdomain.com:5000
REGISTRY_USERNAME=trigger_registry
REGISTRY_PASSWORD=your_very_secure_registry_password

# Worker Performance Configuration
WORKER_CONCURRENCY=50
WORKER_MEMORY_LIMIT=2048m
WORKER_CPU_LIMIT=2.0
WORKER_TIMEOUT=3600000

# processKeepAlive Configuration (New feature)
PROCESS_KEEP_ALIVE_ENABLED=true
PROCESS_KEEP_ALIVE_TIMEOUT=300000
PROCESS_KEEP_ALIVE_MAX_PROCESSES=10

# Docker Image Configuration
TRIGGER_IMAGE_TAG=v4.0.0-beta.22
Step 4: Create Production Docker Compose Configuration
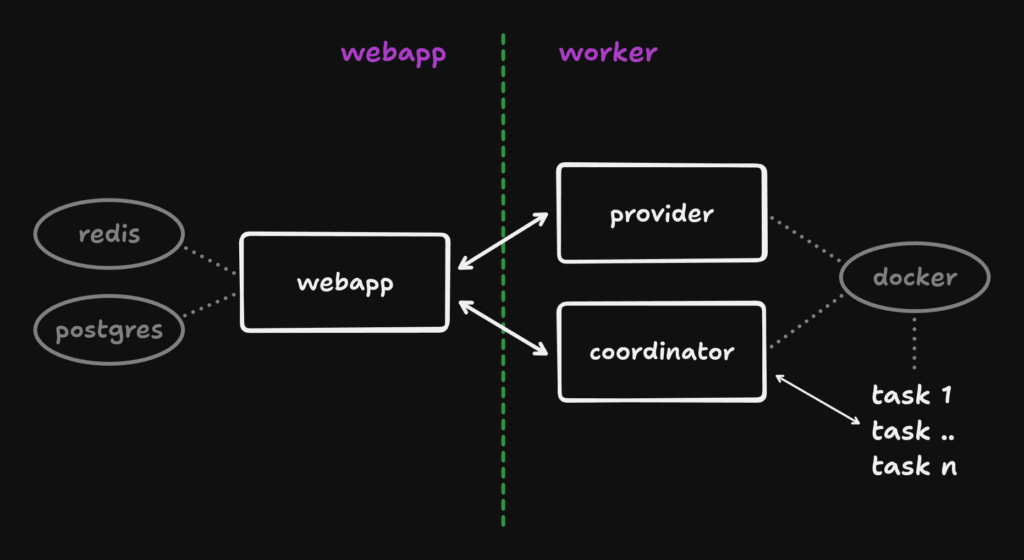
Create a file named webapp/docker-compose.prod.yml and add the following content. This defines the entire webapp stack, including the database, cache, storage, and monitoring services.
version: '3.8'

services:
  webapp:
    image: triggerdotdev/webapp:${TRIGGER_IMAGE_TAG:-v4.0.0-beta.22}
    container_name: trigger_webapp
    restart: unless-stopped
    ports:
      - "127.0.0.1:8030:8030"
    env_file:
      - .env
    depends_on:
      - postgres
      - redis
      - registry
      - minio
      - socket-proxy
    volumes:
      - webapp_data:/app/data
      - webapp_logs:/app/logs
      - shared_data:/home/node/shared
      - backup_data:/backups
    networks:
      - trigger_network
    deploy:
      resources:
        limits:
          cpus: '4.0'
          memory: 8G
        reservations:
          cpus: '2.0'
          memory: 4G
    healthcheck:
      test: ["CMD", "curl", "-f", "http://localhost:8030/health"]
      interval: 30s
      timeout: 10s
      retries: 5
      start_period: 60s

  postgres:
    image: postgres:15-alpine
    container_name: trigger_postgres
    restart: unless-stopped
    environment:
      - POSTGRES_DB=trigger_production
      - POSTGRES_USER=trigger_user
      - POSTGRES_PASSWORD=${POSTGRES_PASSWORD}
    volumes:
      - postgres_data:/var/lib/postgresql/data
    networks:
      - trigger_network
    deploy:
      resources:
        limits:
          cpus: '2.0'
          memory: 4G
        reservations:
          cpus: '1.0'
          memory: 2G
    healthcheck:
      test: ["CMD-SHELL", "pg_isready -U trigger_user -d trigger_production"]
      interval: 10s
      timeout: 5s
      retries: 5

  redis:
    image: redis:7-alpine
    container_name: trigger_redis
    restart: unless-stopped
    networks:
      - trigger_network
    deploy:
      resources:
        limits:
          cpus: '1.0'
          memory: 2G
        reservations:
          cpus: '0.5'
          memory: 1G
    healthcheck:
      test: ["CMD", "redis-cli", "ping"]
      interval: 10s
      timeout: 5s
      retries: 3

  registry:
    image: registry:2.8
    container_name: trigger_registry
    restart: unless-stopped
    ports:
      - "127.0.0.1:5000:5000"
    environment:
      - REGISTRY_AUTH=htpasswd
      - REGISTRY_AUTH_HTPASSWD_PATH=/auth/htpasswd
      - REGISTRY_STORAGE_DELETE_ENABLED=true
    volumes:
      - registry_data:/var/lib/registry
      - ./registry/auth:/auth:ro
      - ./registry/certs:/certs:ro
    networks:
      - trigger_network
    healthcheck:
      test: ["CMD", "wget", "--quiet", "--tries=1", "--spider", "http://localhost:5000/v2/"]
      interval: 30s
      timeout: 10s
      retries: 3

  minio:
    image: minio/minio:RELEASE.2025-07-05T18-35-37Z
    container_name: trigger_minio
    restart: unless-stopped
    ports:
      - "127.0.0.1:9000:9000"
      - "127.0.0.1:9001:9001"
    environment:
      - MINIO_ROOT_USER=${STORAGE_ACCESS_KEY}
      - MINIO_ROOT_PASSWORD=${STORAGE_SECRET_KEY}
    command: server /data --console-address ":9001"
    volumes:
      - minio_data:/data
      - ./minio/certs:/root/.minio/certs:ro
    networks:
      - trigger_network
    healthcheck:
      test: ["CMD", "curl", "-f", "http://localhost:9000/minio/health/live"]
      interval: 30s
      timeout: 20s
      retries: 3

  socket-proxy:
    image: tecnativa/docker-socket-proxy:latest
    container_name: trigger_socket_proxy
    restart: unless-stopped
    environment:
      - CONTAINERS=1
      - IMAGES=1
      - NETWORKS=1
      - VOLUMES=1
    volumes:
      - /var/run/docker.sock:/var/run/docker.sock:ro
    networks:
      - trigger_network

  # --- Monitoring Stack ---
  prometheus:
    image: prom/prometheus:latest
    container_name: trigger_prometheus
    restart: unless-stopped
    ports:
      - "127.0.0.1:9090:9090"
    volumes:
      - prometheus_data:/prometheus
      - ./monitoring/prometheus.yml:/etc/prometheus/prometheus.yml:ro
    networks:
      - trigger_network

  grafana:
    image: grafana/grafana:latest
    container_name: trigger_grafana
    restart: unless-stopped
    ports:
      - "127.0.0.1:3000:3000"
    environment:
      - GF_SECURITY_ADMIN_PASSWORD=${GRAFANA_PASSWORD}
      - GF_USERS_ALLOW_SIGN_UP=false
    volumes:
      - grafana_data:/var/lib/grafana
    networks:
      - trigger_network

  jaeger:
    image: jaegertracing/all-in-one:latest
    container_name: trigger_jaeger
    restart: unless-stopped
    ports:
      - "127.0.0.1:16686:16686"
      - "127.0.0.1:14268:14268"
    environment:
      - COLLECTOR_OTLP_ENABLED=true
    networks:
      - trigger_network

volumes:
  webapp_data:
  webapp_logs:
  postgres_data:
  redis_data:
  registry_data:
  minio_data:
  shared_data:
  backup_data:
  prometheus_data:
  grafana_data:
  jaeger_data:

networks:
  trigger_network:
    driver: bridge
Step 5: Create Registry Authentication
# Create directories for registry auth and certs
mkdir -p registry/auth registry/certs

# Create an htpasswd file for registry authentication
docker run --rm --entrypoint htpasswd registry:2.8 -Bbn trigger_registry your_very_secure_registry_password > registry/auth/htpasswd

# Verify the file was created
cat registry/auth/htpasswd
Step 6: Launch the Webapp Stack
# Create a local env file for secrets not in the main .env
echo "POSTGRES_PASSWORD=your_secure_db_password" > .env.local
echo "GRAFANA_PASSWORD=your_secure_grafana_password" >> .env.local

# Start the full webapp stack in detached mode
docker compose -f docker-compose.prod.yml --env-file .env.local up -d

# Check the status of the containers
docker compose -f docker-compose.prod.yml ps

# Follow the logs for the webapp to ensure it starts correctly
docker compose -f docker-compose.prod.yml logs -f webapp
Step 7: Configure Nginx Reverse Proxy with SSL
This setup uses Nginx to manage traffic and SSL termination for your Trigger.dev services.
# Install Certbot and Nginx
sudo apt install -y certbot python3-certbot-nginx nginx

# Obtain SSL certificates for your domains
sudo certbot --nginx -d trigger.yourdomain.com -d registry.yourdomain.com -d storage.yourdomain.com -d console.storage.yourdomain.com

# Copy certificates for MinIO and the Registry
sudo cp /etc/letsencrypt/live/storage.yourdomain.com/fullchain.pem minio/certs/public.crt
sudo cp /etc/letsencrypt/live/storage.yourdomain.com/privkey.pem minio/certs/private.key
sudo cp /etc/letsencrypt/live/registry.yourdomain.com/fullchain.pem registry/certs/domain.crt
sudo cp /etc/letsencrypt/live/registry.yourdomain.com/privkey.pem registry/certs/domain.key

# Set correct permissions
sudo chown -R $USER:$USER minio/certs registry/certs
chmod 600 minio/certs/private.key registry/certs/domain.key

# Create a new Nginx configuration file
sudo nano /etc/nginx/sites-available/trigger.dev
Production-Ready Nginx Configuration:
# Rate limiting zones
limit_req_zone $binary_remote_addr zone=webapp:10m rate=10r/s;
limit_req_zone $binary_remote_addr zone=registry:10m rate=5r/s;

# Trigger.dev Main Application
server {
    listen 80;
    server_name trigger.yourdomain.com;
    return 301 https://$server_name$request_uri;
}

server {
    listen 443 ssl http2;
    server_name trigger.yourdomain.com;

    # SSL Config
    ssl_certificate /etc/letsencrypt/live/trigger.yourdomain.com/fullchain.pem;
    ssl_certificate_key /etc/letsencrypt/live/trigger.yourdomain.com/privkey.pem;
    include /etc/letsencrypt/options-ssl-nginx.conf;
    ssl_dhparam /etc/letsencrypt/ssl-dhparams.pem;

    # Security Headers
    add_header Strict-Transport-Security "max-age=63072000; includeSubDomains; preload" always;
    add_header X-Frame-Options "SAMEORIGIN" always;
    add_header X-Content-Type-Options "nosniff" always;

    # Rate Limiting
    limit_req zone=webapp burst=20 nodelay;

    location / {
        proxy_pass http://127.0.0.1:8030;
        proxy_set_header Host $host;
        proxy_set_header X-Real-IP $remote_addr;
        proxy_set_header X-Forwarded-For $proxy_add_x_forwarded_for;
        proxy_set_header X-Forwarded-Proto $scheme;

        # WebSocket Support
        proxy_http_version 1.1;
        proxy_set_header Upgrade $http_upgrade;
        proxy_set_header Connection "upgrade";

        # Timeouts
        proxy_connect_timeout 60s;
        proxy_read_timeout 60s;
    }
}

# Add similar server blocks for registry.yourdomain.com (port 5000),
# storage.yourdomain.com (port 9000), and console.storage.yourdomain.com (port 9001).

# Enable the site and restart Nginx
sudo ln -s /etc/nginx/sites-available/trigger.dev /etc/nginx/sites-enabled/
sudo nginx -t
sudo systemctl restart nginx
Step 8: Get Worker Token and Configure the Worker
# Check the webapp logs to find the generated worker token
docker compose -f docker-compose.prod.yml logs webapp | grep "Worker Token"
You’ll see an output similar to this. Save this token securely!
==========================
Trigger.dev Bootstrap - Worker Token
WARNING: This will only be shown once. Save it now!

Token:
tr_wgt_AbCdEfGhIjKlMnOpQrStUvWxYz1234567890
==========================
Now, update the worker’s .env file with this token.
# Edit the worker environment file
cd ../worker
nano .env

# Uncomment and update the line with your token:
TRIGGER_WORKER_TOKEN=tr_wgt_AbCdEfGhIjKlMnOpQrStUvWxYz1234567890
Step 9: Create and Launch the Worker
Create a worker/docker-compose.prod.yml file. This will run the supervisor process that executes your tasks.
version: '3.8'

services:
  supervisor:
    image: triggerdotdev/supervisor:${TRIGGER_IMAGE_TAG:-v4.0.0-beta.22}
    container_name: trigger_supervisor
    restart: unless-stopped
    env_file:
      - .env
    volumes:
      - worker_data:/app/data
      - worker_logs:/app/logs
      - shared_data:/home/node/shared
      - /var/run/docker.sock:/var/run/docker.sock
    networks:
      - trigger_network
    deploy:
      resources:
        limits:
          cpus: '8.0'
          memory: 16G
        reservations:
          cpus: '4.0'
          memory: 8G

volumes:
  worker_data:
  worker_logs:
  shared_data:

networks:
  trigger_network:
    driver: bridge
Now, launch the worker.
# Start the worker stack
docker compose -f docker-compose.prod.yml up -d

# Check status and logs
docker compose -f docker-compose.prod.yml ps
docker compose -f docker-compose.prod.yml logs -f supervisor
Your Trigger.dev v4 instance is now fully deployed and ready for production!
Using Trigger.dev v4
Access Web UI and Login with MFA
- Access URL: Navigate to
https://trigger.yourdomain.com. - Login: Use a magic link or your configured GitHub OAuth.
- Enable MFA: Go to your account settings to enable Multi-Factor Authentication for enhanced security.
Initialize a New Project
# Create a new project directory
mkdir my-trigger-project && cd my-trigger-project

# Login to your self-hosted instance via the CLI
npx trigger.dev@v4-beta login -a https://trigger.yourdomain.com

# Initialize a new Trigger.dev project
npx trigger.dev@v4-beta init

# Install dependencies
npm install

# Start the local development server
npx trigger.dev@v4-beta dev
Create a Task with New Features
This example showcases the new processKeepAlive feature for faster execution.
// src/triggers.ts
import { task, wait } from "@trigger.dev/sdk/v4";
export const myAdvancedTask = task({
id: "my-advanced-task",
// Use processKeepAlive for faster warm starts
processKeepAlive: true,
run: async (payload: { message: string }) => {
await task.setMetadata({ start: new Date().toISOString() });
console.log("Received payload:", payload.message);
await wait.for({ seconds: 5 });
await task.setMetadata({ end: new Date().toISOString() });
return { success: true, message: "Task completed!" };
},
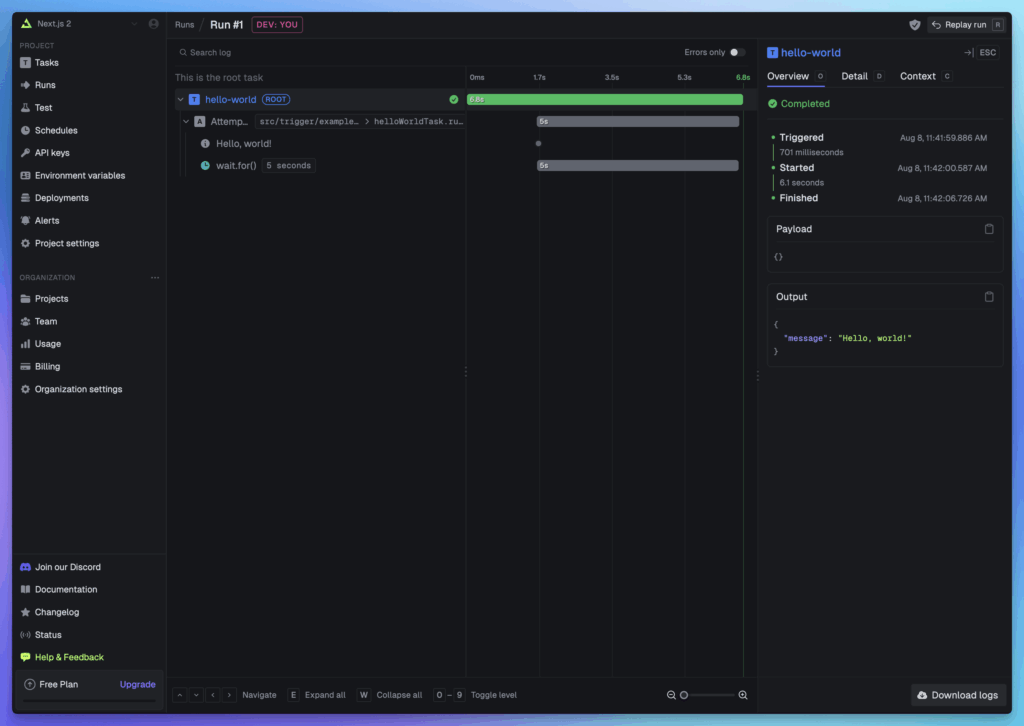
});Deploy and Monitor from the CLI
# Deploy your tasks to your self-hosted instance
npx trigger.dev@v4-beta deploy

# List recent runs
npx trigger.dev@v4-beta runs list

# View the details of a specific run
npx trigger.dev@v4-beta runs show <run-id>

# Cancel or replay a run
npx trigger.dev@v4-beta runs cancel <run-id>
npx trigger.dev@v4-beta runs replay <run-id>
Production Management and Monitoring
Automated Backups
Create a backup script at /opt/trigger.dev/backup.sh to automate database and storage backups.
#!/bin/bash
# Trigger.dev Production Backup Script
BACKUP_DIR="/opt/trigger.dev/backups"
DATE=$(date +%Y%m%d_%H%M%S)
RETENTION_DAYS=30
DOCKER_COMPOSE_FILE="/opt/trigger.dev/trigger.dev/hosting/docker/webapp/docker-compose.prod.yml"

echo "Starting backup at $(date)"

# Backup PostgreSQL
docker compose -f $DOCKER_COMPOSE_FILE exec -T postgres pg_dump -U trigger_user trigger_production | gzip > ${BACKUP_DIR}/postgres_${DATE}.sql.gz

# Backup MinIO Data
docker compose -f $DOCKER_COMPOSE_FILE exec -T minio mc mirror --overwrite /data /backups/minio_${DATE}/

# Clean up old backups
find ${BACKUP_DIR} -name "*.sql.gz" -mtime +${RETENTION_DAYS} -delete
find ${BACKUP_DIR} -type d -name "minio_*" -mtime +${RETENTION_DAYS} -exec rm -rf {} +

echo "Backup completed at $(date)"
Add this script to your crontab to run daily:
0 2 * * * /opt/trigger.dev/backup.sh >> /opt/trigger.dev/logs/backup.log 2>&1
Health Checks and Alerting
Use a monitoring tool like Uptime Kuma or a custom script to periodically check the health of your services:
https://trigger.yourdomain.com/healthhttps://storage.yourdomain.com/minio/health/livehttps://registry.yourdomain.com/v2/
Set up alerting via Prometheus Alertmanager (configured in the Docker stack) to notify you of high resource usage, service downtime, or an increase in task failures.


If you make the Youbube tutoral for this, that will be really great.
And not just me, but everyone is seeking this trigger.dev self hosting.
Thanks.