How to use the new camera actions in Shortcuts for iOS 17
For iOS 17, Apple has introduced a feature that photography enthusiasts will love — the “Open Camera” action in Shortcuts. Here’s how to set up and configure the action.
The iOS 17 beta cycle is winding down as Apple prepares to launch the release to the public later in September. But as well as refining the major new features of iOS 17, the company has been adding certain of them to its Shortcuts app.
Perhaps most notably, a new feature has been introduced to Shortcuts that speeds up getting to take and then save photos via the familiar Camera app. A new “Open Camera” action lets iPhone photographers quickly choose between various camera modes and get straight to taking their photo instead of losing time changing settings.
If you don’t take many photographs, you may have had little reason to even notice that there are different options — until your finger slips and you’re now shooting a panorama. In total, the complete list of camera options — now available via Shortcuts — is:
- Cinematic
- Pano
- Photo
- Portrait
- Portrait Selfie
- Selfie
- Slo-Mo
- Time-Lapse
- Video
For all of these, there is now just the one new Shortcut action which lets users set up in advance which of these they want to use. Thereafter, while the Camera is still available and you can still choose any option, you have the option of bypassing the default “Photo” setting to get to your preference.
How to use a camera shortcut in iOS 17
- Open the Shortcuts app and tap the plus icon in the upper-right corner to create a new shortcut.
- Swipe up from the bottom to find an action, or search for “Open Camera“. Tap on the action to add it to the shortcut.
- Next, tap on the blue text to change the mode from “Photo” to another mode in the list.
It is possible to ask for input and set up a variable so that instead of going straight to one camera option, you could have a list of your two or three most common ones. In that case, the Shortcut will ask you which you want, every time you run it.
That would rather seem to negate the speed of just going straight to Pano, but you can build up a Shortcut into doing many steps for you.
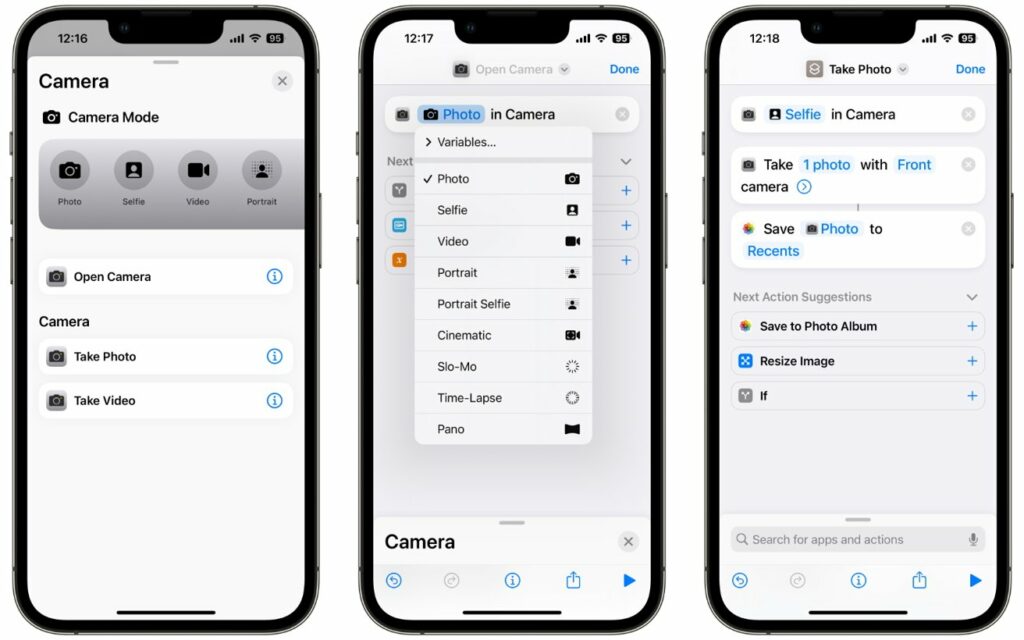
For example, it’s possible to combine actions to take a selfie and automatically save it to the camera roll or the Files app.
Adding a camera shortcut to the Home Screen
Once the shortcut is created, you can add it to the Home Screen as an app icon by tapping the Share icon at the bottom. It looks like a square with an arrow pointing upward, and then users can scroll down and tap “Add to Home Screen“.
Or, turn it into a widget by tapping and holding an empty area on the Home Screen, selecting the plus icon in the upper left, and scrolling or searching for the Shortcuts widget.
Next, drag and drop it onto the Home Screen or press the “Add Widget” button. Finally, tap and hold on the widget, choose “Edit Widget“, and select the new camera shortcut in the menu.
None of these is ever going to be quite as quick as swiping on the Lock Screen to go straight into the camera, and perhaps it’s not even as quick as tapping on the Camera app directly. But when you don’t always want the stock Photo option, this Shortcut is what you need for speed and convenience.

