Building powerful AI applications often feels like a complex endeavor, especially for those without a strong coding background. However, the landscape is rapidly evolving, and tools like the OpenAI Agent Kit are democratizing access to sophisticated AI workflow creation. As someone who’s spent considerable time exploring AI development, I’ve found this kit to be a game-changer, particularly for no-code enthusiasts looking to build intelligent agents and automate tasks using large language models.
In this article, I want to share my insights into the OpenAI Agent Kit, covering its core components, how to build a basic workflow, enhance user experience, orchestrate multiple agents, and implement crucial guardrails. My aim is to equip you with the foundational knowledge to start building your own AI solutions, setting the stage for more advanced explorations.
Understanding the OpenAI Agent Kit: A Unique Approach to AI Workflows
When we talk about building automated workflows, tools like N8N or Zapier often come to mind. These platforms excel at connecting various applications and automating tasks, boasting an extensive library of plugins and integrations. However, the OpenAI Agent Kit offers a distinctly different, yet complementary, focus.
While you could theoretically build AI-powered workflows using N8N by integrating various AI providers, the Agent Kit is specifically designed and optimized for creating sophisticated AI agent workflows within the OpenAI ecosystem. This means you’re tightly integrated with OpenAI’s models and services, which brings several unique advantages:
- Simplicity in AI Workflow Design: For tasks like creating interactive widgets for AI responses, the Agent Kit simplifies what might be a more complex process in a general automation tool. It’s built from the ground up to handle AI-specific output formatting and presentation.
- Built-in Evaluation and Optimization: A significant differentiator is the kit’s ready-to-use evaluation suite. Features like prompt optimizers, trace visualization, and grading tools are integrated, making it much easier to assess and improve the quality of your AI agents compared to general automation platforms.
- Future-Proofing with OpenAI Innovations: The Agent Kit is poised to inherit the best of OpenAI’s advancements. With real-time APIs and the potential integration of tools like Codex, the kit is designed to leverage cutting-edge capabilities as soon as they become available. This synergy within the OpenAI ecosystem ensures that your agents can evolve with the latest AI breakthroughs.
For those already comfortable with N8N, there’s no need to switch. The Agent Kit serves a specific niche, and exploring it alongside existing tools can open up new possibilities. It’s about choosing the right tool for the job, and for building AI-centric workflows, the Agent Kit often provides a more streamlined path.
Core Components of the OpenAI Agent Kit
The OpenAI Agent Kit is structured around three primary components, each playing a vital role in designing, deploying, and managing your AI agents:
1. Agent Builder
This is the central canvas where you visually construct your AI workflows using a drag-and-drop interface. It’s an intuitive environment where you define how your agent receives input, processes information, utilizes tools, and generates output. The Agent Builder simplifies complex logic into manageable, interconnected nodes, making it accessible even for users new to AI development.
2. Connector Registry
The Connector Registry serves as your control hub for managing data and connecting to various OpenAI products and external tools. It’s where you define and integrate the resources your agent will interact with, such as file search capabilities for document retrieval or web search tools for real-time information. This component ensures your agents have access to the information they need to perform their tasks effectively.
3. Chat Kit
The Chat Kit is a convenient feature that allows you to easily embed your AI agent’s chat interface into your existing applications. This makes it simple to integrate your newly built AI workflows directly into user-facing platforms, providing a seamless interaction experience.
OpenAI has done an impressive job of optimizing and simplifying the entire process, allowing no-code users to easily access and leverage advanced AI technology. While this streamlined approach makes it incredibly accessible, it’s important to set realistic expectations: simple setups typically yield results suitable for less complex scenarios. For highly intricate data handling or nuanced conversational AI, you might need to layer additional complexities or leverage the full power of the underlying OpenAI API for finer control.
Building Your First AI Workflow with Agent Builder: A Practical Example
Let’s dive into creating a simple yet powerful AI workflow using the Agent Builder and a basic file search tool. Our goal will be to build an agent that can answer questions based on a provided document, specifically focusing on public service procedures.
Step-by-Step Agent Creation
- Access Agent Builder: Navigate to the Agent Builder section within your OpenAI platform.
- Start a New Workflow: Click on “Create” to begin a new agent workflow. This will be your first agent.
- Define Input: The workflow starts with an
Input Textnode, representing the user’s query or chat message. - Add the Agent Node: Drag and drop an
Agentnode onto your canvas. This node will process the user’s question.- Context and History: Configure the agent node. You can choose to include
Chat Historyso the agent remembers previous interactions, providing a more coherent conversation flow. - Model Selection: Select an appropriate model. If your organization is verified, you’ll have access to a wider range of models. For basic tasks, a faster model like GPT-3.5 Nano might suffice, while more complex reasoning might benefit from larger models like GPT-4. (To verify your organization, go to
Settings > General > Organization Settingand follow the documentation upload process). - Instructions (System Prompt): This is crucial. Define your agent’s persona and capabilities. For our example, I’ll instruct it to act as “an assistant for processing public service documents.” This guides the AI on its role and how it should interact.
- Reasoning Effort: For simple queries, a lower reasoning effort might be fine. As questions become more complex, increasing this setting can improve the agent’s ability to “think” through the problem.
- Context and History: Configure the agent node. You can choose to include
- Integrate a Tool: File Search: Since our goal is to answer questions from documents, we’ll add a
File Searchtool.- Upload Document: Upload your relevant document (e.g., a PDF outlining birth registration procedures). The document will be stored in OpenAI’s vector store.
- Name the Vector Store: Give your vector store a descriptive name, like “Public Services.”
- Configure Chunking: Adjust
chunk sizeandoverlapfor how the document is broken down for search. For this basic example, default settings often work well. - Attach Tool: Once configured, attach this file search tool to your agent.
- Set Output Format: For initial testing, select
Textas the output format. We’ll enhance this later with widgets. - Test Your Agent: Now, ask a question related to your uploaded document. For instance, “I want to ask about the procedure for birth registration for an abandoned baby.”
- Observe the
Search Filesaction and the retrieved information. - The agent will provide an answer, often with citations, indicating where the information was sourced from within your document. You can inspect the logs to see the trace of its actions.
- Observe the
This simple workflow demonstrates how an AI agent can effectively retrieve specific information from a knowledge base, making it a valuable tool for FAQs, internal document search, and more.
Enhancing User Experience with Widget Builder
While text-based responses are functional, a more engaging presentation can significantly improve the user experience. The OpenAI Agent Kit’s Widget Builder allows us to create dynamic and visually appealing output formats.
Creating and Implementing a Custom Widget
- Switch Output Format: Go back to your agent configuration in Agent Builder and change the
Output FormatfromTexttoWidgets. - Create a New Widget: If you don’t have one, click
Createin the Widget Builder interface. The builder provides a visual canvas with various components (lists, buttons, text fields) that you can arrange to design your desired output layout.- You can design a template for how information (e.g., required documents for a procedure) should be displayed. For example, a list of items with optional “show more” buttons.
- Customize: Adjust the styling and layout to match your brand or preferences.
- Download Widget: Once satisfied, download the widget. It will be saved as a file ready for upload.
- Upload Widget to Agent Kit: Return to your Agent Builder and upload the downloaded widget file.
- The Formatting “Trick”: This is a crucial step I’ve learned through experimentation. Currently, the large language models don’t always generate structured responses perfectly for widgets. To ensure your widget displays correctly, you need to provide explicit instructions in your agent’s system prompt:
- Copy Component Code: Within the Widget Builder, after creating your widget, there’s usually a section showing the underlying code structure (e.g., JSON schema) of the components. Copy this snippet.
- Add to Instructions: In your agent’s
Instruction(system prompt), add a line like: “Please answer the question using the following format so the response can be correctly displayed by the widget:” and then paste the component code snippet. This guides the model to output its answer in the exact structure your widget expects.
- Test with Widget: Now, ask a question like, “What documents do I need to submit for a baby’s birth certificate?”
- You’ll see the agent’s response rendered beautifully within your custom widget, presenting the information in a more organized and attractive manner.
While the Widget Builder is a powerful addition, it’s worth noting that the feature is still evolving. You might encounter minor glitches or need to fine-tune instructions to get the exact desired output. However, the ability to create rich, interactive responses is a significant step forward for agent development.
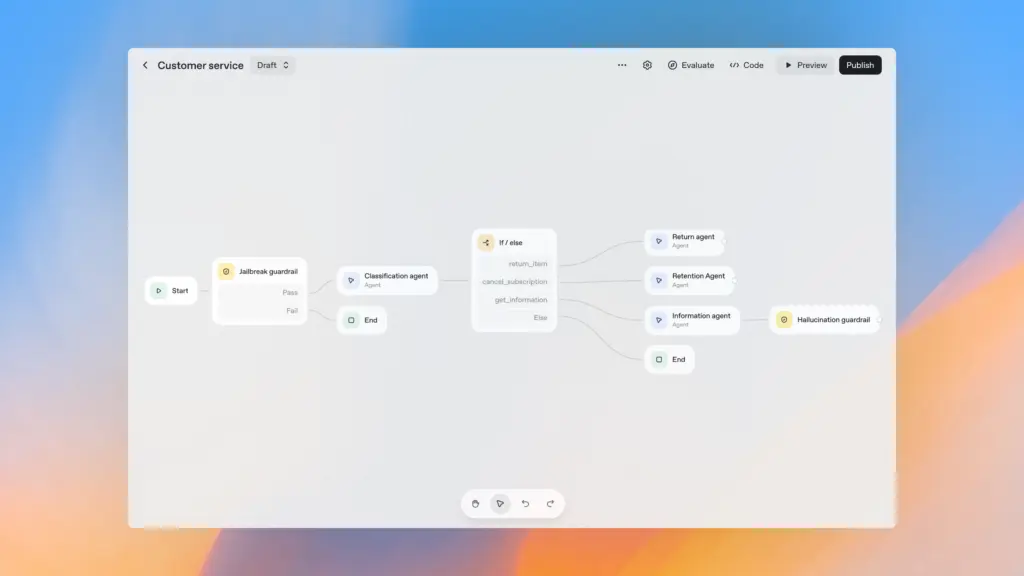
Advanced AI Workflows: Orchestrating Multiple Agents and Implementing Guardrails
Real-world AI applications often require more than a single agent. We might need different agents specializing in various tasks or sources of information. This is where multi-agent orchestration and robust guardrails become essential.
Orchestrating Agents with a Coordinator
Imagine a scenario where your users might ask questions about public service documents (handled by our previous agent) or general public service information found on a government website. Instead of one agent trying to do everything, we can create specialized agents and an “Agent Coordinator” to route requests intelligently.
- Create a Second Specialized Agent:
- Duplicate your existing agent or create a new one.
- Give it a different persona, e.g., “Public Service Information Specialist.”
- Configure it to use a
Web Searchtool. Crucially, specify that it should only search a particular domain, likedichvuk.gov.vn, and set theCountrytoVietnam. AdjustContext Sizebased on how much information you want it to retrieve per query (higher means more retrieval, but potentially higher cost). - Set its
Output FormattoTextfor simplicity in this example.
- Develop an Agent Coordinator:
- Add a new
Agentnode at the beginning of your workflow, before the specialized agents. - Instructions: Give it a clear directive: “Classify the user’s question to route it to the appropriate recipient. If the question is about document procedures (e.g., birth certificates), send it to Anh Chung (our first agent). If it’s another type of question requiring web search, send it to Co Tham (our second agent).” (Using placeholder names for clarity).
- Reasoning Effort: Set a higher
Reasoning Effortfor this coordinator agent to ensure it accurately classifies queries. - Output Format: Enum: This is key. Configure the coordinator’s
Output FormattoEnum(enumerated type). Define the possible output values as the names of your specialized agents, e.g.,["Chung", "Tham"], with a description like “Name of the designated agent.” This forces the coordinator to output one of these specific values.
- Add a new
- Implement an If/Else Node:
- Connect the
Coordinatoragent’s output to anIf/Elsenode. - Condition: Set the condition to check the coordinator’s output. If the
Output Text(which will be “Chung” or “Tham”)Equals“Chung”, route to the “Anh Chung” agent. Otherwise (the “Else” path), route to the “Co Tham” agent. - Connect the outputs of the
If/Elsenode to the respective specialized agents.
- Connect the
- Test Orchestration:
- Ask: “I want to ask about the procedure for birth registration for a baby.” (Should go to “Anh Chung”).
- Ask: “What documents are required to apply for household electricity?” (Should go to “Co Tham” which uses web search).
You’ll see the coordinator reasoning, then the request being correctly routed, and the appropriate agent providing a response, potentially using a widget or web search as configured. This demonstrates how you can build intelligent routing for complex applications.
Implementing Guardrails for Safety and Focus
Guardrails are crucial protective layers that prevent your workflow from being misused, abused, or generating inappropriate content. Think of them as fences that keep your AI agent focused and safe. You can place guardrails at the input, output, or at various points within your workflow.
The OpenAI Agent Kit offers several types of guardrails:
- Personal Information Detection: This guardrail checks for and redacts sensitive personal data like credit card numbers, bank account details, or other personally identifiable information (PII). This is especially important for privacy and compliance.
- Content Moderation: This protects against harmful or inappropriate content. It can detect and block inputs or outputs related to hate speech, self-harm, sexual content, or violence, ensuring your agent remains helpful and ethical.
- Hallucination Detection: When integrated with a vector store and model, this guardrail can assess whether the input query is relevant to the knowledge domain your workflow is designed to handle. If a user asks a question completely outside the agent’s expertise (e.g., asking a public service agent about relationship advice), this guardrail can intervene and prevent the agent from attempting to answer, keeping it focused on its specialized role.
How to Add Guardrails:
- Add a Guardrail Node: Drag and drop a
Guardrailnode onto your canvas. - Configure: Choose the type of guardrail you want to implement (e.g., “Personal Information Detection,” “Moderation,” “Hallucination”).
- Placement: Place guardrails strategically.
- Input Guardrail: Place it immediately after the
Input Textnode to filter queries before they even reach your agents. - Agent Output Guardrail: Place it after an
Agentnode to ensure the agent’s response meets safety and relevance criteria.
- Input Guardrail: Place it immediately after the
For instance, if a user asks a public service agent about personal relationship advice, a hallucination guardrail could detect this and issue a response like, “I am unable to assist with personal matters. My expertise lies in public service procedures.” This keeps your agent on topic and provides a professional boundary.
Conclusion: The Path Forward with OpenAI Agent Kit
The OpenAI Agent Kit represents a significant step forward in making AI agent development accessible to a broader audience, especially for no-code users. From intuitively building workflows with the Agent Builder, to enhancing user interaction with the Widget Builder, and intelligently orchestrating specialized agents with robust guardrails, the kit provides a comprehensive environment for creating powerful AI solutions.
While the kit is still under active development, and you might encounter minor quirks or areas needing manual adjustments (like the widget formatting “trick”), its potential is immense. It streamlines processes that would otherwise require deep coding expertise, allowing innovators to focus on application logic and user value.
My experience with the Agent Kit has shown me that it offers a solid foundation for building practical AI applications today, with a clear roadmap for future enhancements. As OpenAI continues to refine and expand its capabilities, I anticipate it will become an even more indispensable tool for anyone looking to harness the power of AI agents. If you’re eager to build intelligent workflows without getting lost in complex code, the OpenAI Agent Kit is definitely worth exploring.