In today’s fast-paced digital world, maintaining a vibrant and consistent social media presence is crucial for individuals and businesses alike. However, the sheer volume of platforms and the constant need for fresh content can quickly become overwhelming. This is where automation steps in as a game-changer. I’ve spent considerable time exploring efficient ways to manage social media, and I’ve found that combining the power of N8N, a robust workflow automation tool, with Postiz, a dedicated social media posting service, offers an incredibly flexible and potent solution. It allows you to schedule, publish, and even generate content across multiple platforms with remarkable ease.
This guide will walk you through my process for automating social media posting using N8N and Postiz, covering everything from initial setup to handling platform-specific intricacies and leveraging AI for content creation.
Getting Started: Setting Up N8N and Integrating Postiz
Before we dive into creating our automated workflows, the first step is to ensure your N8N instance is ready and integrated with Postiz. If you’re running a self-hosted N8N setup, the process is straightforward.
Installing the Postiz Community Node
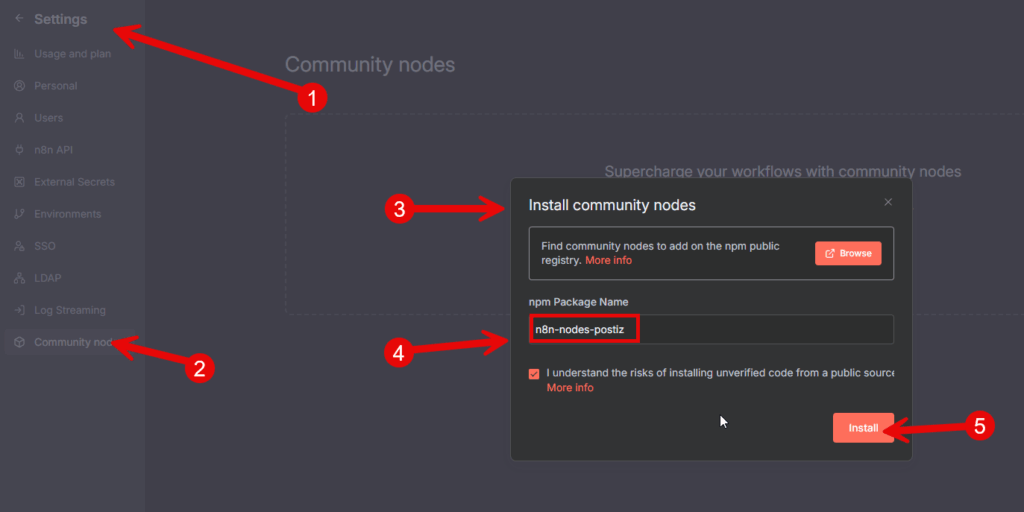
N8N’s extensibility comes from its community nodes, and Postiz is available as one of these. Here’s how you can get it installed:
- Access N8N Settings: Open your N8N self-hosted instance. On the left-hand navigation panel, you’ll typically find a “Settings” or gear icon. Click on it.
- Navigate to Community Nodes: Within the settings, locate and click on “Community Nodes.”
- Install New Node: You’ll see an option to “Install Community Node.” Click this.
- Search and Install Postiz: In the search bar that appears, type “nodes-postiz” (or simply “postiz”). The Postiz node should appear. Click “Install.”
- Confirmation: Allow a few seconds for N8N to download and install the node. Once complete, you’ll have the Postiz node ready for use in your workflows.
With Postiz successfully integrated into your N8N environment, you’re now equipped to start building powerful social media automation workflows.
Scheduling Your First Posts: Text, Images, and Beyond
Let’s begin with the fundamentals: scheduling a simple text post, and then elevating it to include images. I’ve found that starting simple helps in understanding the core mechanics before adding more complexity.
Crafting a Simple Text Post
For a basic text-only post, the N8N workflow is incredibly intuitive:
- Create a New Workflow: In your N8N dashboard, click to create a new workflow.
- Add a Manual Trigger: The first node in almost any workflow should be a trigger. For testing and manual initiation, I often start with a “Manually Trigger” node. This allows you to run the workflow on demand.
- Introduce the Postiz Node: Add a new node and search for “Postiz.” Select the “Postiz” node and then choose the “Schedule Post” operation.
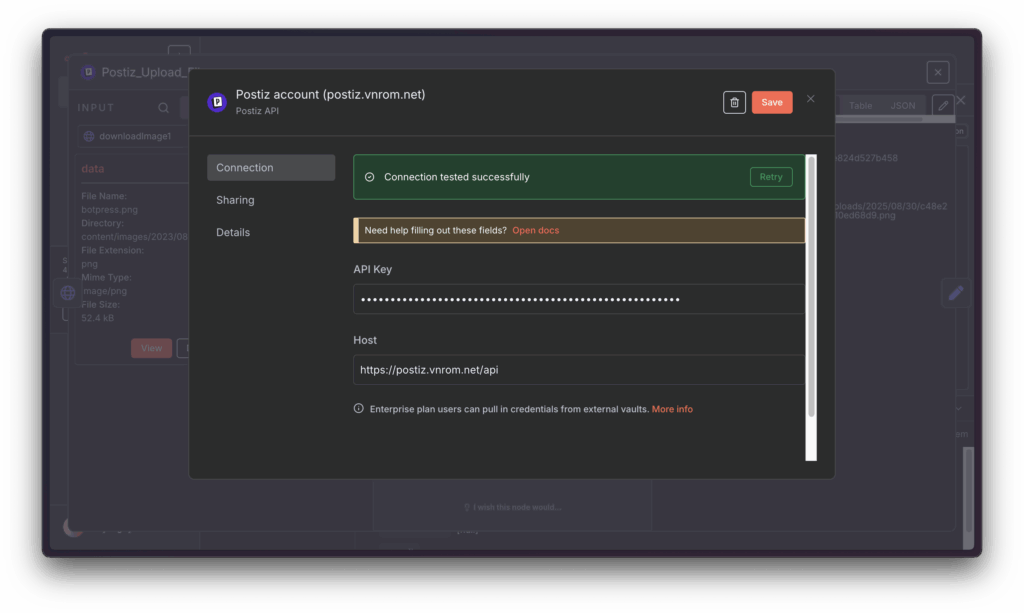
- Create new credential:
NOTE:
If you are self-hosting Postiz on port 5000 (reverse proxy), Your host must end with /api for example: http://yourdomain.com/api- Configure the Postiz Node:
- Channel ID: This is crucial. You’ll need to get the specific ID for the social media channel you wish to post to. Log into your Postiz dashboard, navigate to your desired social media channel (e.g., Blue Sky, Threads), and copy its Channel ID. Paste this into the “Channel ID” field in your N8N Postiz node.
- Content Items: Under “Content Items,” you can add the text for your post. Simply type your desired message.
- Date and Time: By default, it might schedule for “now.” You can set a specific future date and time if you wish.
- Execute and Confirm: Execute the step. You should receive a confirmation in N8N, including a Post ID and Integration ID. Head over to your selected social media platform, and you’ll see your post live!
Adding Images to Your Scheduled Posts
Most social media posts benefit immensely from visuals. Integrating images into your automated posts requires an additional step: uploading the image to Postiz first. This is important because many platforms whitelist URLs, and Postiz ensures your image URLs are properly handled.
Here’s how I typically set up an image post workflow:
- Load the Image via HTTP Request:
- Disconnect your “Postiz Schedule Post” node for a moment.
- Add an “HTTP Request” node. This node will fetch your image from a URL.
- In the HTTP Request node, set the “Request Method” to “GET” and provide the URL of the image you want to upload.
- Ensure the “Response Format” is set to “Binary” if you’re loading an image file.
- Upload Image to Postiz:
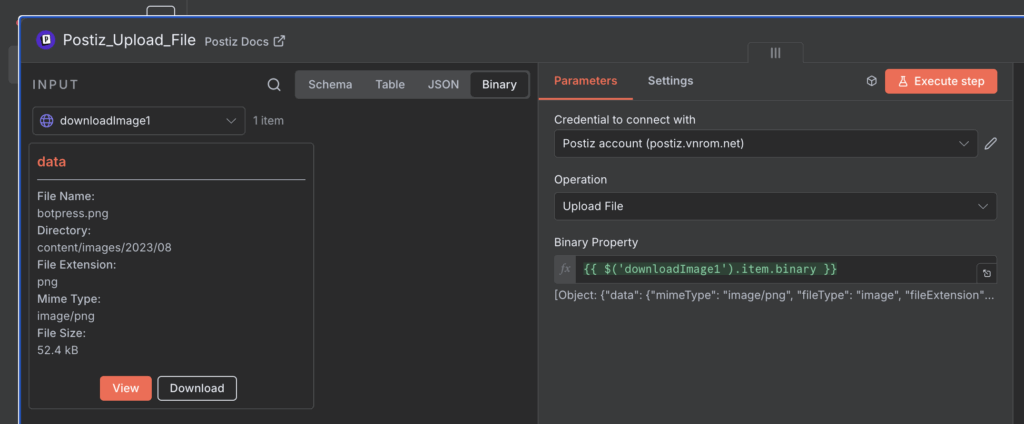
- Add another “Postiz” node, but this time select the “Upload File to Postiz” operation.
- Binary Property: This is a key step. You need to tell Postiz where to find the image data from the previous HTTP Request node. Use an expression:
{{ $('HTTP Request').item.binary }}. This expression dynamically pulls the binary data of the image from the output of your HTTP Request node. - Execute this “Upload File to Postiz” step. You’ll get an output containing the image’s ID, name, and path within Postiz. This information is essential for the next step.
- Update the “Schedule Post” Node:
- Reconnect your original “Postiz Schedule Post” node.
- In the “Content Items” section of this node, add an “Image” field.
- Image ID: For the Image ID, use an expression to pull the ID from the “Upload File to Postiz” node:
{{ $('Postiz Upload File').item.json.id }}. - Image Path: Similarly, for the Image Path, use an expression:
{{ $('Postiz Upload File').item.json.path }}. - Add your text content as usual.
- Execute the Workflow: Run the entire workflow. If everything is set up correctly, your image, along with your text, will appear on your chosen social media platform.
This two-step process (fetching then uploading to Postiz) ensures the image is properly prepared and linked for optimal delivery across various social platforms.
Scaling Your Reach: Posting to Multiple Social Media Platforms
One of the greatest advantages of automation is the ability to extend your reach without extra effort. Posting to multiple social media channels simultaneously is a prime example of this.
I’ve found two main approaches to achieve this within N8N and Postiz:
Option 1: Duplicating Postiz Nodes (For Structured Workflows)
If you prefer a highly organized workflow where each social media platform has its own dedicated Postiz node, you can simply duplicate the “Postiz Schedule Post” node.
- Duplicate Node: Right-click on your existing “Postiz Schedule Post” node and select “Duplicate.”
- Change Channel ID: In the new duplicated node, change the “Channel ID” to that of your second social media platform (e.g., Threads, instead of Blue Sky).
- Connect Inputs: Ensure both Postiz nodes are connected to the preceding nodes (e.g., the “Upload File to Postiz” node if you’re including an image, or directly to the trigger if it’s text-only).
- Execute: When you run the workflow, it will execute both Postiz nodes, scheduling the content across both platforms.
This method can be beneficial for complex workflows where you might want to apply different logic or content variations to specific platforms.
Option 2: Using Multiple Channel IDs within a Single Node (For Efficiency)
For simpler, identical posts across multiple platforms, I often opt for adding multiple channel IDs within a single “Postiz Schedule Post” node. This keeps your workflow cleaner and more concise.
- Add Another Channel ID: In your “Postiz Schedule Post” node, navigate to the “Content Items” section.
- Create New Content Item: Click “Add Item” or similar to create a new content entry.
- Populate Details:
- Channel ID: Go to your Postiz dashboard, copy the Channel ID for your next desired platform (e.g., Threads), and paste it here.
- Content: Add your text message.
- Image/Video (if applicable): If you’re including an image, ensure you add the Image ID and Image Path expressions, just as you did for the first platform, pulling them from the “Upload File to Postiz” node.
- Execute: When you execute this single Postiz node, it will generate an array of items, indicating that posts have been scheduled for each specified channel.
I personally prefer this second method for its elegance when the content is largely the same across platforms. It’s incredibly efficient for broad announcements or general updates. After executing, you’ll see your post appear on all the linked social media feeds.
Navigating Platform-Specific Requirements: The TikTok Example
While the basic posting process is quite streamlined, some social media platforms, like TikTok, have unique requirements for posting. They often demand specific settings for privacy, comments, duet options, and more. Initially, attempting to post without these settings might result in a lengthy error message detailing all the missing parameters.
Instead of trial and error, I rely on Postiz’s powerful API documentation and wizard to get these settings right the first time.
Utilizing the Postiz API Documentation for Settings
The Postiz public API documentation is an invaluable resource for understanding platform-specific parameters. Here’s my process:
- Consult the Postiz Public API: Go to the Postiz documentation, specifically the public API section. You’ll often find a “Generate an API Request” or similar wizard.
- Simulate Post Creation: In this wizard, select the platform (e.g., TikTok), input a sample message, and crucially, begin to configure the specific settings you desire.
- Privacy Level: Public, Friends Only, Private.
- Content Posting Method: Direct Post.
- Add Music: Yes/No.
- Allow User to Comment/Duet/Stitch: True/False.
- Video Made with AI/Disclose Video Content/Brand Content Toggle: True/False.
- Image/Video: Attach a placeholder image if required by the wizard.
- Generate Output: Once you’ve configured your desired settings in the wizard, click “Create Output.” The wizard will generate a JSON payload containing all the necessary settings in the correct format.
Implementing TikTok Settings in N8N
Now that you have the correct settings from the Postiz API wizard, you can add them to your N8N workflow:
- Select the Postiz “Schedule Post” Node: Ensure your workflow is configured to post to your TikTok channel ID.
- Add Settings: Within the “Postiz Schedule Post” node, look for an “Add Settings” or “Additional Fields” option. This typically allows you to add custom key-value pairs.
- Input Key-Value Pairs: Based on the JSON output from the Postiz API wizard, you’ll add each setting as a key and its corresponding value. Pay attention to data types (string, boolean):
- Key:
privacyLevel, Value:public_to_everyone(string) - Key:
contentPostingMethod, Value:direct_post(string) - Key:
addMusic, Value:true(boolean) - Key:
comment, Value:false(boolean) - Key:
duet, Value:false(boolean) - Key:
stitch, Value:false(boolean) - Key:
videoMadeWithAI, Value:false(boolean) - Key:
disclose, Value:false(boolean) - Key:
brandOrganic, Value:false(boolean) - Key:
brandContentToggle, Value:false(boolean)
(Note: These are examples; always refer to the latest Postiz API documentation for exact keys and accepted values.)
- Key:
- Execute and Verify: Run the workflow. This time, with all the necessary settings provided, your post should successfully appear on TikTok, adhering to your specified preferences (e.g., with music, no duets).
This systematic approach, leveraging Postiz’s own tools, ensures that even the most demanding platform requirements are met without frustrating debugging cycles.
Unleashing Creativity: AI Video Generation and Post Management
Postiz isn’t just about scheduling; it also offers advanced features like AI-powered video generation and comprehensive post management, which significantly enhance your content strategy.
Generating Videos with AI
One feature I find particularly exciting is the ability to generate videos using AI, turning text and images into engaging video content. This is a powerful tool for rapidly creating unique content.
Here’s how I integrate AI video generation into an N8N workflow:
- Retrieve Voice IDs:
- First, you need to know which AI voices are available. Add a “Postiz” node and select the “Video Related Functions” operation.
- Choose “Load Voices” and specify the identifier, often something like
image_text_slides. - Execute this step. It will return a list of available voice IDs (e.g., Rachel, Matthew, etc.). Pick a suitable voice ID for your video.
- Generate Video with AI Node:
- Add another “Postiz” node, selecting the “Generate Video with AI” operation.
- Format: Set your desired video format (e.g.,
verticalfor short-form content). - Custom Parameters: This is where you specify the AI voice and your video script (prompt).
- Key:
voice, Value: Paste the voice ID you obtained in the previous step. - Key:
prompt, Value: Write the text you want the AI voice to narrate and turn into slides. For example: “We have just won a million dollars! What an amazing achievement.”
- Key:
- Execute this node. Video generation can take a few moments. Once complete, Postiz will return the ID, name, and path of your newly generated video.
- Schedule the AI-Generated Video:
- You can then use these details (ID and Path) in a “Postiz Schedule Post” node, similar to how you would schedule an image, to publish your AI-created video to your desired social media channels.
This capability opens up new avenues for content creation, allowing for rapid production of engaging video content without complex editing software.
Managing Your Scheduled Posts
Beyond creating content, Postiz also provides tools for managing your scheduled posts. A basic but essential function is retrieving a list of all your posts.
- Get List of Posts Node: Add a “Postiz” node and select the “Get List of All Posts” operation.
- Date Filters (Optional): You can specify a “Start Date” and “End Date” to filter your posts by a particular time range. If left blank, it will retrieve all posts.
- Execute: Run this step, and N8N will output a list of your Postiz posts, including their IDs, status, and associated platforms. This is incredibly useful for auditing your content schedule or reviewing past performance.
Conclusion: Automate, Innovate, and Elevate Your Social Media Strategy
Automating your social media posting with N8N and Postiz transforms a time-consuming chore into an efficient and strategic operation. From scheduling basic text and image posts to navigating complex platform-specific settings and even generating engaging video content with AI, this powerful combination empowers you to maintain a dynamic online presence with minimal manual intervention.
My experience with N8N and Postiz has shown me the immense potential for streamlining content delivery, expanding reach across diverse platforms, and fostering creativity through automation. By leveraging these tools, you’re not just scheduling posts; you’re building a scalable and intelligent social media ecosystem. I encourage you to explore the possibilities, experiment with different workflows, and unlock a new level of efficiency in your digital communications.

