In the dynamic world of AI, particularly with the rapid evolution of Large Language Models (LLMs) and intelligent agents, the ability for these systems to seamlessly interact with various tools and data sources is paramount. If you’ve been in the AI space for the past year or so, you’ve undoubtedly heard the buzz around the Model Context Protocol (MCP). Many have hailed it as a game-changer, and after building numerous MCP servers and clients for our teams and B2B clients, and even incorporating it into our AI agents bootcamp, I can confidently say: they are absolutely correct.
MCP isn’t just an interesting concept; it’s a fundamental shift in how we develop and deploy AI applications. It’s about empowering your AI agents with the right context at the right time, making them exponentially more powerful and versatile. In this article, I’ll walk you through the fundamentals of MCP, explain why it’s so important, and show you how to build your own MCP servers, both with no-code tools and traditional programming.
What is the Model Context Protocol (MCP) and Why Does it Matter?
Anthropic, the creators of MCP, define it as an open protocol that standardizes how your LLM applications connect to and work with your tools and data sources. Initially, that definition might sound a bit abstract. So, let me explain it the way I came to understand it, using a simple analogy:
Imagine the early days of computing before the universal standard of the USB port. If you wanted to connect your computer to a microphone, then a webcam, and perhaps a printer, you’d likely face a nightmare of incompatible ports, specialized cables, and custom software drivers. It was complex, messy, and severely limited innovation.
The USB port changed all that. It provided a universal standard, allowing almost any device to connect and work with any other device with plug-and-play ease. This seemingly simple standardization unleashed a massive wave of innovation, making technology far more accessible and powerful.
MCP plays a similar role for AI agents. Before MCP, if you wanted to give your AI agent access to various tools and data—say, a calendar, email, a note-taking app, and a video conferencing tool for a scheduling agent—you’d have to custom-write code for each specific tool’s API. Every external system had its own unique way of interacting, leading to fragmented AI development, custom prompt logic, and custom data access for every single application. This was a significant bottleneck.
MCP standardizes these interactions. It provides a universal “plug” for your AI agents to connect with thousands of external software and data sources. This means:
- Massive Tool Expansion: The number of tools your AI agents can access, now often called MCP servers, has exploded. There are now tens of thousands of pre-built MCP servers readily available, and anyone can easily write, publish, and use them.
- Simplified Development: Instead of custom implementations for every integration, you can build MCP-compatible applications that leverage a vast ecosystem of standardized servers.
- Reusability: An MCP server you build can be reused by various AI applications—be it an AI assistant, an AI agent, or even a desktop app or IDE. Conversely, your AI application can access multiple types of MCP servers (data stores, CRMs, version control systems, etc.) with consistent interaction patterns.
The ease of use and the standardization that MCP brings are truly amazing, enabling a level of interoperability for AI that was previously a major hurdle.
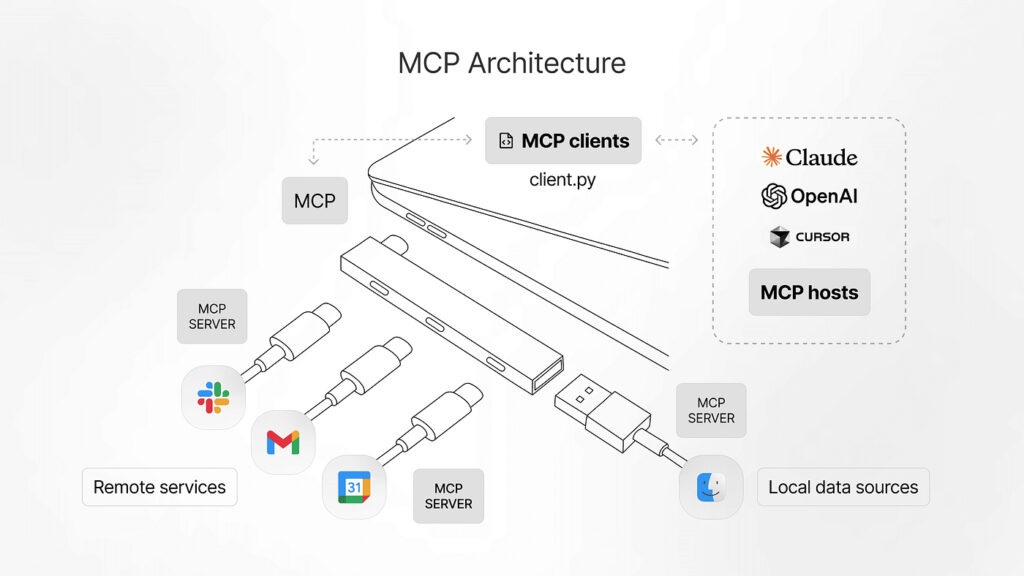
The Foundation of MCP: Host, Client, and Server (HCS) Architecture
To truly understand MCP, it’s essential to grasp its core architecture, which revolves around three key components: the Host, the Client, and the Server (HCS).
The Host
The Host is essentially your LLM application—any application that wants access to certain data or tools through MCP. Think of it as the main device where the “work” happens. Examples include:
- AI assistants like Claude Desktop
- No-code platforms like n8n
- Custom AI agents
- Integrated Development Environments (IDEs)
- Any large language model application
The host is the user-facing part, where the AI agent resides and processes requests.
The MCP Server
MCP Servers are lightweight programs that expose different capabilities, tools, and data. They are the external systems your AI agent needs to interact with. A few examples of what MCP servers can provide:
- Data Access: Real-time and historical stock data (e.g., Alpha Vantage), read-only access to PostgreSQL databases, access to Google Drive functions.
- Utility Tools: Time and time zone conversion, calculators, Gmail integration for sending messages.
- Business Systems: CRM systems, GitLab for version control, Redis for caching.
- Document Processing: Documented data processing, retrieval, and search functionalities.
These servers are the “adapters” that allow your AI to perform specific actions or retrieve specific information from external services.
The MCP Client
The MCP Client is the crucial intermediary. It lives inside the Host and is responsible for invoking the MCP protocol to maintain a one-on-one connection with the MCP Server. When your Host (LLM application) needs to use a tool or access data provided by an MCP Server, it’s the MCP Client that facilitates this communication. It translates the Host’s request into the standardized MCP format and sends it to the Server, then relays the Server’s response back to the Host.
In essence, the Host houses the MCP Client, which, via the MCP protocol, connects to and utilizes the MCP Server.
Inside an MCP Server: Tools, Resources, and Prompt Templates (TRP)
An MCP server is more than just a simple API wrapper. It encapsulates three major types of components, which I like to refer to as TRP: Tools, Resources, and Prompt Templates.
1. Tools
Tools are perhaps the most commonly understood component. These are functions and capabilities that can be invoked by the client. When your AI agent needs to do something external, it uses a tool.
- Examples: Sending a message in Gmail, performing complex calculations, retrieving specific stock market data (like
timeSeries,intraday,globalQuote), inserting or updating database records, generating reports.
These are the active functions that allow the AI to interact with and manipulate external systems.
2. Resources
Resources are read-only data exposed by the server. Unlike tools, which perform actions, resources provide information that the client can query but cannot change.
- Examples: Markdown notes, tracking logs (e.g., a history of weather data collected), database records (like contracts, meeting recordings, or specific information stored in a SQLite database), or the schema of a database.
Resources are incredibly useful for providing context, historical data, or reference information to the AI agent without requiring it to re-execute tools repeatedly. For instance, instead of calling a weather API tool every time you need historical weather data, you could query a resource that logs all past weather data points.
3. Prompt Templates
Prompt Templates are structured blueprints for prompts, designed by the server builder to guide the AI agent toward optimal output. They alleviate the burden of complex prompt engineering from the end user.
- Scenario: If an MCP server is designed to summarize meeting transcripts and generate reports, an average user might simply prompt, “Summarize this transcript and generate a report.” The results might be subpar.
- With Prompt Templates: The server builder can embed a sophisticated prompt template within the MCP server. This template might include specific instructions on how to extract key action items, identify sentiment, or structure the report, ensuring a much higher quality output. The user then only needs to input the specifics (e.g., the transcript itself) into this pre-defined, optimized template.
Prompt templates are a powerful way to embed best practices and expertise directly into the MCP server, making it more user-friendly and effective.
Consider a comprehensive SQLite MCP server example:
It could offer tools to read, insert, update, and delete information in the database. Alongside, it might include a resource that logs all historical changes to the database, providing an audit trail. Finally, it could house prompt templates that incorporate best practices for querying and interacting with that specific database, making it easier for an AI agent to extract meaningful insights without needing deep SQL knowledge.
The Communication Lifecycle and Transports
The interaction between an MCP Client and an MCP Server follows a defined communication lifecycle and leverages different transport mechanisms.
The Communication Lifecycle
- Initialization: The MCP client initiates a connection with the MCP server, signaling its intent to interact.
- Message Exchange: The client sends requests to the server (e.g., “I want to use this tool”), and the server sends back responses. This is the core phase where data and commands are exchanged.
- Termination: Once the interaction is complete, the client and server gracefully terminate their connection.
Transport Mechanisms
Transports handle the underlying mechanics of how messages are sent and received. There are two main categories:
- Local Servers: When the MCP server and host are running on the same machine, communication is often simplified. Imagine two friends cooking at home, passing notes to each other. A common transport here might be
stdout, where logs and messages are exchanged locally without complex network protocols. - Remote Servers: For servers residing on different machines or in the cloud, network protocols are necessary.
- HTTP + SSE (Server-Sent Events): This supports a stateful connection. Think of a sit-down restaurant: you order an appetizer, then a main course, then a drink, and the waiter remembers your previous orders. If you say, “I’d like the same drink again,” the server understands without needing full re-specification. The server maintains the state and memory of your interaction throughout the session.
- Streamable HTTP: This is generally the preferred method because it can support both stateful and stateless interactions. A stateless interaction is like a fast-food restaurant: each order is a new transaction; the cashier doesn’t remember your previous Big Mac order if you come back for chicken nuggets. Each request is independent. Streamable HTTP offers the flexibility to handle both scenarios, which is crucial as different AI tasks might benefit from either stateful continuity or stateless independence.
Understanding these transports becomes particularly important when you’re setting up and optimizing your MCP server implementations.
Building Your First MCP Server: A No-Code Approach with n8n
One of the most exciting aspects of MCP is its accessibility. You don’t need to be a seasoned programmer to start building powerful MCP servers. No-code platforms like n8n make it incredibly straightforward.
Let me walk you through an example of building an MCP server that integrates a calculator and Gmail, all without writing a single line of code.
Setting Up Your n8n MCP Server
- Start a New Workflow: In n8n, begin with a fresh workflow and add a “Server Trigger” node. This node will act as the entry point for your MCP server.
- Add Tools:
- Calculator Tool: Add a “Calculator” node. This provides basic mathematical capabilities to your AI agent.
- Gmail Tool: Add a “Gmail” node. Configure it to “Send” emails.
- You’ll need to set up your Gmail credentials (e.g., sign into your Google account).
- For the recipient, subject, email type (HTML), and message, set them to be “let the model decide.” This allows the AI agent connected to this MCP server to dynamically determine these parameters.
- Activate and Get Endpoint: Save your workflow. Ensure the server trigger is “Active.” n8n will provide a “Production URL”—this is your MCP server’s endpoint. Copy this URL.
Connecting Your AI Agent (Host) to the n8n MCP Server
Now, let’s see how an AI agent, for instance, running on n8n itself or Claude Desktop, can use this server.
Example 1: Using n8n as the Host
- Create a New Agent Workflow: In n8n, create another workflow for your AI agent. This might include an “AI Agent” node and an “OpenAI Chat Model” node.
- Add MCP Client: Add an “MCP Client” node to this agent workflow.
- Paste the Production URL (your MCP server endpoint) into the “Endpoint” field.
- Select
HTTP Streamableas the server transport, as it’s the recommended and most robust option.
- Test It Out: Now, prompt your AI agent. For example: “Calculate 11 * 99.”
- The AI agent will interact with the MCP Client.
- The MCP Client will recognize the need for the “calculator” tool from your n8n MCP server.
- The calculation will be performed, and the result (1089) will be returned to your agent.
- Similarly, you could prompt: “Send an email to [email protected] asking her if she wants to grab a coffee sometime.” The agent would then use the Gmail tool to compose and send the email.
Example 2: Using Claude Desktop as the Host
You can easily switch hosts. To connect your n8n MCP server to Claude Desktop:
- Enable Developer Mode: In Claude Desktop, go to “Help” and search for “developer” to enable developer mode.
- Open Config File: Under developer options, open the Claude Desktop config file.
- Add Server Configuration: Paste a configuration snippet defining your MCP server. It will look something like this:
{
  "mcp_servers": [
    {
      "name": "n8n_server",
      "endpoint": "YOURN8NPRODUCTION_URL",
      "transport": "sse" // Or "http_streamable" if supported by Claude's configuration
    }
  ]
}- Replace
YOUR_N8N_PRODUCTION_URLwith the endpoint you copied from n8n. - Save the config file and restart Claude Desktop.
- Interact with Claude: Claude will now display “n8n_server” under its tools, including “Send a message in Gmail” and “Calculator.”
- You can then prompt Claude: “Send an email to [email protected] asking her to host an octopus party.”
- Claude will ask for permission to use the “send a message in Gmail” tool from your n8n server. Once allowed, the email will be sent automatically.
This no-code approach demonstrates just how accessible and powerful MCP is, allowing you to rapidly deploy custom AI agent capabilities.
Advanced MCP Server Building with Code
While no-code platforms are fantastic for quick implementations, building MCP servers with code unlocks the full potential of TRP (Tools, Resources, and Prompt Templates). Currently, platforms like n8n might not allow you to define custom resources or hardcode specific prompt templates directly within their MCP server builders.
With a code-based approach, you gain granular control and the ability to embed sophisticated logic, custom data sources, and expert-crafted prompts.
A Code Example: Google Sheets and Forms MCP Server
Let’s consider a practical example: an MCP server designed to work with Google Sheets and Google Forms. This server would provide tools for manipulation, resources for data access, and prompt templates for analysis.
Core Functionality:
- Tools:
list_spreadsheets: To list all available spreadsheets in a Google account.read_sheet: To read data from a specific sheet.write_sheet: To write data to a sheet.append_sheet: To add new rows to a sheet.- Other tools for interacting with Google Forms (e.g., submitting responses).
- Resources:
get_sheet_resource: A read-only resource to access sheet data (e.g., column names, metadata) without full sheet reads, or logs of form submissions.
- Prompt Templates:
analyze_sheet_data: A sophisticated template for analyzing spreadsheet data and extracting insights.create_report_template: A template for generating structured reports based on sheet data.form_to_sheet_workflow: A template for automating data transfer from Google Forms to Google Sheets.
How it Works (Code Snippet Overview):
In a typical Python implementation, you might use decorators to define your MCP tools and resources.
from your_mcp_library import mcp_tool, mcp_resource, mcp_prompt_template

# Define your credentials and Google Sheets API interactions

@mcp_tool(name="list_spreadsheets", description="Lists all available Google Sheets.")
def list_spreadsheets_function():
    # ... Google API call to list spreadsheets ...
    return spreadsheet_names

@mcp_tool(name="read_sheet", description="Reads data from a specified Google Sheet.")
def read_sheet_function(spreadsheet_id: str, range_name: str):
    # ... Google API call to read sheet data ...
    return sheet_data

@mcp_resource(name="get_sheet_resource", description="Provides read-only access to sheet metadata or logs.")
def get_sheet_resource_function(spreadsheet_id: str):
    # ... Logic to retrieve sheet metadata or specific logs ...
    return sheet_metadata

@mcp_prompt_template(name="analyze_sheet_data", description="Template for analyzing sheet data.")
def analyze_sheet_data_template(sheet_data: str):
    return f"""
    You are an expert data analyst.
    Analyze the following spreadsheet data and provide key insights,
    trends, and actionable recommendations.
    Data: {sheet_data}
    Structure your analysis into sections: Summary, Key Findings, Trends, Recommendations.
    """

# ... other tools, resources, and prompt templates ...

# Then, you would run your MCP server, exposing these components.
Benefits of the Code-Based Approach:
- Custom Logic: Implement any complex logic or integration with specialized APIs.
- Full TRP Control: Directly hardcode and fine-tune your tools, expose granular resources, and embed highly optimized prompt templates.
- Scalability & Performance: Optimize server performance and scalability for demanding applications.
- Advanced Data Handling: Process and transform data extensively before exposing it to the LLM.
When running such a server, an AI agent connected as a host (like Claude Desktop) would see “G Sheets” as an available tool. It could then prompt: “List out the spreadsheets that are available.” The server’s list_spreadsheets tool would be invoked, returning a list of available Google Sheets. Following that, the agent could say: “Use read sheet to get the columns of the anonymous feedback spreadsheet,” utilizing the read_sheet tool, or even the get_sheet_resource to quickly get metadata without a full data read.
Finally, by selecting the analyze_sheet_data prompt template and providing the target spreadsheet, the agent could trigger a complex analysis, leveraging the pre-defined expert instructions within the template to generate a structured dashboard or report.
Conclusion: The Endless Possibilities of MCP
The Model Context Protocol is truly transformative for AI development. It shifts AI application building from fragmented, custom integrations to a standardized, plug-and-play ecosystem. By understanding the Host-Client-Server architecture, and leveraging the power of Tools, Resources, and Prompt Templates within MCP servers, we can build significantly more capable, context-aware, and intelligent AI agents.
Whether you choose the rapid development path with no-code tools like n8n or dive into the nuanced control of a code-based implementation, the ability to create your own MCP servers opens up a world of possibilities. You can connect your agents to virtually any external system, providing them with rich context and functionality that was once painstakingly difficult to achieve.
I highly encourage you to explore Anthropic’s deeplearning.AI course on MCP for step-by-step code implementation details, or if you’re interested in containerized deployment, Network Chuck’s video on using Docker for MCP. The journey into building your own MCP servers is rewarding and will undoubtedly empower you to build more sophisticated AI applications than ever before. The future of AI interaction is standardized, and MCP is leading the way.