We have all been there. You discover a tool like Google’s NotebookLM, and it feels like magic. Suddenly, you have a free AI research assistant that can digest your documents, answer complex questions, and even generate a podcast where two AI hosts banter about your PDF files. It’s incredible.
But then, the realization hits.
To use it, you have to upload your data to the cloud. For casual reading, that’s fine. But what about your proprietary business strategies? Your unpublished research? Or sensitive legal documents? That is where the hesitation kicks in. We want the intelligence of these tools, but we crave the security of keeping our data on our own machines.
I have been exploring open-source solutions to this exact problem, and I’ve found something that bridges the gap perfectly. In this guide, I’m going to introduce you to Open Notebook, a powerful, privacy-focused alternative that gives you the features you love—including podcast generation—while keeping your data strictly under your control.
Why you need a local research assistant
Before we dive into the installation, let’s talk about why making the switch to a local tool matters. It’s not just about paranoia; it’s about ownership.
When you use a fully local alternative like Open Notebook (or its cousin, Hyperbook LM), you are building a “cognitive partner.” You aren’t just a user; you are the admin. You get:
- Total Privacy: Your documents never leave your local environment unless you explicitly send them to an API you trust.
- Model Flexibility: Unlike Google’s walled garden, you can choose your brain. Want to use GPT-4? Gemini? A local Llama model? You decide.
- Customization: You get granular control over context, prompt templates, and output formats that standard tools simply don’t offer.
Getting started with Open Notebook
The beauty of Open Notebook is that, despite being open source, it is surprisingly user‑friendly to set up with Docker. You do not need to be a developer; you just need Docker installed and a few minutes to run the container.
Prerequisites
To get Open Notebook running, you only need a few core components:
- Docker or Docker Desktop
Docker is the engine that runs the application container and SurrealDB database. Make sure Docker is installed and running before you continue. - AI Provider API Keys
Open Notebook is “bring your own key”: it supports 16+ providers, including OpenAI, Anthropic, Google (Gemini), Ollama, LM Studio, and more.
You can start with just an OpenAI or Gemini key, and later add others for embeddings, TTS, or STT. - Available ports and disk space
Ensure ports 8502 (web UI) and 5055 (API) are free, and that you have at least 10 GB of free disk space for your notebooks and database.
Quick Docker setup
The recommended way to run Open Notebook is via Docker, using the single‑container image lfnovo/open_notebook:v1-latest-single. This image bundles the frontend, API, background worker, and SurrealDB in one container.
1. Create a project folder
Create a folder on your machine where Open Notebook can store its data:
mkdir open-notebook && cd open-notebookThis folder will hold:
notebook_data/– your notebooks, uploads, and research contentsurreal_data/– SurrealDB database files
2. Run the container
Run the following command, replacing your_key_here with your own API key:
docker run -d \
  --name open-notebook \
  -p 8502:8502 -p 5055:5055 \
  -v ./notebook_data:/app/data \
  -v ./surreal_data:/mydata \
  -e OPENAI_API_KEY=your_key_here \
  lfnovo/open_notebook:v1-latest-single
What this command does:
- Exposes port 8502 for the web interface.
- Exposes port 5055 for the FastAPI backend, which is required for the app to function.
- Mounts
./notebook_dataand./surreal_dataso your content and database survive container restarts. - Passes your
OPENAI_API_KEYinto the container so Open Notebook can call the OpenAI API.
If you are running on a remote server (VPS, NAS, Proxmox, etc.) and will access it from another device, add the API_URL environment variable:
-e API_URL=http://YOUR_SERVER_IP:5055For example, if you access the UI at http://192.168.1.100:8502, set:
API_URL=http://192.168.1.100:5055Avoid using localhost in API_URL when running on a remote machine, as it will only work from inside the container itself.
3. Access the interface
Once the container is running, open your browser and navigate to:
- Local machine:
http://localhost:8502 - Remote server:
http://YOUR_SERVER_IP:8502
If you see a blank page or connection error, double‑check that Docker is running and that both ports 8502 and 5055 are exposed correctly.
Using Docker Compose
If you prefer a more maintainable setup, you can use Docker Compose instead of a single docker run command.
Create a docker-compose.yml file in your open-notebook folder:
services:
  open_notebook:
    image: lfnovo/open_notebook:v1-latest-single
    # Or: ghcr.io/lfnovo/open-notebook:v1-latest-single
    container_name: open-notebook
    ports:
      - "8502:8502"   # Web UI
      - "5055:5055"   # API (required)
    environment:
      - OPENAI_API_KEY=your_key_here
      # For remote access from other devices, set:
      # - API_URL=http://YOUR_SERVER_IP:5055
      - SURREAL_URL=ws://localhost:8000/rpc
      - SURREAL_USER=root
      - SURREAL_PASSWORD=root
      - SURREAL_NAMESPACE=open_notebook
      - SURREAL_DATABASE=production
    volumes:
      - ./notebook_data:/app/data
      - ./surreal_data:/mydata
    restart: always
Then start Open Notebook with:
docker compose up -dThis will:
- Start SurrealDB on port 8000 (inside the container).
- Start the FastAPI backend on port 5055.
- Start the React/Next.js frontend on port 8502.
When everything is up, open http://localhost:8502 or http://YOUR_SERVER_IP:8502 to use the app.
To stop the stack:
docker compose downTo stop and remove all data volumes (fresh reset):
docker compose down -vAfter installation: configure your AI “brain”
The first time you open Open Notebook, nothing will work until you configure at least one AI provider.
- Go to Settings → Model Providers.
- Add API keys for providers you use (OpenAI, Gemini, Anthropic, Ollama, LM Studio, ElevenLabs, etc.).
- Choose:
- a language model (e.g. GPT‑4o, Gemini 1.5)
- an embedding model (e.g.
text-embedding-3-largeor a local Ollama embedding model) - optional TTS and STT providers if you want podcast generation and voice input.
Once your models are configured, you can create your first notebook, add sources (PDFs, docs, web pages, videos, audio), and start chatting, generating insights, and creating podcasts—all running on your own infrastructure.
Creating your first notebook
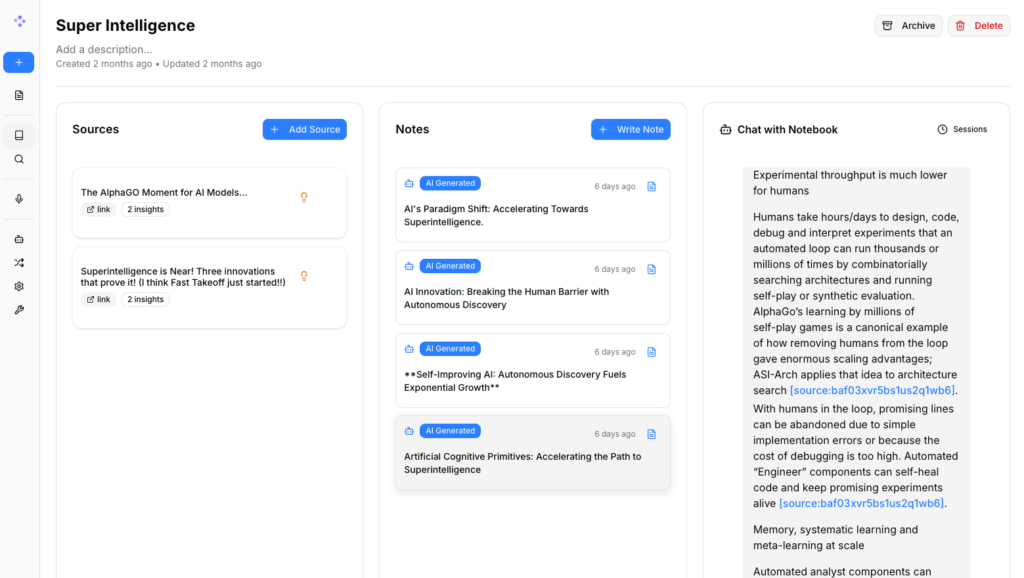
The workflow here feels very familiar. You create a “Source,” which acts as a container for your knowledge. You can upload PDF files, text documents, or even paste links.
I tested this by uploading a document detailing the content strategy for a YouTube channel. The indexing speed was impressive. The moment the file is uploaded, the embedding model scans it, and you can immediately start chatting.
Unlocking deep insights
One feature I absolutely love in Open Notebook is the Insights tab. It goes beyond simple chat. You can click a button to generate specific “transformations” of your content, such as:
- Paper Analysis: Breaks down purpose, key findings, and implications.
- Study Guides: Automatically generates reflection questions.
- Table of Contents: Great for navigating long, dense reports.
It feels genuinely intelligent because it is grounded strictly in the source material you provided.
The podcast generation feature
This is the feature that took the internet by storm, and Open Notebook replicates it beautifully.
In the Podcast tab, you aren’t stuck with a single “host” persona. You have templates. You can choose a “Business Panel” for a corporate vibe, a “Solo Expert” for a lecture style, or a “Tech Discussion” for a deep dive.
I ran a test using the “Tech Discussion” template on my uploaded channel documentation.
- The Cost: It cost me about $0.46 to generate a 32-minute podcast using high-quality models. That is negligible for the value provided.
- The Quality: The result was shocking. It created a two-person dialogue where one speaker acted as the “Doctor” breaking down concepts, and the other provided color commentary. It accurately pulled specific details from my documents, discussing “reproducible artifacts” and “production-oriented tutorials.”
It wasn’t just reading text; it was synthesizing a conversation.
A second option: HyperbookLM
While Open Notebook is fantastic, I want to give you a complete picture of the landscape. There is another player called HyperbookLM.
Hyperbook is also open-source and local, but it leans into different strengths.
- Web Scraping: It has a “Hyper Browser” for better live-web context.
- Visuals: It can generate mind maps and even slide decks from your research.
- Audio Quality: It integrates with ElevenLabs, which offers arguably the best AI voice synthesis on the market right now.
However, Hyperbook LM requires a bit more elbow grease to install. You will likely need to clone the repository using Git and run command-line prompts to install dependencies. If you are comfortable with a terminal window, it’s worth exploring for the visual features alone.
Which one should you choose?
If you are looking for a direct, privacy-respecting alternative to Google’s tool that is easy to install via Docker, Open Notebook is my top recommendation. It is stable, creates amazing audio, and the “Insights” tab is a massive productivity booster for researchers and students.
If you need visual aids like mind maps or slides and don’t mind a slightly more complex installation, Hyperbook LM is a strong contender.
The bottom line is that we are no longer dependent on big tech companies to hold our hand (and our data) for AI research. With these local tools, you get the power of a supercomputer with the privacy of a locked filing cabinet.
Give Open Notebook a try this weekend. Your privacy—and your productivity—will thank you.