In the world of automation, webhooks are incredibly powerful tools. They act as the trigger for countless workflows, connecting different systems and allowing your applications to communicate seamlessly. However, with great power comes great responsibility – and significant risk if not properly secured. I’ve seen firsthand the potential fallout of unprotected webhooks, from unexpected financial burdens due to misused API calls to the alarming prospect of sensitive data falling into the wrong hands.
The core issue is simple: when an n8n webhook is active, it has a public production URL. This means anyone with access to that endpoint can potentially trigger your workflow. If your automation interacts with services that incur costs, like large language models (LLMs) from OpenAI or Open Router, an attacker could trigger millions of requests, leaving you with a hefty bill. Beyond financial implications, consider scenarios where your agent is integrated with critical tools like databases, knowledge bases, or CRM systems. An exposed webhook could become a direct conduit to your most sensitive information.
While it’s wise to construct a unique and complex webhook path to make it harder to guess, a robust path alone isn’t a silver bullet. If someone does manage to discover your publicly facing webhook, the real defense lies in implementing strong authentication. I’ve found that understanding and applying the right authentication methods is crucial for safeguarding your n8n automations. Let’s dive into the three primary ways you can secure your webhooks: Header Authentication, Basic Authentication, and JSON Web Token (JWT) Authentication.
Understanding the Inherent Risks of Open Webhooks
Before we delve into solutions, it’s vital to grasp the gravity of the problem. An unsecured webhook endpoint is essentially an open door to your backend processes.
Financial Exposure
Imagine an n8n workflow designed to interact with a generative AI service. Each interaction might cost a fraction of a cent, but these costs add up quickly. If an unauthorized party continuously triggers your webhook, they could rack up thousands, even millions, of these micro-transactions. What might seem like a negligible per-request cost can quickly escalate into a substantial, unexpected bill, especially if you wake up to a $500 charge for an agent that was supposed to be running only a few times a day.
Data Security and Privacy Breaches
Beyond financial risk, there’s the critical concern of data security. Many n8n workflows are designed to interact with sensitive systems. Your automation might pull data from a customer relationship management (CRM) system, update records in a database, or query an internal knowledge base. If an attacker gains unauthorized access to your webhook, they could potentially:
- Extract sensitive data: By crafting specific requests, they might trick your workflow into revealing confidential customer information, proprietary business data, or internal documents.
- Manipulate data: In some cases, they could even trigger actions that modify or delete data within your integrated systems.
- Disrupt operations: Maliciously triggered workflows could flood your systems, leading to denial-of-service conditions or operational disruptions.
This is why simply having a hard-to-guess URL isn’t enough. Implementing a strong authentication layer is the foundational step in protecting your valuable resources and ensuring the integrity of your data.
Download workflow: https://romhub.io/n8n/Webhook_ProtectionMethod 1: Implementing Header Authentication for Your n8n Webhooks
Header authentication is often the simplest and most universally applicable method for securing your webhooks. It operates on a similar principle to how you might interact with many external APIs: you send a specific key or password within the HTTP request headers to prove your identity.
How Header Authentication Works
When you make a request to an API (like Perplexity AI or OpenWeather), you typically include an API key in the request headers. This key serves as your credential, authenticating your request against their server. With Header Authentication for your n8n webhook, you become the server. You define a specific key-value pair that must be present in the incoming request’s headers for the webhook to process it.
Setting Up Header Authentication in n8n
- Select “Header Auth”: Within your webhook node settings, choose “Header Auth” as the authentication type.
- Define Key and Value: You’ll be prompted to create a new authentication entry. Here, you’ll specify the
Key(e.g.,X-API-Key,Authorization, or simplysecret-key) and its correspondingValue(e.g., a long, complex string likekjh234jkh3g4jh3g4jh34gkj3hg4). - Save: Once saved, your webhook is now secured.
Practical Application
Let’s say you’ve set your header key as secret-key and the value as my-super-secret-password. If someone tries to hit your webhook URL without including this header, or with an incorrect value, n8n will immediately reject the request with an “authorization data is wrong” error.
However, if they include the header secret-key: my-super-secret-password in their POST or GET request, your n8n workflow will successfully receive and process the data.
When to Use Header Authentication
- Simplicity: It’s straightforward to set up and manage.
- Universal Compatibility: Most platforms and programming languages allow you to easily add custom headers to HTTP requests, making it highly versatile for various integrations.
- API Key Analogy: If you’re building a system that acts like an internal API for other services, this method aligns well with standard API key practices.
Header authentication provides a good baseline level of security for many common webhook use cases.
Method 2: Leveraging Basic Authentication for Webhook Security
Basic authentication is another common method, quite similar to header authentication but with a more standardized structure involving a username and password.
How Basic Authentication Works
Instead of an arbitrary key-value pair, Basic Authentication uses a predefined structure: a username and a password. When a client makes a request, these credentials are encoded (specifically, base64 encoded) and sent in the Authorization header, prefixed with “Basic “. The server (your n8n webhook) then decodes and verifies these credentials.
Setting Up Basic Authentication in n8n
- Select “Basic Auth”: In your webhook node’s authentication settings, choose “Basic Auth.”
- Define Username and Password: You’ll be prompted to enter a
Username(e.g.,webhook_user) and aPassword(e.g.,securePassword123). - Save: Once configured, n8n expects these credentials in every incoming request.
Practical Application
If your workflow is listening for requests and someone attempts to access it without providing the correct basic authentication credentials, they will receive an “authorization is required” response.
To successfully interact with your webhook, the client would need to include an Authorization header containing the base64-encoded username and password. Most HTTP client tools (like Postman or cURL) have built-in support for Basic Authentication, simplifying this process.
Header Auth vs. Basic Auth: When to Choose Which
The main difference between Header Auth and Basic Auth often comes down to compatibility and convention:
- Basic Auth: Often preferred when integrating with legacy systems or platforms that have built-in support for Basic Auth, as it’s a very established standard. If the system sending data to your webhook already uses Basic Auth for other purposes, it might be the most convenient option.
- Header Auth: Generally more universal and customizable. You can define any key name, offering more flexibility. Since most modern HTTP clients can easily add custom headers, it’s widely applicable and often my go-to for new integrations where no specific legacy constraint exists.
While both provide a similar level of “key-value” pair security, the choice often depends on the specific requirements of the system initiating the webhook request.
Method 3: Advanced Security with JSON Web Token (JWT) Authentication
For more sophisticated security needs, particularly when you need to embed user-specific information or enforce more granular access controls, JSON Web Token (JWT) authentication is the gold standard. It might seem a bit more complex initially, but its power lies in its ability to carry a “payload” of data securely.
What JWT Offers Beyond Basic Authentication
Unlike Header or Basic Auth, which simply verify a credential, JWTs allow you to:
- Capture a Payload: A JWT can contain structured data about the user or client making the request (e.g.,
name,email,user_id,admin: true/false). This “payload” is signed, making it tamper-proof. - Identify Users: You can know who is accessing your webhook, not just that someone with the right credentials is.
- Track Sessions and Usage: With the embedded data, you can track how many times a specific user or application accesses your backend service, when, and from where.
- Granular Access Control: Based on the information in the payload, your n8n workflow can dynamically decide what actions the user is authorized to perform. For example, an admin user might get access to certain sensitive operations, while a regular user is restricted.
- Time-Limited Access: JWTs can have an expiration time, ensuring that even if a token is compromised, it only remains valid for a limited duration.
How JWT Authentication Works
A JWT is essentially a compact, URL-safe string composed of three parts, separated by dots:
- Header: Specifies the algorithm (e.g., HS256) and type of token.
- Payload: Contains the claims (the data you want to store, like user ID, roles, etc.).
- Signature: Created by encoding the header and payload with a secret key. This signature is crucial because it verifies that the token hasn’t been tampered with and was issued by a legitimate source (i.e., your application or identity provider).
When an authorized client generates a JWT using your secret, they send this token in the Authorization header, usually as a “Bearer Token.” Your n8n webhook, knowing the same secret, can then verify the signature and decode the payload, accessing the embedded user information.
Setting Up JWT Authentication in n8n
- Generate a JWT Secret: You’ll need a strong, random secret key. Tools like
jwt.iocan help visualize tokens and their secrets, though for production, your secret should be generated securely.
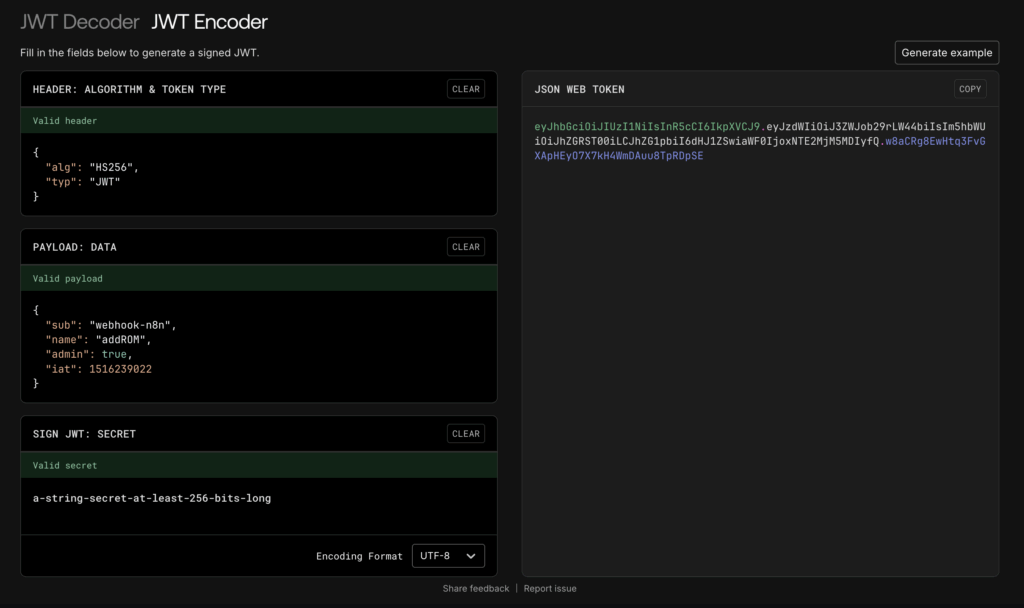
- Select “JWT Auth”: In your webhook node’s authentication settings, choose “JWT Auth.”
- Configure Token Details:
- Key Type: Often “Passphrase.”
- Algorithm:
HS256is a common and secure choice, aligning with what many JWT libraries use. - Secret: This is where you paste the secret key generated in step 1.
- Save: Your n8n webhook is now configured to expect and validate JWTs.
Practical Application
When an authorized client makes a request to your n8n webhook, they will typically include an Authorization header with the format Bearer [your_jwt_token].
Upon receiving the request, n8n performs two critical checks:
- Signature Verification: It uses the configured secret key to verify the JWT’s signature. If the signature is invalid (meaning the token was tampered with or issued by a different secret), the request is rejected.
- Payload Extraction: If the signature is valid, n8n automatically decodes the payload from the JWT. This payload becomes accessible within your workflow, allowing you to use its data for conditional logic.
For example, your workflow can then inspect the admin flag from the JWT payload:
- If
administrue, route the request to an agent with administrative privileges. - If
adminisfalse, route it to a standard user agent.
This allows for highly dynamic and secure routing, ensuring that only authorized individuals can access specific functionalities based on their defined roles within the token. You can also use the embedded email or user_id to log activity, track usage patterns, or cross-reference with your internal user management systems.
When to Use JWT Authentication
- Multi-User Environments: When different users need varying levels of access to your webhook functionality.
- Auditing and Tracking: If you need to log specific user actions or track individual usage of your services.
- Microservices Architectures: For secure communication between different internal services where identity and authorization are critical.
- Time-Limited Access: When you want tokens to expire after a certain period, enhancing security by reducing the window of opportunity for compromised tokens.
While it requires a bit more initial setup, the power and flexibility of JWT make it indispensable for advanced and enterprise-grade webhook security.
Choosing the Right n8n Webhook Security Strategy
The best authentication method depends on your specific use case, the sensitivity of the data, and the complexity of your integration.
- For simple, one-off integrations where a shared secret is sufficient, Header Authentication is often the easiest and most practical choice. It’s flexible and widely supported.
- If you’re integrating with older systems or platforms that natively support username/password flows, Basic Authentication might be the most convenient.
- For robust, multi-user applications requiring granular access control, user identification, and session management, JWT Authentication is the clear winner. It adds a layer of intelligence to your authentication that goes beyond simple access gates.
My advice is always to start with the simplest secure option that meets your needs. However, as your automations grow in complexity and interact with more sensitive data or services, don’t hesitate to upgrade to a more sophisticated method like JWT. The small investment in learning and implementation now can save you significant headaches and costs down the line.
Conclusion
Securing your n8n webhooks isn’t an optional add-on; it’s a fundamental requirement for responsible automation. The risks of unprotected endpoints—from racking up unexpected bills with AI services to exposing critical business data—are too significant to ignore. By understanding and implementing Header, Basic, or JWT authentication, you can transform a potential vulnerability into a robust and reliable component of your automated workflows.
I hope this deep dive into n8n webhook security empowers you to build more secure and resilient automations. Taking these proactive steps ensures peace of mind, allowing you to leverage the full power of n8n without the lurking fear of unintended consequences. Always prioritize security; your data and your wallet will thank you.