Have you ever spent hours trying to create a polished screen recording only to watch your hours of work get bogged down by sluggish playback, jerky cursor movements, and poor audio quality? Or worse, have you struggled to direct your viewer’s attention to the right part of your screen while editing in a clunky timeline interface? You’re not alone. Screen recording has become essential for content creators, educators, and professionals—but most tools require extensive manual work to make videos look professional.
Screen Studio changes the game entirely. This premium macOS screen recorder automatically transforms your raw recordings into cinema-quality videos with smooth animations, intelligent zoom effects, and professional-grade audio enhancement—all without requiring you to learn complex editing software. In this comprehensive guide, we’ll explore exactly how Screen Studio works, walk you through installation, demonstrate its powerful features, and show you why thousands of professionals have made it their go-to screen recording solution.
What is Screen Studio?
Screen Studio is an opinionated, premium screen recording application built exclusively for macOS that makes your videos look beautiful with minimal effort. Rather than trying to be a full-featured video editing suite like Camtasia or Adobe Premiere, Screen Studio focuses obsessively on doing one thing exceptionally well: transforming ordinary screen recordings into polished, engaging videos that capture and maintain viewer attention.
The Philosophy Behind Screen Studio
The core philosophy is elegantly simple: professional videos shouldn’t require professional skills. Instead of forcing users to manually adjust zoom levels, smooth out jerky cursor movements, or spend hours editing in a timeline, Screen Studio uses intelligent automation to handle these tasks automatically. The result is that you can record a messy, unedited screen session and export a polished final video that looks like it was created by a professional videographer.
Key Features That Make Screen Studio Stand Out
Automatic Zoom with Manual Control:
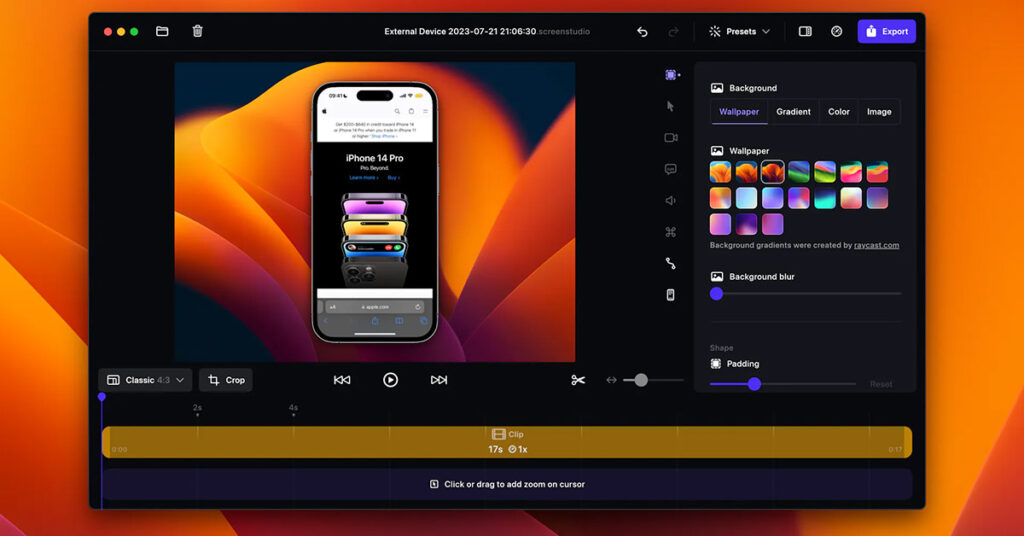
Screen Studio’s signature feature automatically detects where the action is happening on your screen and zooms in smoothly to keep viewers focused. For important sections you want to highlight, you can manually add zoom points on the timeline, and the app automatically animates the transition. When exporting for vertical video formats (like TikTok or Instagram Reels), Screen Studio adjusts all zoom animations for optimal mobile viewing.
Smooth, Beautiful Cursor Movement:
The notorious “jittery cursor” problem that plagues basic screen recorders is solved with Screen Studio’s intelligent cursor smoothing. Rapid, shaky mouse movements are transformed into fluid, graceful animations. You can even adjust cursor size after recording, change it to different styles, and enable motion blur for extra cinematic effects.
Professional Audio Enhancement:
Recorded audio is automatically enhanced with voice volume normalization and background noise removal. The app can record system audio, microphone input, or both. A unique feature generates transcripts of your speech and can add them as subtitles to your video—all processed locally on your Mac without sending data to external servers.
Webcam and iOS Device Recording:
Record your face as a picture-in-picture overlay that automatically repositions to avoid covering your cursor. You can also record directly from your iPhone or iPad, with Screen Studio automatically detecting the device model for proper display formatting.
Customizable Branding:
Personalize your videos with custom backgrounds, spacing, shadows, and inset styling to match your brand. This is invaluable for course creators and businesses maintaining consistent visual identity across their content.
Built-in Video Editing:
While not as comprehensive as dedicated video editors, Screen Studio includes essential editing capabilities: cutting sections from your timeline, adjusting zoom points, modifying audio levels, and adding keyboard shortcut displays for tutorials.
Who Benefits From Screen Studio?
- Educators and Course Creators: Create engaging tutorials and online courses with automatic zoom highlighting key concepts
- Product Managers and Entrepreneurs: Record smooth product demos for investors, stakeholders, and marketing teams
- Software Developers: Document bug fixes, feature demonstrations, and onboarding processes
- Marketing Teams: Create promotional content and social media videos without professional video editing skills
- Business Professionals: Record training materials, presentations, and internal documentation
- Content Creators: Produce YouTube tutorials, Twitch streams, and social media content
System Requirements and Compatibility
Before installing Screen Studio, verify your Mac meets the minimum requirements:
Required:
- Operating System: macOS Ventura 13.1 or later
- Processor: Apple M1 or later (recommended) or Intel-based Mac from 2018+ (MacBook Pro 2018 or later, MacBook Air 2020 or later)
- Memory: 8GB RAM minimum
To check your Mac’s specifications:
- Click the Apple logo in the top-left corner
- Select About This Mac
- Verify your macOS version, processor type, and RAM
The app is approximately 242.1 MB and supports both Intel and Apple Silicon architectures.
Download
- Screen Studio 3.5.0-4019 (ARM).dmg | Backup
- Screen Studio 3.5.0-4019 (Intel).dmg | Backup
- Screen Studio 3.4.2-3726 (ARM).dmg | Backup
- Screen Studio 3.4.2-3726 (Intel).dmg | Backup
- Screen Studio 3.1.0 (ARM).dmg | Backup
- Screen Studio 3.1.0 (Intel).dmg | Backup
How to Install Screen Studio on macOS
Installing Screen Studio is straightforward and takes just a few minutes. Follow these steps carefully.
Step 1: Download the .DMG file that matches your Mac type — either Apple Silicon or Intel.
Step 2: Open the .DMG file and drag the Screen Studio app into your /Applications folder.
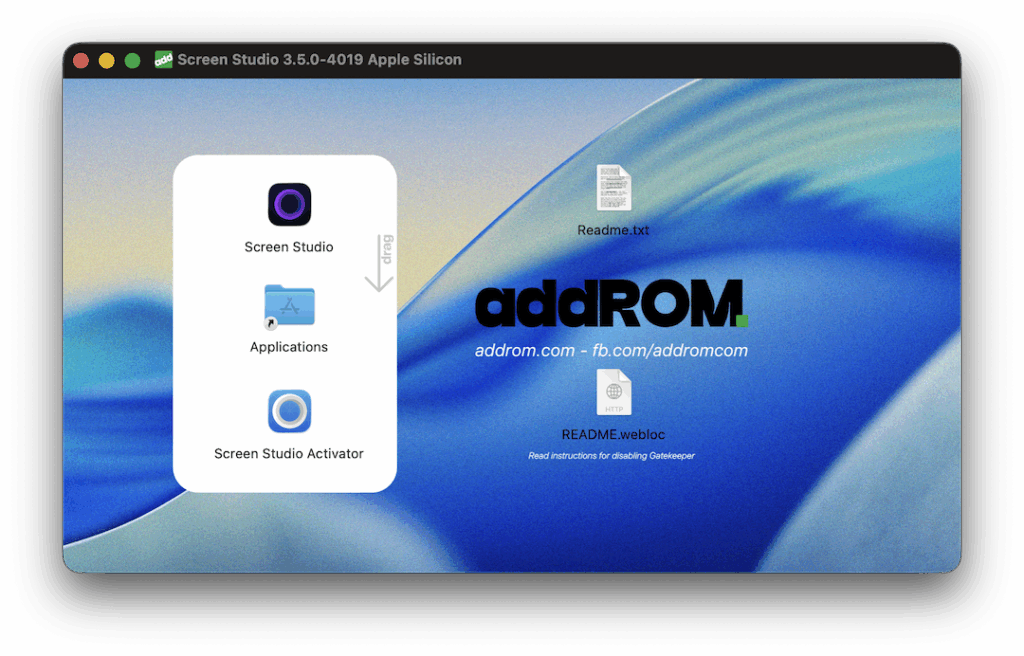
Step 3: Launch the Screen Studio app for the first time.
Step 4: Edit the /etc/hosts file in Terminal by adding the following lines:
127.0.0.1 api.lemonsqueezy.com
127.0.0.1 screen.studio
Step 5: Open the Screen Studio Activator file to activate the application.
Common Installation Issues
Issue: “Screen Studio can’t be opened because the developer cannot be verified”
Solution:
# Open Terminal and run:
xattr -d com.apple.quarantine /Applications/Screen\ Studio.app

# Then try opening Screen Studio again
Issue: Screen recording permission denied
Solution:
- System Settings → Privacy & Security → Screen Recording
- Remove and re-add Screen Studio
- Restart Screen Studio
Issue: Microphone or webcam not detecting
Solution:
- Verify that no other application is using the microphone/camera exclusively
- Grant Screen Studio microphone access in System Settings → Privacy & Security → Microphone
- Restart Screen Studio
Advanced Tips and Tricks
Tip 1: Use the Keyboard Shortcut Display Creatively
Don’t just show basic typing—keyboard display works for any keystroke your viewers might find helpful:
- Cmd+S (save)
- Cmd+Z (undo)
- Cmd+F (find)
- Terminal commands
This transforms viewers from passive watchers to active learners who can follow your workflow.
Tip 2: Master Automatic Zoom for Storytelling
Rather than letting Screen Studio’s automatic zoom fully control the narrative, use manual zoom points to guide viewers:
- Zoom on a button you’re about to click just before clicking it
- Zoom out periodically to show the big picture
- Create dramatic reveals by zooming into important information
This combines automation convenience with intentional storytelling.
Tip 3: Record Interviews by Combining Webcam and System Audio
For interview-format content:
- Enable both webcam recording and system audio
- Position the webcam overlay in corner to show your reactions
- Record the interviewee’s audio through your Mac speakers/headphones
- Result: Professional interview-style video with both parties visible or audible
Tip 4: Use Vertical Export for Maximum Social Media Impact
When creating content for TikTok, Instagram Reels, or YouTube Shorts:
- Record in standard format (doesn’t matter—you’ll export vertical)
- During export, select “Vertical Mode”
- Screen Studio automatically reframes zooms and compositions for vertical viewing
- Export MP4 and upload directly to social platforms
Tip 5: Transcription for SEO and Accessibility
Screen Studio’s automatic transcription feature is gold for content creators:
- After recording, check “Generate Transcript”
- Screen Studio transcribes your audio locally (no data sent externally)
- Option to display transcript as subtitles in final video
- Copy transcript for video description, blog post, or social media captions
- Improves SEO (Google indexes transcripts) and accessibility (deaf/hard of hearing viewers)
Tip 6: Batch Exporting Multiple Versions
For maximum distribution, export the same recording in multiple formats:
- Record once
- Export 1080p version for YouTube
- Export 720p version for Twitter/X
- Export vertical format for TikTok
- Export for specific social platform with optimized settings
This maximizes reach without multiple recording sessions.
Troubleshooting Common Issues
Issue: Recording Stutters or Drops Frames
Cause: Your Mac is running too many background applications or insufficient disk space
Solutions:
- Close unnecessary applications before recording
- Free up at least 5-10GB of disk space
- Record to external SSD instead of internal drive
- Reduce recording resolution temporarily
- Restart your Mac before important recordings
Issue: Microphone Records Very Quietly
Cause: Microphone input level set too low or hardware issue
Solutions:
- In Screen Studio settings, increase microphone input level before recording
- Test microphone in System Settings → Sound → Input
- Use external USB microphone for better input levels
- Enable “Enhance Audio” during editing to normalize volume levels
Issue: Audio/Video Out of Sync
Cause: Rare but can occur with certain system audio setups
Solutions:
- Update macOS to latest version
- Update Screen Studio (Help → Check for Updates)
- Record microphone separately instead of system audio
- Try restarting your Mac and Screen Studio
Issue: Export Takes Extremely Long
Cause: Exporting high resolution from Mac with limited resources
Solutions:
- Use lower export resolution (1080p instead of 4K)
- Export H.264 instead of ProRes (faster)
- Free up disk space and close background apps during export
- Export to external SSD for faster processing
- Apple Silicon Macs export significantly faster than Intel
How Screen Studio Compares to Alternatives
While we love Screen Studio, let’s be objective about how it compares to other popular screen recording tools:
Screen Studio vs. Loom
| Aspect | Screen Studio | Loom |
|---|---|---|
| Auto-Zoom | ✅ Excellent | ⚠️ Basic |
| Cursor Effects | ✅ Advanced smoothing & customization | ⚠️ Basic |
| Editing | ✅ Built-in, intuitive | ⚠️ Limited |
| Platform | ❌ macOS only | ✅ Cross-platform |
| Free Plan | ❌ No | ✅ Limited (5 min, 25 videos) |
| AI Features | ✅ Coming soon | ✅ Automatic chapters, summaries |
Verdict: Screen Studio wins for macOS users wanting professional polish with minimal effort. Loom wins for teams requiring cross-platform and free options.
Screen Studio vs. Camtasia
| Aspect | Screen Studio | Camtasia |
|---|---|---|
| Learning Curve | ✅ Very gentle | ❌ Steeper (complex interface) |
| Automatic Effects | ✅ Extensive auto-magic | ⚠️ Manual configuration |
| Editing Power | ⚠️ Good for basics | ✅ Professional-grade |
| Platform | ❌ macOS only | ✅ Windows & macOS |
| Performance | ✅ Fast, responsive | ⚠️ Can be sluggish |
Verdict: Screen Studio for quick, beautiful recordings. Camtasia for complex editing needs and cross-platform requirements.
Screen Studio vs. OBS (Open Broadcaster Software)
| Aspect | Screen Studio | OBS |
|---|---|---|
| Ease of Use | ✅ Very beginner-friendly | ❌ Steep learning curve |
| Automatic Effects | ✅ Extensive | ❌ None (manual only) |
| Professional Output | ✅ Beautiful by default | ⚠️ Requires extensive tweaking |
| macOS Support | ✅ Native, optimized | ⚠️ Works but less smooth |
| Streaming | ⚠️ Limited | ✅ Excellent for live streaming |
Verdict: Screen Studio for professional-looking videos with zero learning curve. OBS for free, customizable setup and live streaming.
Conclusion: Making Professional Videos Effortless
Screen Studio represents a fundamental shift in screen recording—from “how do I make this look professional?” to “how do I make this look less professional?” The automatic zoom, smooth cursor movement, and intelligent audio enhancement transform raw recordings into polished videos that make you look like a professional videographer, even if you’ve never edited a video in your life.