Managing remote servers can be cumbersome with traditional SSH tools. Whether you’re a system administrator juggling multiple connections, a developer deploying applications, or a tech enthusiast managing infrastructure, the right SSH client makes all the difference. Enter Termix, a modern, self-hosted, open-source server management platform that revolutionizes how you connect to and manage remote servers.
Unlike outdated tools like PuTTY or basic OpenSSH implementations, Termix SSH client combines a full-featured terminal, file manager, tunneling capabilities, and server monitoring in one intuitive interface. What makes Termix stand out is its emphasis on security, ease of use, and cross-platform support. Whether you’re working on Windows, macOS, Linux, or even iOS and Android, Termix provides a consistent, powerful experience for remote server access.
In this guide, we’ll explore everything you need to know about installing and using Termix. You’ll learn how to set it up on your system, create and manage SSH connections, leverage advanced features like session management and file transfers, and discover why thousands of developers and administrators are switching to this modern alternative. By the end, you’ll be equipped to streamline your server management workflow with a tool that prioritizes both functionality and security.
What is Termix?
Termix is an open-source, forever-free, self-hosted server management platform designed to simplify remote server administration. It’s the perfect alternative to commercial tools like Termius, offering powerful features without vendor lock-in or subscription costs.
Key Features of Termix SSH Client
Termix delivers a comprehensive feature set for server professionals:
- SSH Terminal Access – Full-featured terminal with split-screen support (up to 4 panels) and browser-like tabbed sessions. Customize terminal themes, fonts, and appearance to match your workflow.
- SSH Tunneling – Create and manage secure SSH tunnels with automatic reconnection and health monitoring for uninterrupted connectivity.
- Remote File Manager – Upload, download, rename, delete, and move files on remote servers. Preview images, audio, and video files directly in the interface, with code editing capabilities.
- SSH Host Manager – Save and organize SSH connections with tags and folders. Automate SSH key deployment and manage reusable login credentials securely.
- Server Statistics – Monitor CPU, memory, and disk usage in real-time. View network performance, uptime, and comprehensive system information at a glance.
- Secure User Authentication – Multi-user support with admin controls, OIDC integration, and two-factor authentication (2FA via TOTP) for enterprise-grade security.
- Data Encryption – All backend data stored in encrypted SQLite databases for maximum security.
- Multi-Platform Support – Available as a web app, desktop application (Windows, macOS, Linux), and mobile apps for iOS and Android.


Why Choose Termix Over Traditional SSH Tools?
Traditional SSH clients like PuTTY offer basic terminal functionality, but they lack the modern features today’s infrastructure professionals expect. Termix provides a unified platform for SSH access, file management, and server monitoring—eliminating the need for multiple tools. Its self-hosted nature means your data stays under your control, and its open-source licensing ensures transparency and community-driven development.
Installation Guide
Termix supports multiple installation methods across different platforms. Follow the instructions for your operating system below.
Prerequisites
- A modern web browser (Chrome, Firefox, Safari) or a compatible desktop/mobile device
- For desktop: macOS 12.0+, Windows 7+, or modern Linux distribution
- Internet connection for initial setup
- Optional: Docker and Docker Compose for containerized deployment
Windows Installation
Method 1: MSI Installer (Recommended)
- Visit the Termix GitHub Releases page and download the latest MSI installer (e.g.,
Termix-Setup-1.8.0.msi) - Double-click the installer file to launch the setup wizard
- Follow the on-screen prompts to select installation location (default:
C:\Program Files\Termix) - Choose whether to create a desktop shortcut
- Click Install and wait for the installation to complete
- Launch Termix from the Start menu or desktop shortcut
- Configure your first SSH connection in the Host Manager
Method 2: Chocolatey Package Manager
If you use Chocolatey, installation is simplified:
choco install termixAfter installation completes, start Termix from your command line or applications menu.
Method 3: Portable Version
Download the portable executable from GitHub releases if you prefer not to install:
- Download
Termix-Portable.exefrom GitHub Releases - Extract to your desired directory
- Run
Termix.exedirectly—no installation required
macOS Installation
Method 1: Homebrew (Easiest)
Homebrew users can install Termix with a single command:
brew install termixOnce installed, launch Termix from your Applications folder or Launchpad.
Method 2: Apple App Store
For a streamlined experience with automatic updates:
- Open the App Store
- Search for “Termix”
- Click Get and authenticate with your Apple ID
- Installation will begin automatically
Method 3: DMG Installer
For manual installation:
- Download the latest DMG file from GitHub Releases
- Double-click the
.dmgfile to mount the disk image - Drag the Termix application to your Applications folder
- Eject the disk image
- Open Applications and launch Termix

Linux Installation
Method 1: APT (Debian/Ubuntu)
For Debian-based distributions:
sudo apt update
sudo apt install termix
Method 2: Flatpak
For universal Linux compatibility:
flatpak install flathub com.termix.Termix
flatpak run com.termix.Termix
Method 3: AppImage
Download and run the portable AppImage:
wget https://github.com/Termix-SSH/Termix/releases/download/v1.8.0/Termix-1.8.0.AppImage
chmod +x Termix-1.8.0.AppImage
./Termix-1.8.0.AppImage
Method 4: Docker Compose (Recommended for Servers)
For a self-hosted setup, use Docker Compose:
services:
  termix:
    image: ghcr.io/lukegus/termix:latest
    container_name: termix
    restart: unless-stopped
    ports:
      - "8080:8080"
    volumes:
      - termix-data:/app/data
    environment:
      PORT: "8080"

volumes:
  termix-data:
    driver: local
Deploy with:
docker compose up -dAccess Termix at http://localhost:8080
Mobile Installation
iOS/iPadOS
- Open the Apple App Store
- Search for “Termix”
- Tap Get and authenticate (iOS 15.1+ required)
- Installation begins automatically
Android
- Open Google Play Store
- Search for “Termix”
- Tap Install
- Grant necessary permissions and wait for installation (Android 7.0+ required)
Troubleshooting Installation Issues
Issue: “Termix is not recognized as an internal command” (Windows)
- Solution: Add Termix to your PATH or reinstall using the MSI installer, which automatically configures PATH variables
Issue: Port 8080 already in use (Docker)
- Solution: Modify the Docker Compose file to use a different port:
- "8081:8080"
Issue: Permission denied on Linux
- Solution: Grant execute permissions:
chmod +x Termix-*.AppImage
Issue: Application won’t launch on macOS
- Solution: Go to System Preferences > Security & Privacy, then allow Termix to run
How to Use Termix
Getting Started: Basic SSH Connections
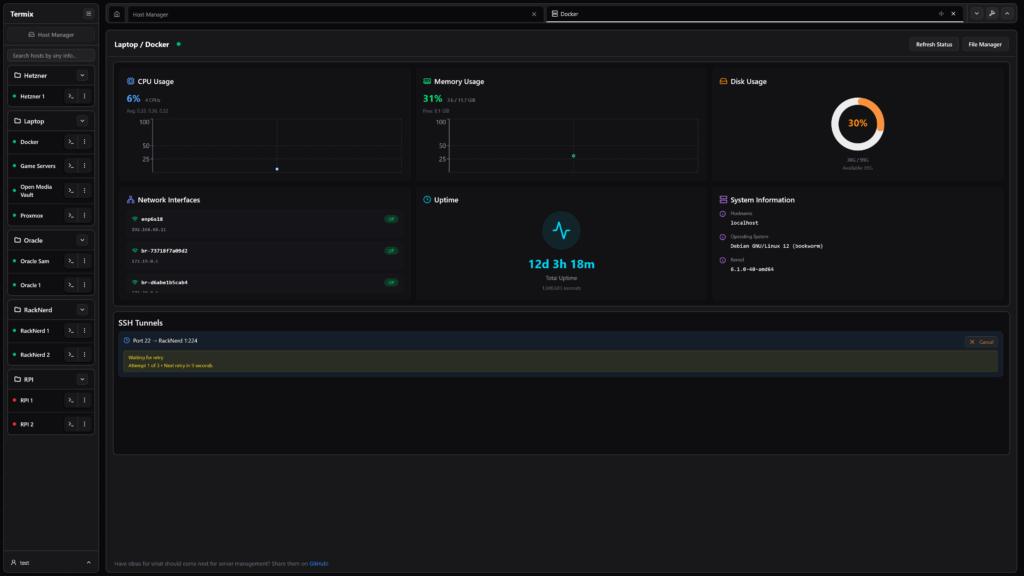
Once Termix is installed and launched, you’ll see a clean dashboard with several panels. Here’s how to establish your first SSH connection:
Step 1: Add an SSH Host
- Click the Host Manager tab or icon in the left sidebar
- Select Add New Host or click the + button
- Enter the following details:
- Host Name: A descriptive label (e.g., “Production Server 1”)
- Host Address: Your server’s IP address or domain (e.g.,
192.168.1.100orserver.example.com) - Username: Your SSH username (e.g.,
ubuntuorroot) - Port: Default is 22; change if your server uses a custom SSH port
- Authentication: Choose password or SSH key-based authentication
# Example: Connecting to a typical Linux server
Host Address: 192.168.1.50
Username: addrom
Port: 22
Authentication: SSH Key- Click Save to store the connection
Step 2: Initiate an SSH Connection
- In the Host Manager, locate your newly created host
- Double-click it or click Connect
- A new terminal tab opens with your active SSH session
- You’re now connected to your remote server
# Typical connection output
[email protected]'s password:
Last login: Sun Nov 09 14:22:10 2025 from 192.168.1.100
addrom@production-server:~$
Step 3: Execute Remote Commands
Once connected, execute commands just as you would in a local terminal:
# Check system information
addrom@production-server:~$ uname -a

# View disk usage
addrom@production-server:~$ df -h

# List processes
addrom@production-server:~$ ps aux
Advanced Features: Mastering Termix
Session Management: Multi-Panel Split Screen
Termix supports split-screen terminals with up to 4 panels simultaneously. This is invaluable for monitoring while running commands.
- Within an active terminal tab, look for the split screen icon
- Click to divide the current terminal into two panels (horizontal or vertical)
- Each panel functions independently—connect to different servers or monitor different processes
- Resize panels by dragging the divider between them
# Panel 1: Monitor server logs
tail -f /var/log/syslog

# Panel 2: Run deployment commands
./deploy-app.sh

# Panel 3: Check resource usage
top
SSH Tunneling for Secure Database Access
Create SSH tunnels to securely access remote databases or services:
- Go to SSH Tunnel Management
- Click Create New Tunnel
- Configure:
- Source Port: Local port (e.g., 3306 for MySQL)
- Destination Host: Remote server IP
- Destination Port: Remote service port (e.g., 3306)
- SSH Host: Your SSH server credentials
# After tunnel creation, connect locally
mysql -h 127.0.0.1 -u dbuser -p database_name

# The tunnel securely forwards traffic to your remote database
Remote File Manager: Upload and Download
The integrated file manager eliminates the need for separate SFTP tools:
- Open an active SSH session
- Click the File Manager tab or icon
- Browse remote server directories just like your local file explorer
- Upload: Drag files from your desktop into the file manager
- Download: Right-click files and select Download
- Edit: Double-click text files to edit directly in Termix
- Preview: Images, audio, and video files display inline
Customizing Terminal Appearance
Personalize your Termix experience with themes and fonts:
- Access Settings (typically a gear icon)
- Navigate to Appearance or Terminal Settings
- Choose from built-in themes (Dark, Light, Solarized, Dracula, etc.)
- Select your preferred font (Menlo, Monaco, Inconsolata, etc.)
- Adjust font size and line height for comfort
- Click Apply and restart the terminal for changes to take effect
Running Commands Across Multiple Terminals
Execute a single command across all open terminal sessions:
- Ensure multiple terminal tabs or panels are open
- Go to Tools > Execute on All Terminals
- Type your command (e.g.,
systemctl restart nginx) - The command executes simultaneously in all connected sessions
- View outputs from each server in their respective panels
# Deploy a file to multiple servers at once
# Run in all terminals simultaneously:
scp deploy-package.tar.gz /opt/app/
tar -xzf /opt/app/deploy-package.tar.gz
systemctl restart myapp
Real-World Usage Scenarios
Scenario 1: Monitoring a Production Server
Use split-screen to monitor logs while deploying an update:
# Left panel: Monitor application logs
tail -f /var/log/myapp.log

# Right panel: Run deployment
./scripts/deploy.sh
Scenario 2: Database Migration with SSH Tunnel
Safely access a remote PostgreSQL database for migration:
- Create SSH tunnel: Local port 5433 → Remote server 5432
- Use local database client:
psql -h localhost -p 5433 -U migrator -d production_db - Perform migration safely through encrypted SSH connection
Scenario 3: Multi-Server Deployment
Coordinate deployments across three web servers:
# Server 1 tab: Pull latest code
git pull origin main

# Server 2 tab: Build application
npm run build

# Server 3 tab: Restart services
systemctl restart api-server
Conclusion
Termix SSH client represents a significant leap forward in server management tools. By combining SSH terminal access, file management, tunneling capabilities, and server monitoring in one platform, Termix eliminates the need for multiple disconnected tools while prioritizing security and ease of use.
Whether you’re managing a single server or a complex infrastructure, Termix’s intuitive interface and powerful features will streamline your workflow. The cross-platform support—from desktop to mobile—means you can manage your servers from anywhere, on any device.
Key Takeaways
- Termix is a modern, open-source alternative to commercial SSH clients like Termius
- Installation is straightforward across Windows, macOS, Linux, and mobile platforms
- Features like split-screen terminals, SSH tunneling, and integrated file management eliminate tool fragmentation
- Security features including encryption, 2FA, and OIDC support meet enterprise requirements
- The self-hosted option ensures your data remains under your control
Getting Started Today
Ready to improve your server management experience? Start by downloading Termix from the official GitHub repository or your platform’s app store. The entire platform is free and open-source, with no subscriptions or license fees.
Download Termix Now – Available for Windows, macOS, Linux, iOS, and Android
Support and Community
For help, feature requests, or bug reports, visit the Termix Issues page. Join the vibrant community of developers and administrators who are already using Termix to simplify their infrastructure management.
Additional Resources
- GitHub Repository: Termix-SSH/Termix
- Official Documentation: docs.termix.site
- Discord Community: Join the Discord server for discussions and support
- License: Apache License Version 2.0 – Free and open-source