Using Cloudflare Tunnel to publish API to subdomains
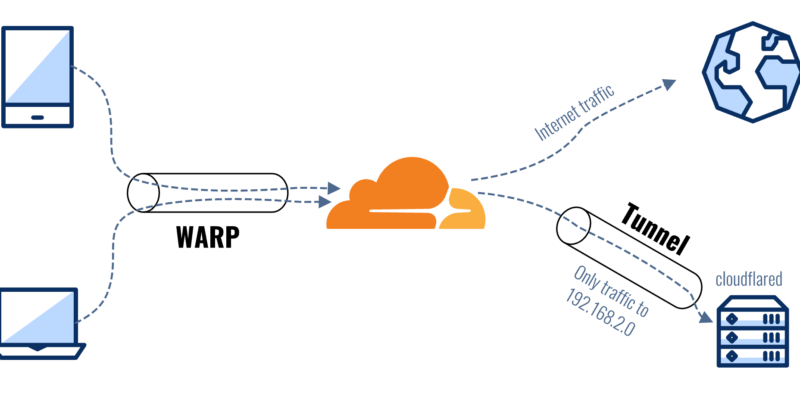
Cloudflare Tunnel, previously known as Argo Tunnel, is a service that helps you securely expose your web server to the internet. without opening any ports On your router or firewall, this tunnel creates a secure, outbound-only connection from your server or localhost to Cloudflare, making it customizable for your needs.
Things to prepare before using Cloudflare tunnel
1/ Cloudflare Account
- Apply for a Cloudflare account : If you don’t have a Cloudflare account yet, you’ll need to sign up at Cloudflare .
- Add Domain : Add the domain you want to use with Cloudflare and complete the DNS settings.
2/ Server Environment
- Server or machine used : You must have a server or machine used. This can be a physical server or a virtual server (VM).
- Operating System : Cloudflare Tunnel supports Linux, macOS, and Windows.
Steps to Set Up Cloudflare tunnel
1/ Sign up for a Cloudflare account.
2/ Install Cloudflare Tunnel :
Cloudflare Tunnel is part of the tool. `cloudflared` which you must install on your machine.
For Linux:
curl -L https://github.com/cloudflare/cloudflared/releases/latest/download/cloudflared-linux-amd64.deb -o cloudflared-linux-amd64.deb
sudo dpkg -i cloudflared-linux-amd64.deb
For macOS:
brew install cloudflare/cloudflare/cloudflaredFor Windows:
Download the executable from the Cloudflare GitHub releases.
3/ Authenticate cloudflared :
- You will need to authenticate using the `cloudflared` cli to connect to your Cloudflare account.
cloudflared loginThis command will open a browser window and ask you to log in to your Cloudflare account. After successful authentication, cloudflared will create a certificate file in the directory. ~/.cloudflared
4/ Create a Tunnel :
Use the following command to create a new Tunnel in Cloudflare.
cloudflared tunnel create my-tunnelMake sure to edit my-tunnel with your tunnel name. This command will returm the tunnel ID value you will use next.
5/ Configure Tunnel :
Create a file for your Tunnel configuration. Here is an example Configure file (config.yml):
tunnel: <TUNNEL_ID>
credentials-file: ~/.cloudflared/<TUNNEL_ID>.json

ingress:
  - hostname: example.com
    service: http://localhost:8080
  - service: http_status:404
Edit <TUNNEL_ID> with your tunnel ID value obtained from the previous command, and replace example.com with your domain or subdomain. Adjust the service field to point to the service you want to attach to the domain or subdomain. yours (e.g. http://localhost:8080)
6/ Run your service successfully.
7/ Run Tunnel:
Start tunnel based on the configured config.
cloudflared tunnel --config config.yml run my-tunnelCreate a Python Flask api for testing Cloudflare Tunnel.
Example of how to create a simple Python Flask API to test with the Cloudflare Tunnel API.
Step 1: Set Up Flask
First Flask must be installed. This can be done using pip:
pip install FlaskStep 2: Create a Flask Application
Create a file named app.py The contents are as follows:
from flask import Flask, jsonify, request

app = Flask(__name__)

@app.route('/')
def home():
    return "Welcome to the Flask API!"

@app.route('/api/greet', methods=['GET'])
def greet():
    name = request.args.get('name', 'World')
    return jsonify(message=f"Hello, {name}!")

@app.route('/api/data', methods=['POST'])
def data():
    content = request.json
    return jsonify(received=content)

@app.route('/api/status', methods=['GET'])
def status():
    return jsonify(status="API is running smoothly!")

if __name__ == '__main__':
    app.run(host='0.0.0.0', port=5000)
Step 3: Run to test Flask Application.
Flask applications can be run with:
python app.pyThis command will start the Flask server at http://localhost:5000.
Step 4: Config Cloudflare Tunnel
Assuming you have already set up Cloudflare Tunnel as described in the previous text, create or update the config.yml file to point to your Flask application:
tunnel: abcdef123456  # Replace with your tunnel ID
credentials-file: ~/.cloudflared/abcdef123456.json

ingress:
  - hostname: myapp.example.com  # Replace with your domain
    service: http://localhost:5000
  - service: http_status:404
Step 5: Run Cloudflare Tunnel
Start Cloudflare Tunnel with the command:
cloudflared tunnel --config config.yml run my-app-tunnelStep 6: Start testing the API
The API can be tested by sending a request to myapp.example.com (replace with your actual hostname):
Home Endpoint: http://myapp.example.com/
curl http://myapp.example.com/Greet Endpoint: http://myapp.example.com/api/greet?name=BaaBaa
curl http://myapp.example.com/api/greet?name=BaaBaaData Endpoint: http://myapp.example.com/api/data
curl -X POST -H "Content-Type: application/json" -d '{"key": "value"}' http://myapp.example.com/api/dataStatus Endpoint: http://myapp.example.com/api/status
curl http://myapp.example.com/api/statusSummary of all commands
pip install Flask
python app.py
cloudflared tunnel --config config.yml run my-app-tunnel


