
How to Enable All Bands Through Service Menu on US/CA Samsung Galaxy S23 series
What is this?
This is a guide on how to enable all LTE and 5G bands on the US or Canadian S23 series phones by going through the service menu. Which is mostly based on this S20U guide by mellojosh, but has been adapted for the S23U phone with more information added.
Who needs this?
Different countries and carriers use different 5G frequency bands, so the phone’s software limits 5G bands to your model’s country and carrier even though the phone hardware supports more bands. Here are some cases when unlocking all 5G bands could be useful:
- You live outside the US/Canada but bought a US/Canadian model and want to use 5G in your country that uses different 5G bands than US/Canadian carriers.
- You live in the US/Canada but are travelling to a different country and want to use their 5G service which uses different 5G bands than US/Canada.
- You live in the US/Canada but think your carrier is limiting your 5G service for some reason and think that you can optimize it better.
Which bands can be enabled this way?
All bands the phone supports in hardware can be enabled through the service menu. For the US S23 Ultra, that includes all Sub-6 bands like n78, and mmWave bands, as well as 5G SA bands, as shown in this screenshot below. For the Canadian S23 Ultra, this method will unlock all the same bands as the US model except mmWave (might be a hardware or firmware limitation).

Which phones does this method support?
This method has been confirmed to work on:
- Samsung S23 Ultra (S918U, S918U1, S918W).
- Samsung S22 Ultra (S908U, S908U1, S908W).
- Galaxy Z Fold 4 and Z Flip 4. Thanks @Abaddon and @otteporihs.
This method works on both Android 12 (One UI 4.1) or Android 13 (One UI 5.0, 5.1).
This method requires your device be on the US firmware (XAA or other US CSC), so as long as you can Odin flash XAA firmware on your device (such as Canadian variant), you should be able to do this.
If you get this method working on your phone that isn’t in the known list, post it here and I will add it to the list above.
How to guide
You will need a Windows computer (or VM) and the Samsung USB Driver installed to do the following steps. Install the USB driver from here before proceeding if you do not have it installed.
A. Flash US Firmware
First, your device must be on US firmware (XAA or other CSC). You can skip this step and go to B if your device is already on US firmware.
If you’re not on a US firmware because you have another Snapdragon variant (like Canadian), follow the steps below to flash XAA firmware. Note this will WIPE and FACTORY RESET your device. ALL DATA WILL BE LOST. So backup if you need to.
- Download Odin 3.14.4 or latest version.
- Download US XAA U1 firmware for your device from SamMobile.com or SamFw.com. For example, for the S23 Ultra, download the XAA firmware for S918U1. Extract the contents of the firmware to somewhere on your computer. You should have 5 files (BL, AP, CP, CSC, HOME_CSC). We won’t use HOME_CSC.
- Restart your phone and go into download mode. On the S23 Ultra, hold all three power and up + down volume at the same time until the phone starts, then press the up volume key to get into download mode.
- Open Odin and connect your phone to your computer with a USB. Odin should say your phone was added.
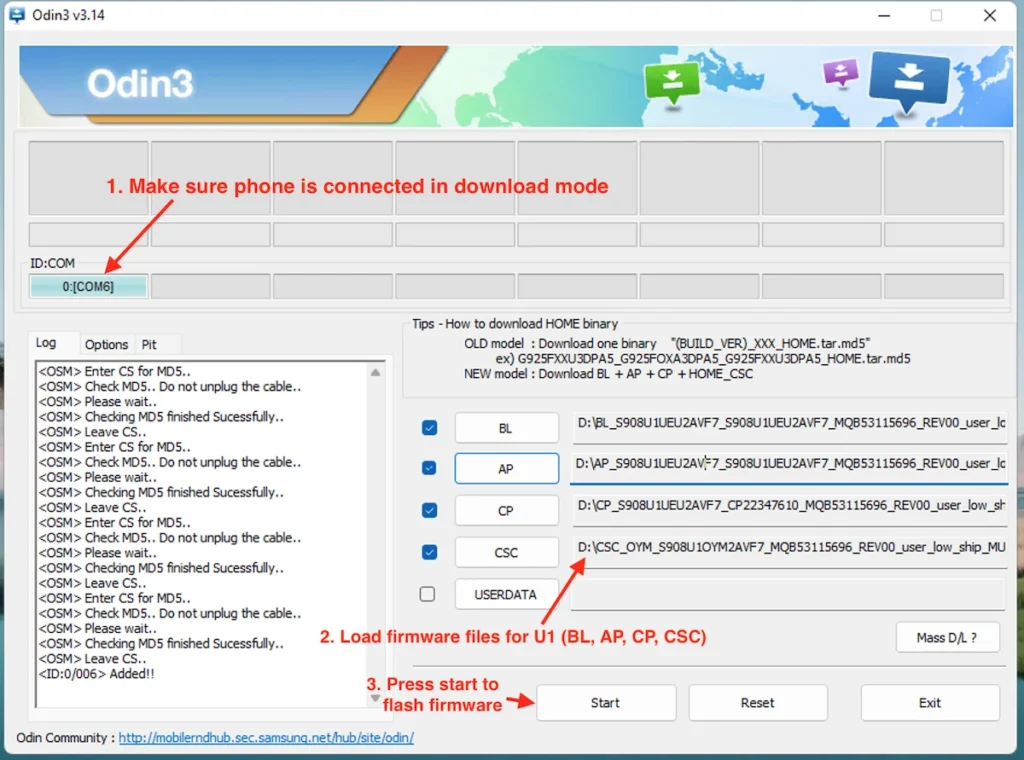
- Click each of the BL, AP, CP, CSC buttons and select the corresponding files from the firmware zip you extracted. For CSC, use the file that starts with CSC and not HOME_CSC (we won’t be using HOME_CSC). Do not load anything into USERDATA.
- Click start and let it flash the firmware (see the picture below). If it flashed correctly, your phone will be on XAA firmware after it restarts and you will have to set it up again from scratch.
- Set up your phone and verify it is on XAA firmware by going to Settings -> About Phone -> Software information -> check that it says XAA/XAA,XAA/OOO under “Software provider software version”. OOO here will be your phone’s original CSC like XAC which you cannot change and do not need to.
B. Unlock Service Menu Secret Codes
The next step is we need to unlock access to the service menu. Usually this is locked by default, but it might already be unlocked for you.
First check if you can access the service menu by trying each of these ways:
- Open dialer and enter
*#27663368378#to try to get directly into the service mode main menu. The menu should open after you press the last # character, you shouldn’t have to press call. - Open dialer and enter
*#73#to get into RF Test mode. Press Band Selection. Press three dots on top right -> Back. Repeat three dots -> back three more times until you get to the service mode main menu. - If either of the above ways works for you to get to the service mode main menu, then you can skip the below steps to unlock the menu and go directly to instructions C.
If you cannot access the menu with the above codes, then follow these instructions to unlock the secret codes.
- Enable USB Debugging in Developer menu.
- Download SamFW FRP tool 4.1 or latest version from here.
- Open SamFW FRP tool and connect your phone to the computer with a USB.
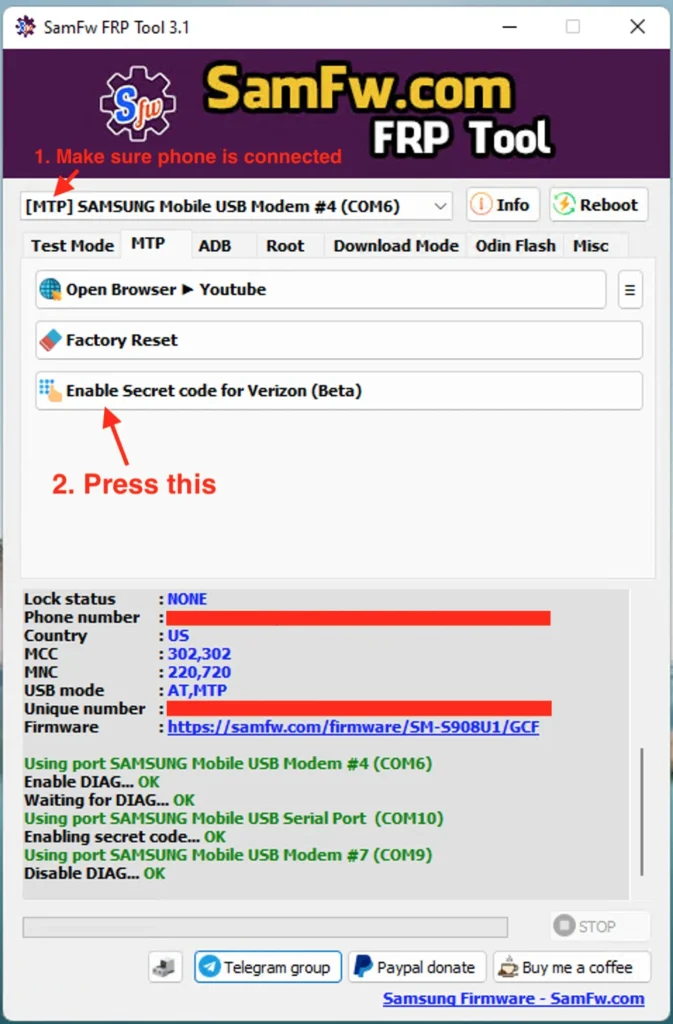
- Using SamFW FRP tool, go to MTP tab and click on “Enable Secret Code for Verizon”. See the picture below. Note it works on any US CSC even though it says “for Verizon”.
- If in the program output you see it’s getting stuck on “Waiting for DIAG”, then dial
*#0808#on your phone to open USB settings and select “DM + MODEM + ADB” then press OK. The program should then complete the step and then get stuck on “Disabling DIAG”. When it does, using the*#0808#menu again, select “MTP + ADB” this time and press OK. Now the program should complete the step and say that secret codes was unlocked.
- If in the program output you see it’s getting stuck on “Waiting for DIAG”, then dial
- Now you should be able to use
*#73#for RF test, or*#27663368378#*to go directly to service menu. Test it to make sure at least one of the codes works and the service menu is opening.
C. METHOD 1: Use the Service Menu to Unlock All Bands
- Enter the service menu using either way.
- Open dialer and enter
*#27663368378#to get directly into the service mode main menu. - Open dialer and enter
*#73#to get into RF Test mode. Press Band Selection. Press three dots on top right -> Back. Repeat three dots -> back three more times until you get to the service mode main menu.
- Open dialer and enter
- Use the service mode to set the following options. Note you can go back between screens with three dots -> back for quicker navigation, but I am just starting each option below from the main menu so it’s easy to read.
- Enable all LTE and 5G bands.
- Service Mode Main Menu -> UE SETTING & INFO -> SETTING -> SYSTEM -> Next page 4 times -> SET LTE BAND CONFIG -> SET DEFAULT LTE BAND.
- Service Mode Main Menu -> UE SETTING & INFO -> SETTING -> PROTOCOL -> NR5G -> PRUNE STATUS -> REMOVE NR5G PRUNE.
- Service Mode Main Menu -> UE SETTING & INFO -> SETTING -> PROTOCOL -> GCF -> REMOVE ONLY NR WHITELIST.
- Optional if you need to enable mmWave bands on US model: Service Mode Main Menu -> UE SETTING & INFO -> SETTING -> PROTOCOL -> NR5G -> Sub6/mmWave -> ALL ENABLE.
- Optional if you have issues going from LTE to LTE+ (carrier aggregation not working properly): Service Mode Main Menu -> UE SETTING & INFO -> SETTING -> PROTOCOL -> AS -> Next Page -> DISABLE CA COMBO CHECK -> DISABLE ON.
- Enable 5G NR features (DSS & CDRX) if needed. These options might already be enabled for you by default.
- Service Mode Main Menu -> UE SETTING & INFO -> SETTING -> PROTOCOL -> AS -> Next Page -> NR CDRX CONTROL -> NR CDRX ENABLE. NR CDRX is 5G power saving mode.
- Service Mode Main Menu -> UE SETTING & INFO -> SETTING -> PROTOCOL -> AS -> Next Page 2 times -> NR DSS CONTROL -> NR DSS ENABLE. NR DSS is 5G Dynamic Spectrum Sharing.
- Enable 5G SA if you’re lucky enough to have a carrier with standalone 5G networks. This option might be enabled by default already.
- Service Mode Main Menu -> UE SETTING & INFO -> SETTING -> PROTOCOL -> NR5G -> SA/NSA Mode Control -> SA/NSA ENABLE.
- Service Mode Main Menu -> UE SETTING & INFO -> SETTING -> PROTOCOL -> NR5G -> SA/NSA Mode Control -> Remove SA permit list.
- Service Mode Main Menu -> UE SETTING & INFO -> SETTING -> PROTOCOL -> NR5G -> NRDC -> NRDC ENABLE. NRDC is for dual connectivity with Sub6 + mmWave bands in parallel. Only applies to 5G SA networks and only if your carrier uses it.
- Restart your phone, then dial *#73# to get into RF Test Mode. Click Band Selection -> Sim 1 or Sim 2 (whichever you use). On this screen if you scroll down, you’ll see a list of enabled NR5G bands. Make sure all bands are enabled. See my picture below.
- NOTE: Band selection won’t be reset with a reboot, but might be reset after a CSC update (or a software update that includes a CSC update). You will have to re-do the service menu settings every update or re-flash of a CSC.
- NOTE: If you use an eSIM or a dual-SIM phone with a 2nd SIM, you need to change the NR5G stack before changing the NR5G related options above. Change the NR5G stack to Stack 2 with the following setting first.
- Service Mode Main Menu -> UE SETTING & INFO -> SETTING -> PROTOCOL -> NR5G -> Stack Selection -> Select STACK 2.
- OPTIONAL: Now that all bands are enabled and usable, you can use the Band Selection menu under
*#73#to selectively disable certain bands if you need to. This is not covered here but that menu is self-explanatory. - If this method isn’t working, try METHOD 2 below. You do not need to try METHOD 2 if this method ended up working for you.
- Enable all LTE and 5G bands.
D. METHOD 2: Unlock all bands via Protocol Simulation menu.
- If METHOD 1 above didn’t work or not all bands were unlocked, you can try to unlock all bands by simulating a change in your CSC to GCF (Global Certification Forum). This won’t actually change your CSC to GCF, but will change the options in the service menu as if you were on GCF CSC, which should give you access to all SA and NSA bands. Credits to @wr3cckl3ss1 for figuring out this method.
- To do this method, first enter the service mode main menu using either of the following ways.
- Open dialer and enter
*#27663368378#to get directly into the service mode main menu. - Open dialer and enter
*#73#to get into RF Test mode. Press Band Selection. Press three dots on top right -> Back. Repeat three dots -> back three more times until you get to the service mode main menu.
- Open dialer and enter
- Using the service menu, change the following options
- Go to: Service Mode Main Menu -> PROTOCOL STATE -> PROTOCOL SIMULATION -> IMEI PRE CFG SIMULATION.
- In this menu, click [1] AP, then click GCF (last option). Then click [2] NET1 and change it to GCF as well. Do the same for [3] NET2. All GCF.
- Press [4] Write. Then restart phone.
- Check if all SA bands were unlocked. If not, repeat the band unlocking instructions from METHOD 1 above and then restart the phone and check again.
Enjoy your unlocked LTE and 5G bands!
I have personally tested this on a Canadian S23 Ultra (S918W) on US XAA firmware to enable all bands. I re-flashed Canadian firmware after I unlocked the service menu and the service menu stayed accessible even on Canadian firmware. So the trick is to always start out on US firmware and unlock the menu there first.
Thank @peacey8


Worked on S21 FE Verizon, Thanks a lot!
It worked on my s22 ultra , 5g connected
I do the same things on my new s24 ultra (i had to open service menu with root cmd), all steps done, no 5g
I live in non supported 5g country , bands is not problem but whitelist is
Please help us for band selection in one UI6
Did you have to reset your Canadian phone when you were installing XAA firmware on Odin? Going from XAA back to XAC it seems it did not reset the phone