
If you are into automation, you’ve likely stumbled upon n8n. It is an incredible, node-based workflow automation tool that rivals Zapier and Make, but with one distinct advantage: it is self-hostable.
However, the “self-hosting” part usually comes with a catch. You either run it on your laptop—which requires leaving your machine on 24/7, draining battery and electricity—or you pay for a VPS (Virtual Private Server).
But there is a third option. Through my own exploration of cloud providers, I’ve found a way to host n8n for free on Google Cloud Platform (GCP) using their “Always Free” tier. If you configure it correctly, you can have a running n8n server up 24/7 without paying a single dollar.
In this guide, I will walk you through the exact technical steps to set up a lifetime free n8n server, including configuring the instance, setting up Docker, securing it with SSL, and pointing your own domain to it.
Understanding the Google Cloud Free Tier
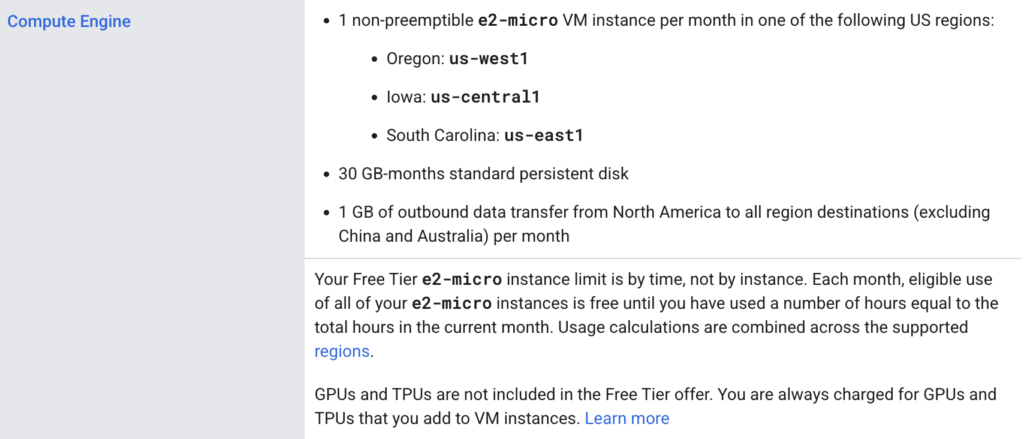
Before we dive into the console, it is important to understand why this works and what the limitations are. We aren’t just using a temporary trial credit; we are utilizing the permanent free tier capabilities of Google Compute Engine.
To stay within the “free forever” limits, we must stick to specific resources:
- Instance Type: E2-micro VM instance.
- Region: It must be hosted in specific regions (usually Oregon, Iowa, or South Carolina).
- Storage: We get up to 30GB of standard persistent disk storage per month.
The E2-micro is a modest machine (often around 2 vCPUs and limited RAM), but for running personal automation workflows or a small agency setup, it is sufficient.
Step 1: Setting Up the Compute Engine Instance
First, head over to the Google Cloud Console. If you don’t have a project yet, create a new one. I usually name mine something simple like n8n-server.
You will need to set up a billing account. Don’t worry—Google requires this to verify you are a real human and not a bot. As long as we stick to the configuration below, you won’t be charged, but you do need a valid credit card on file to unlock the features.
Creating the Instance
- Navigate to Compute Engine > VM Instances in the left sidebar.
- Enable the Compute Engine API if prompted (this takes a minute or two).
- Click Create Instance.
Critical Configuration
To ensure the server remains free, follow these settings exactly:
- Name: Give it a recognizable name (e.g.,
n8n-instance). - Region: Choose us-west1 (Oregon), us-central1 (Iowa), or us-east1 (South Carolina).
- Machine Family: Choose E2.
- Machine Type: Select e2-micro.
- Boot Disk: The default is usually 10GB. Change this to 30GB to maximize your free allowance. Keep the OS as Linux (Debian or Ubuntu are fine).
- Firewall: Check the boxes to Allow HTTP traffic and Allow HTTPS traffic.
Important: Under the advanced management settings, ensure you disable snapshots. Snapshots and automated backups are not free and will incur costs. Since this is a budget setup, we can manually back up our workflow data later (e.g., exporting to GitHub) rather than paying for snapshotting services.
Once configured, click Create.
Step 2: Networking and Static IP Configuration
While the instance boots up, we need to ensure it is accessible from the outside world.
Firewall Rules
By default, GCP is very restrictive. We need to open specific ports.
- Go to VPC Network > Firewall.
- Create a new firewall rule (e.g.,
global-access). - Set Targets to “All instances in the network.”
- Set Source IPv4 ranges to
0.0.0.0/0(this allows access from anywhere on the internet). - Under Protocols and ports, allow TCP port
5678(this is the default n8n port) if you want to test directly, though we will eventually route through port 80/443 using Nginx.
Reserving a Static IP
If you restart your server, Google might assign it a new IP address, which breaks your domain connection. To fix this:
- Go to VPC Network > IP addresses.
- Click Reserve External Static IP Address.
- Name it
n8n-static-ip. - Attach it to your specific VM instance.
Now, your server has a permanent identity on the internet.
Step 3: Connecting via SSH and Installing Docker
Now comes the actual installation. In the VM Instances list, click the SSH button next to your instance. This opens a terminal window directly in your browser.
Since the E2-micro is a clean slate, we need to install the environment. We will use Docker to run n8n, as it containerizes the application and makes management significantly easier.
Run the following commands to install Docker and necessary dependencies. I recommend running them one by one to ensure no errors occur:
- Update the OS:
bash sudo apt-get update- Install Docker: How to Install Docker on Ubuntu: A Step-By-Step Guide
- Verify Docker: Type
docker --versionto ensure it is installed.
At this stage, you can technically run n8n directly using a quick Docker run command to test it on port 5678. However, for a production-ready environment, we want HTTPS and a proper domain name.
Step 4: Domain Setup and Nginx Reverse Proxy
Using an IP address to access your automation tools is clunky and insecure. We want to access it via a URL like n8n.yourdomain.com.
Pointing the Domain
Go to your domain registrar (Namecheap, GoDaddy, etc.):
- Access your Advanced DNS settings.
- Create an A Record.
- Host:
n8n(or whatever subdomain you prefer). - Value: Paste the Static External IP you reserved in Step 2.
- Save changes. It might take a few minutes to propagate.
Setting up Nginx
Back in your SSH terminal, we will use Nginx as a reverse proxy. This takes traffic coming to your domain and routes it to the n8n Docker container.
- Install Nginx:
sudo apt install nginx -y- Configure Nginx:
You need to create a configuration file that tells Nginx to listen for your specific domain. Create a new config file in/etc/nginx/sites-available/and link it tosites-enabled. - The Config:
Inside the config file, ensure theserver_namematches your subdomain (e.g.,n8n.addrom.com). Set the proxy pass to point tohttp://localhost:5678.
Securing with SSL (Certbot)
We need HTTPS for security, especially since n8n handles API keys and credentials.
- Install Certbot:
sudo apt install certbot python3-certbot-nginx -y- Generate Certificate:
Runsudo certbot --nginx -d n8n.yourdomain.com. - Follow the prompts (enter email, agree to terms). Certbot will automatically modify your Nginx configuration to force HTTPS.
Step 5: Deploying n8n with Docker Compose
To make our setup robust—meaning it restarts automatically if the server reboots—we will use Docker Compose.
- Create a Directory:
mkdir n8n-docker cd n8n-docker- Create the
.envfile:
Use a text editor like Nano (sudo nano .env).
Inside, define your variables:DOMAIN_NAME=n8n.yourdomain.com[email protected]- Save the file (Ctrl+X, Y, Enter).
- Create the
docker-compose.ymlfile:
Runsudo nano docker-compose.yml. You can find standard n8n docker-compose templates in their documentation. The key elements you need are:- Service: n8n
- Image: n8nio/n8n
- Ports: “5678:5678”
- Volumes: Map a local folder to
/home/node/.n8nto ensure your workflows are saved even if the container is destroyed. - Restart Policy:
always(This ensures n8n starts up if the VM reboots).
- Launch:
sudo docker compose up -dThe -d flag runs it in “detached” mode, meaning it runs in the background.
Step 6: Validation and Testing
Once Docker is running, open your browser and navigate to https://n8n.yourdomain.com.
If you configured everything correctly:
- You should see the n8n setup screen (securely loaded via HTTPS).
- Create your owner account.
- You will land in the empty workspace.
The “Hello World” Test
To ensure the server is responsive:
- Create a new workflow.
- Add a Webhook node. Set the method to GET and the path to
test. - Connect it to a Respond to Webhook node.
- In the Response node, set the body to: “Setup is complete!”
- Execute the workflow and copy the Production URL.
- Paste that URL into a new browser tab. You should see your text response immediately.
Monitoring Costs and Performance
After running this setup for several months, I have verified the billing. While you might see estimated costs on the setup screens, the actual invoice at the end of the month for the E2-micro instance and 30GB storage in the supported regions should be $0.00.
A Note on Performance
Because the E2-micro only provides limited RAM (often shared or roughly 1-2GB effectively depending on the burst), heavy data processing might cause lag.
- Recommendation: This setup is perfect for connecting APIs, handling webhooks, and standard automation logic.
- Limitation: If you try to process massive CSV files or run memory-intensive binaries, the instance might hang.
However, for getting started, learning the tool, and running personal business logic, it is an unbeatable solution.
Conclusion
You now have a fully functional, SSL-secured n8n server running on Google Cloud for free. You have eliminated the need to keep a local laptop running, and you haven’t committed to a monthly subscription fee for a VPS.
This setup serves as a fantastic entry point into the world of cloud engineering and automation. As you scale, you can always upgrade the instance type with a single click, but for now, enjoy your lifetime free automation server.
If you found this guide helpful in your automation journey, I highly recommend diving deeper into Docker and Linux—they are the superpowers that enable this kind of flexibility. Happy automating!


This is a solid guide—what really stands out to me is how it leverages Google Cloud’s free tier without hidden costs. I’ve tried similar setups before, and the tricky part is always balancing performance with the E2-micro limits. I’d be curious to hear how others handle heavier workflows—do you stick with multiple lightweight instances or upgrade a single VM? For anyone starting with n8n, this approach is a game-changer for learning automation without paying a cent.
Thanks! You nailed it, the RAM limit on the e2-micro is definitely the biggest bottleneck. To get around it, I usually set up a 2GB-4GB Swap file, which helps prevent crashes during memory spikes.
To answer your question: I prefer upgrading a single VM (Vertical Scaling) rather than managing multiple lightweight instances. Running n8n in Queue Mode (required for multiple instances) adds overhead with Redis and Worker processes, which consumes the limited resources of an e2-micro anyway. For heavy production loads, moving to a cheap VPS with more native RAM is usually the smoother path.