Apple’s iCloud keeps copies of your synced data, but making consistent archives of your online content can be tricky. Here’s how to do it.
iCloud is Apple’s cloud service which allows you to share data across devices seamlessly. The idea is you can save data from apps that support it to iCloud, and those same apps on other devices can then sync the data which is stored on Apple’s iCloud servers.
In practice this works, fairly well, but there have been issues with synchronization and keeping data uniform across devices since iCloud’s inception. Apple has tried to address these problems, but some users still report intermittent issues with iCloud today.
Technical Background
Under the hood iCloud uses two Apple technologies to manage and sync data. The first is Core Data, which is a local database technology from Apple that allows apps to store data locally on devices.
The second technology is CloudKit, which is a web API and interface for storing shared data on Apple’s iCloud servers, which can then be accessed by applications that make calls to CloudKit APIs.
Behind the scenes in all of Apple’s operating systems are daemons that run silently and keep everything in sync. When an app makes a change to locally managed objects in Core Data, it can then cause the OS to push those changes to the CloudKit stores via API calls, which the OS daemons sense and use as signals for synchronization.
All of this works silently in the background to keep data in sync across both devices and on Apple’s iCloud servers.
iCloud Drive
Apple also offers iCloud Drive, which is an iCloud-based file storage and synchronization system. An Apple app called Files on iOS, iPadOS, and tvOS allow you to upload and synchronize files to designated folders. On macOS iCloud Drive is managed by the Finder, in a folder named iCloud Drive.
Other Apple and third-party apps such as Pages, Numbers, Keynote, and others also support iCloud and iCloud drive – allowing you to share and sync files directly from those apps.
For a third-party app to support iCloud or iCloud Drive, it must make use of the CloudKit APIs to synchronize files and data.
iCloud Sharing
Apple’s operating systems also support other built-in iCloud sharing across devices such as Photos, Contacts, Reminders, Calendar, Notes, and other apps. These are usually enabled or disabled in the Settings or System Settings app.
Third-party app iCloud toggle switches are also usually provided in the Settings app, and you can enable or disable an app’s iCloud support using these switches.
iCloud Backups
On iOS and iPadOS, the operating systems also support iCloud backups which you can turn on and off in Settings as well. When these are on you can select which apps you want to have backed up to iCloud, and which you don’t, also using standard toggle switches.
Apple has several articles on how to use iCloud and local backups on iOS, iPadOS, and Macs.
The major point to remember with these automated device backups, as Apple states, is that not all data on your devices gets backed up – in particular data already stored in iCloud from apps doesn’t get backed up automatically.
Some data doesn’t transfer across devices on backup and restore, if corresponding apps don’t support it. For example, for some data, you may be able to backup and restore data from one iPhone to another iPhone, but not necessarily from an iPhone to an iPad, unless the same apps across devices support the same data.
In iOS and iPadOS you also delete any backed-up data when you turn automatic backups off.
You can also back up some iCloud data by logging into your iCloud account on Apple’s iCloud website, and then export the data from each app on the web. For example for Contacts data synced to iCloud across devices, you can log into your iCloud web account, select the Contacts app, then select “Export” from the popup menu in the upper right corner.
You can also view and manage most iCloud storage from Apple’s iCloud web interface by going to your iCloud homepage, clicking your account icon in the upper right corner, then selecting “iCloud Settings”, and then clicking “Your iCloud Storage” from the menu across the top of the page.
This lets you view storage for most shared iCloud app data, backups, and iCloud Drive.

To view your iCloud’s overall storage on iOS or iPad OS, go to System Settings->AppleID->iCloud->iCloud Storage->Manage. On the Mac it’s the same except that you use the Mac’s System Settings app.
If you turn on the “Optimize Mac Storage” radio button switch in System Settings, a full copy of all your iCloud Drive data will be stored on your Mac, assuming there is adequate local storage space.

iCloud App Storage
For each app you want to store data for in iCloud, turn on its switch in System Settings->Apple ID->iCloud. Starting with iOS 16.2, iPadOS 16.2 and macOS 13.1, there’s a switch at the bottom of the iCloud pane which also allows you to turn iCloud web access for all apps on or off:

macOS’s Local iCloud Drive Archive folder
On macOS, if you are using iCloud Drive storage for Mac apps, iCloud keeps a copy of all stored documents in a local folder called “iCloud Drive (Archive)” in your user folder. You can Option-drag files stored in this archive folder out to other Finder locations to make local copies of them.
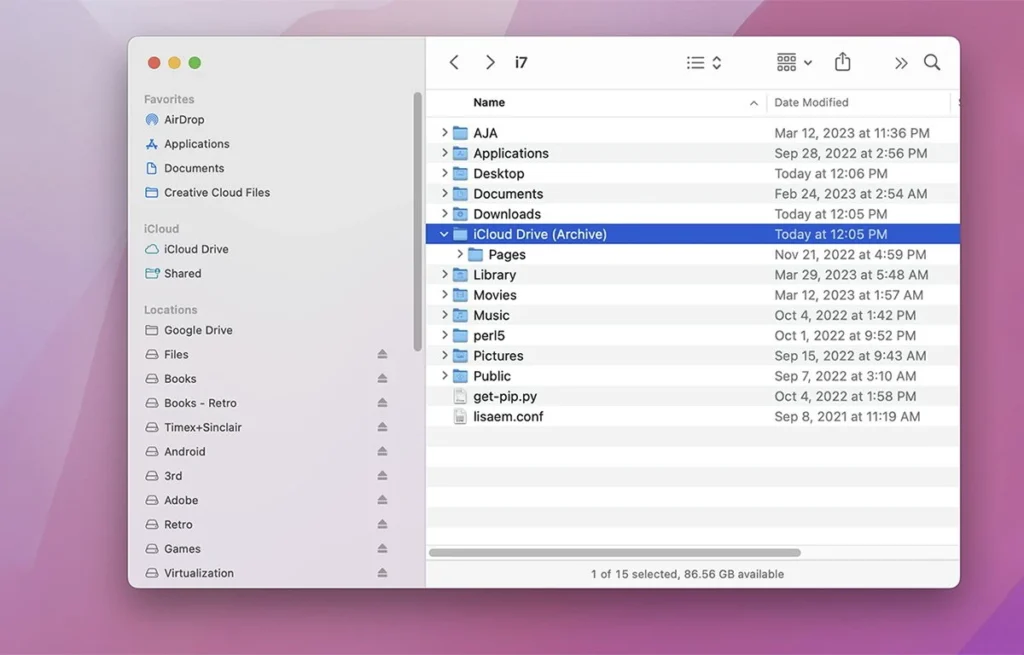
This folder is a snapshot of all your iCloud Drive files at a given time. You can actually create several iCloud Drive archive snapshots.
Each time you sign in or out of your Apple ID, or turn iCloud on or off, your Mac makes a new iCloud Drive (Archive) snapshot folder and appends a number to the end of its name.
If you manually delete any copies of files in any of these archive folders, it doesn’t delete the copies stored in iCloud, it only deletes the local copies. These are essentially local backups of the iCloud-stored documents, not current synced versions.
If you want to manually sync any of these older archived documents back to iCloud, you’ll need to manually copy them back to the iCloud Drive folder in Finder, which will overwrite and sync any current version stored there.
iCloud Drive’s Restore
If you do accidentally delete something important and want to recover it, you’re in luck because iCloud makes restorable backups of your iCloud Drive files, for up to thirty days.
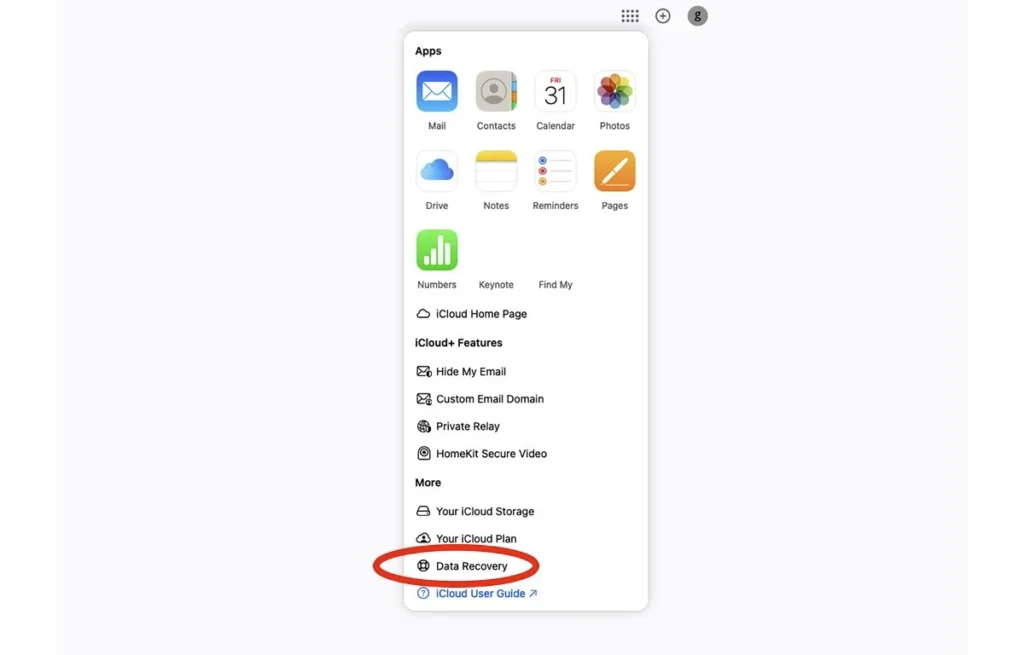
To do so, sign in to iCloud from your browser and click the small grid icon in the upper right corner. Then click “Data Recovery”. This displays the iCloud Data Recovery page.
Click “Restore Files”, “Restore Bookmarks”, “Restore Contacts”, or “Restore Calendars”. Click the files you want to recover and click “Restore” This adds the selected files back to your iCloud Drive.
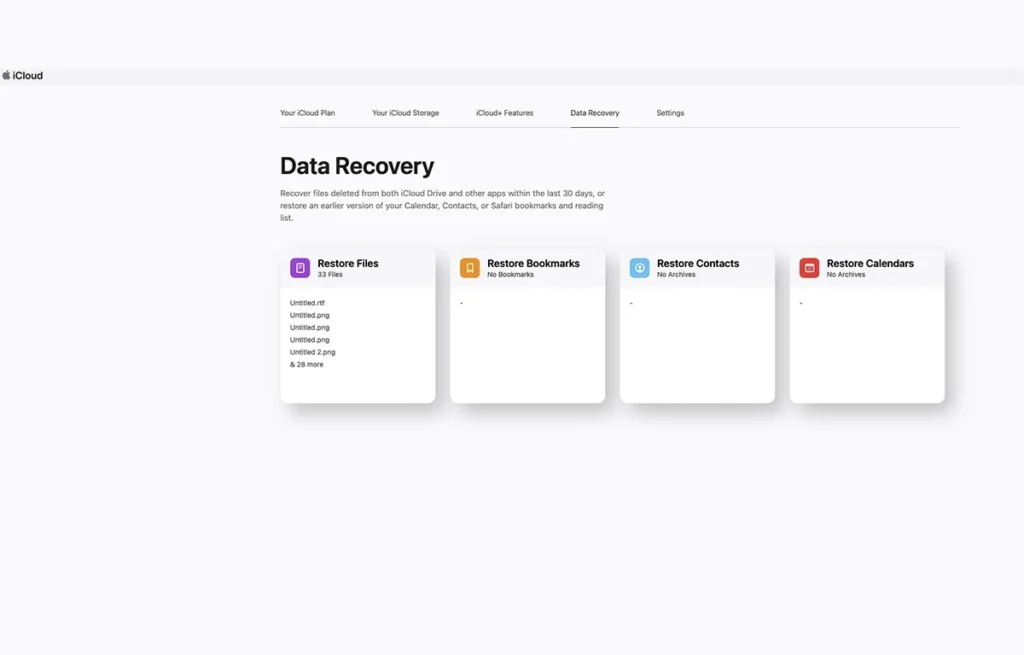
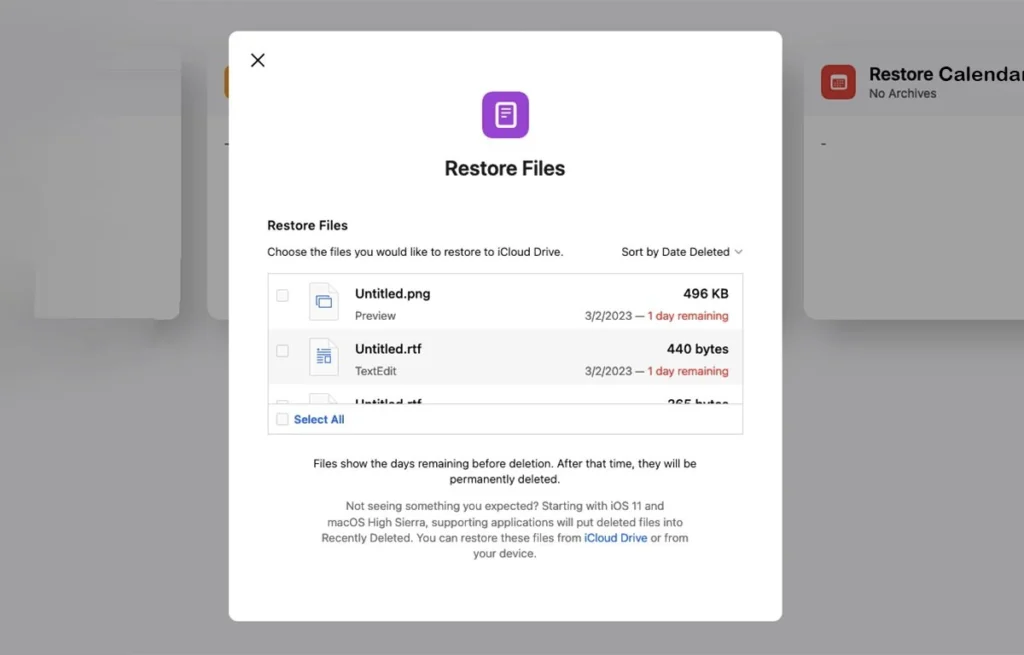
For Bookmarks, Contacts, or Calendars, restored data will be copied back to those applications directly. For Files, a Restore Files popup window will be displayed.
Click the checkboxes next to each file you want to restore, then click the “Restore” button. This restores those copies of the selected files back to your iCloud Drive.
Apple also has a page detailing how to recover and delete files and data from Mail, Notes, Reminders, Photos, Pages, Numbers, and Keynote.
iCloud Desktop and Documents setting
In macOS if you go to System Settings->Apple ID->iCloud->iCloud Drive, a popup window will be displayed with a “Turn On”/”Turn Off” button, and below that, an “Options” button. If you click the Options button, yet another popup window will be displayed which includes a “Documents” tab and a list of apps with checkboxes next to them.
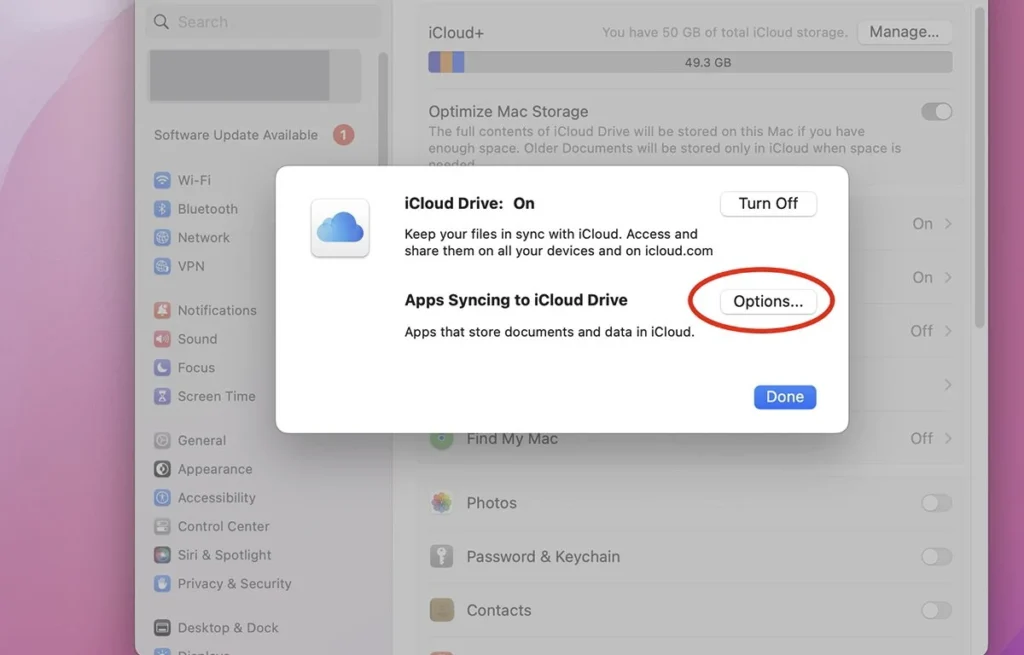
For each checkbox you turn on in this list, that app’s documents will be stored and synced to and from iCloud Drive. This includes any third-party apps on your Mac which support iCloud drive.
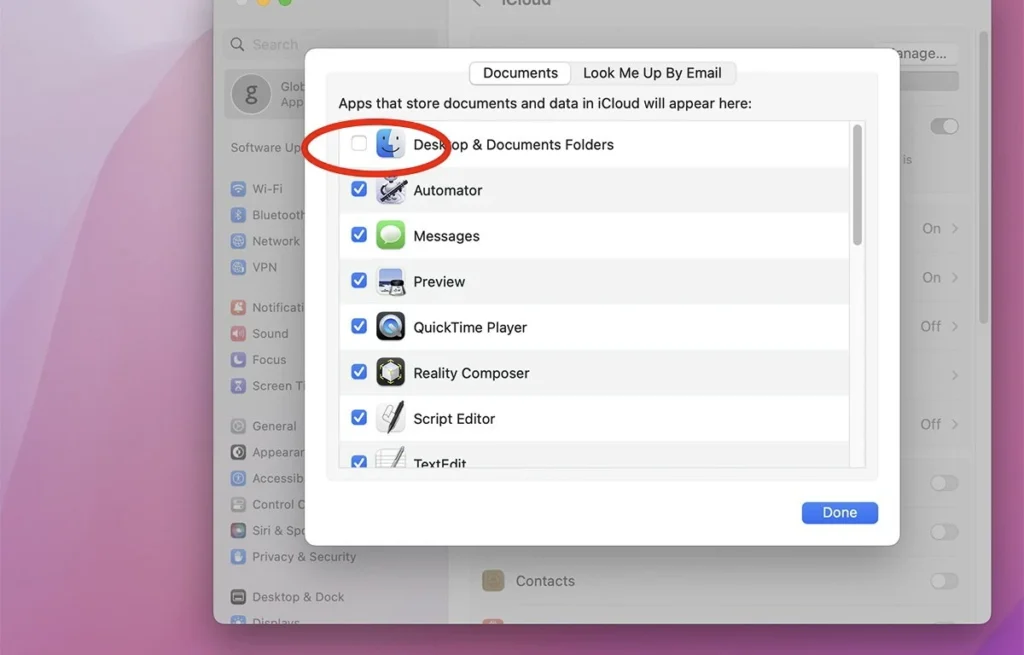
Select the apps whose files you want to sync to and from iCloud.
If you turn on the topmost checkbox, “Desktop & Documents Folders”, macOS will also sync all files and folders present both on the Finder’s Desktop, and in the Documents folder in your user folder.
When iCloud does this, it also adds a small icon next to each synced file or folder in the Finder.
A cloud icon with a downward pointing arrow means that file or folder exists in iCloud but not on your Mac. An upward-facing arrow means that file or folder is stored locally on your Mac but not in iCloud.
No cloud or arrow icon means that the file or folder is both stored locally on your Mac and also synced to iCloud.
As long as the “Desktop & Documents Folders” checkbox remains on, you can Control-click, or right-click on any folder or file on the Desktop or in Documents, and select either Download Now or Remove Download from the menu.
The former downloads the copy from iCloud Drive, and the latter uploads the local copy to iCloud Drive.
Note that using “Desktop & Documents Folders” is different than turning on individual iCloud drive radio button switches in the System Settings iCloud Drive pane itself.
The former copies files directly from the Desktop and Documents folders, and the latter causes individual app data to be synced, which may or may not be files, depending on the app.
If you turn on the “Optimize iCloud Storage” radio button in the iCloud pane, iCloud tries to intelligently choose which files to download or store in iCloud based on the amount of local storage available on your Mac’s Startup Disk.
One thing to be aware of about using “Desktop & Documents Folders”, is that once you turn it on and iCloud has synced files in those folders, turning it back off again will delete all those files and folders from your Mac, but not from iCloud.
You won’t lose your data completely, but turning it off will remove all those file from your Mac locally.
To get the locally deleted files and folders back on your Mac, you’ll need to turn “Desktop & Documents Folders” back on, then re-download everything from iCloud Drive to your Mac – which may be a time-consuming process if those folders contained lots of files.
You can also view which files and folders are currently in iCloud Drive, or synced to iCloud drive by opening a new Finder window and selecting iCloud Drive from the sidebar on the left:
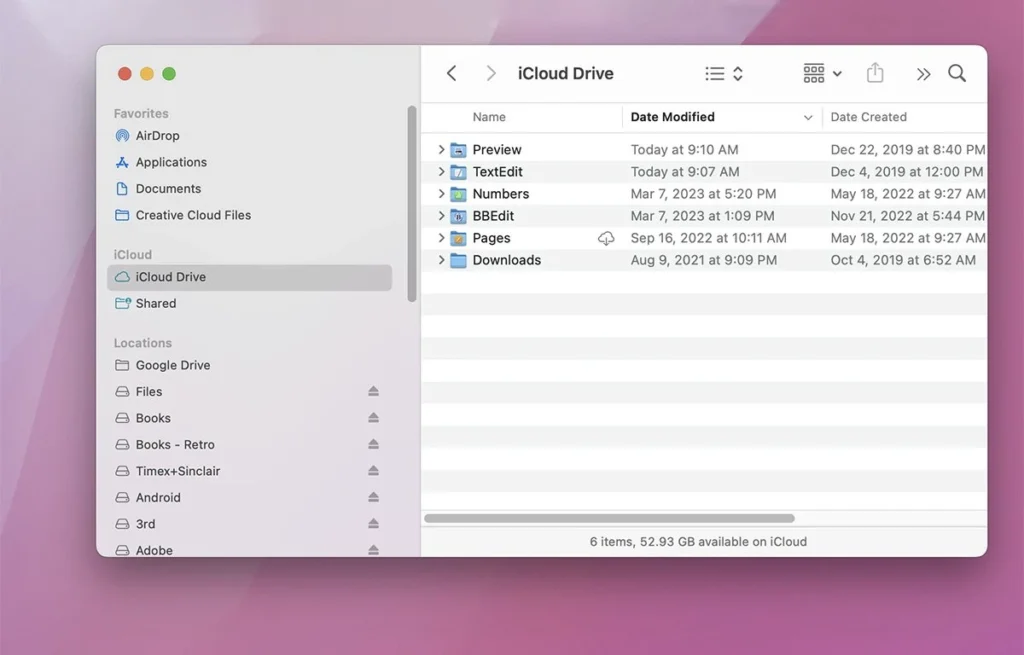
The cloud icon with a downward pointing arrow means the item is stored in iCloud but hasn’t been downloaded to your Mac yet.
Photos and Notes
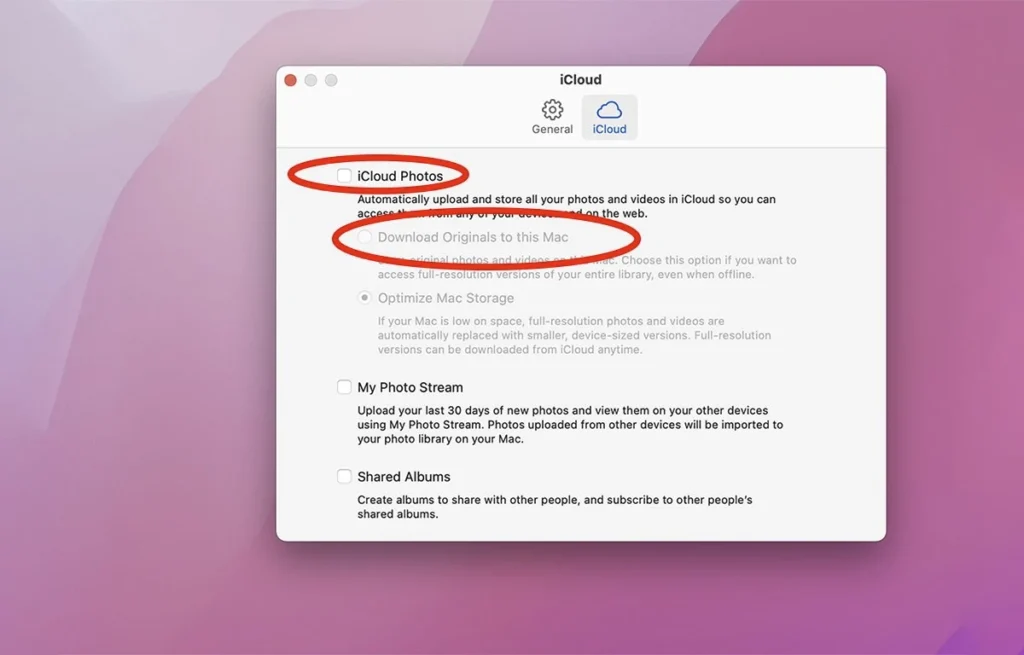
The macOS Photos app has a control in its Photos->Settings window which allows you to download copies of all your photos stored in iCloud to your Mac. To do so, the “iCloud Photos” checkbox must be already turned on, and photos synced to iCloud.
To download local copies, check the “Download Originals to this Mac”.
Selecting this option downloads local copies of all your photos stored in iCloud and stores them in your local Photos app photo library – which is usually stored on your Mac’s Startup Disk in the Pictures folder inside your user folder, in a file named “Photos Library.photoslibrary”.
You can Option-drag this file in the Finder to make a copy of it, and later re-import it back into the Photos app by selecting File-Import
Unfortunately for Apple’s Notes app, there is no built-in or official way to make copies of all your Notes data, nor is there any Notes import/export feature, other than saving everything in the currently selected note to a single exported PDF file, which is less than ideal.
To make backups of your Notes data, you have to either copy each note item and paste it elsewhere, or drag each note item to the Desktop, which only creates a Finder text clipping of that one item.
While there’s no unified way of making backups of your iCloud data, it’s not that difficult once you know how. Perhaps in the future, Apple will add a more robust and automatic backup mechanism to all iCloud features, across all apps, which would make using iCloud all the more compelling.