How to use ReVanced CLI for non-root users
Q: Why do we need to learn how to use ReVanced CLI when we already have ReVanced Manager?
A: Because some features are still not available on ReVanced Manager (e.g. custom themes for youtube app) and build time on PC is faster than smartphone.
In this guide I will build youtube app, you can do the same with other supported apps.
This guide is for Windows users only.
Step 1: Install Zulu OpenJDK 17
(Choose only one of the two options)
Option 1: Install from homepage
Visit the Zulu OpenJDK homepage here to download the version 17 installation file and install it like other software. Then reboot your PC.
Option 2: Use Chocolatey to install (recommended)
I recommended this option because if we just install from the homepage, the command maybe don’t work. Cause is path environment is missing (something like JAVA_HOME, JAVA_PATH). But if we use chocolatey to install, this tool will automatically setup path environment for us and the command will work anywhere.
Visit Chocolatey homepage to install it, if you want step-by-step pictures for chocolatey.
After that use this command to install Zulu OpenJDK 17:
choco install zulu17 -yThen reboot your PC.
Both options 1 and 2 you need to check if the system chooses the default Zulu OpenJDK by using the command:
java --version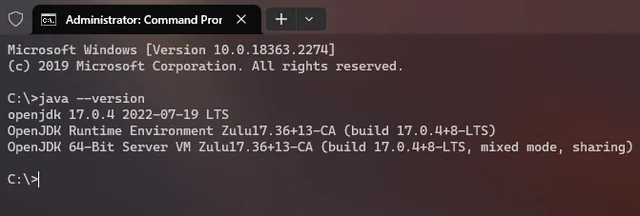
If the java –version command gives different results than the Zulu OpenJDK, you need to uninstall the old JDK version and restart your computer. Then check with this command again.
TIPS:
In this guide we don't need Android Debug Bridge (adb), but maybe you will need it in the future, so use this command to install it: choco install adb -y
Step 2: Download required packages
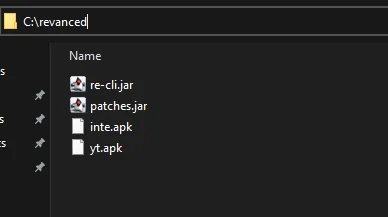
(Rename to shorten command)
- Revanced CLI (re-cli.jar)
- Revanced Patches (patches.jar)
- Revanced Integrations (inte.apk)
- Original YouTube APK (yt.apk)
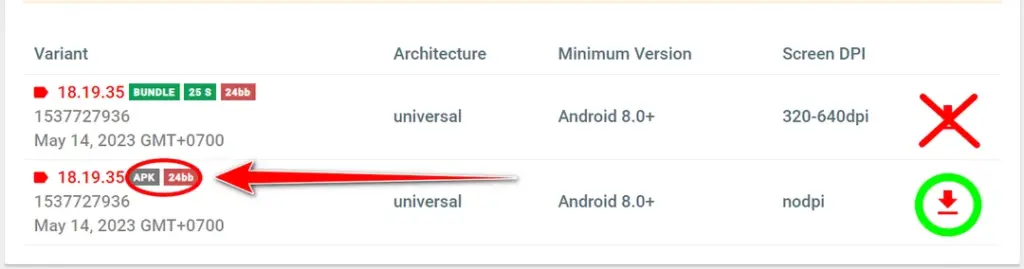
Before downloading youtube apk, you NEED check the target version, click here
The version may be different in the future and I don't have time to update this post, so you need to check before downloading.Select the same version as “target version”, make sure you choose APK file(not bundle)
Put all files in one folder, for example C:\revanced
Step 3: Build ReVanced apk file
(Choose only one of the two options)
Option 1: Install all patches (recommended)
You can use Powershell, but i recommend you to use Windows Terminal from now on (it uses Powershell by default). Because it has a very useful feature for easy report error, I will talk about it at the end of the post.
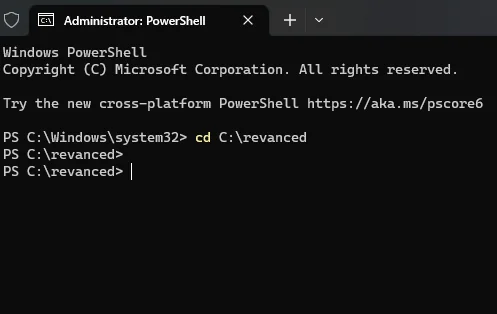
Now find Windows Terminal in the windows search bar and open it with administrator privileges:

Type and enter: cd C:\revanced
Before continuing, if you want the old dark theme instead of the amoled theme, you must create the options.json file and paste this value:
[{"patchName" : "Theme",
  "options" : [{
  "key" : "darkThemeBackgroundColor",
  "value" : "#212121" }]
}]
It’s the hex code of the old dark theme color, you can change to another color value you want. #212121
Now copy and paste this command into Windows Terminal, then enter:
java -jar re-cli.jar -b patches.jar -m inte.apk -a yt.apk -c -o ReVanced.apk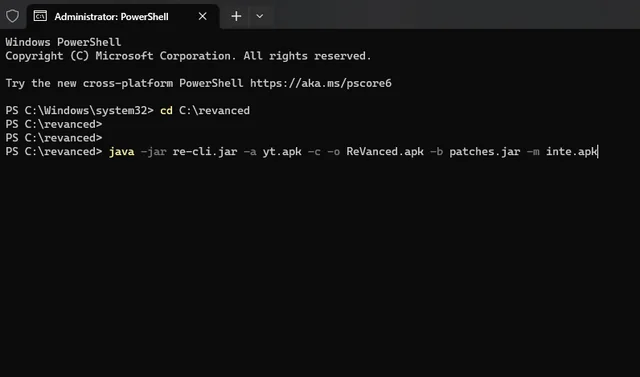
After that command line finished, it will create a file ReVanced.apk, just need to move that file into your smartphone. You must install Vanced MicroG first, then install ReVanced.apk
This option is easy but it will install all the patches so there will be features you don’t use. If you don’t like it, choose option 2.
Option 2: Install optional patches
To list patches use this command:
java -jar re-cli.jar -b patches.jar -l --with-packages -a yt.apk | findstr "youtube"If you want to select the patch to install instead of installing all, add the above command line and separate the patch names with --exclusive -i
It will be like:
java -jar re-cli.jar -a yt.apk -c -o ReVanced.apk -b patches.jar -m inte.apk --exclusive -i patch-1 -i patch-2 -i patch-3 -i patch-4 -i patch-5 ...Just remember, always choose because it’s required for non-root. microg-support
You can use my command if you want, here is my patch list:
client-spoof

copy-video-url

custom-branding

disable-shorts-on-startup

disable-zoom-haptics

general-ads

hdr-auto-brightness

hide-cast-button

hide-endscreen-cards

hide-floating-microphone-button

hide-get-premium

vanced-microg-support ----> need for non-root phone

minimized-playback

navigation-buttons

old-quality-layout

open-links-externally

remember-video-quality

return-youtube-dislike

theme ----> need for custom themes

video-ads
So my command be like:
java -jar re-cli.jar -b patches.jar -m inte.apk -a yt.apk -c -o ReVanced.apk --exclusive -i client-spoof -i copy-video-url -i custom-branding -i disable-shorts-on-startup -i disable-zoom-haptics -i hdr-auto-brightness -i general-ads -i hide-cast-button -i hide-endscreen-cards -i hide-floating-microphone-button -i hide-get-premium -i hide-shorts-button -i vanced-microg-support -i minimized-playback -i navigation-buttons -i old-quality-layout -i open-links-externally -i remember-video-quality -i return-youtube-dislike -i theme -i video-ads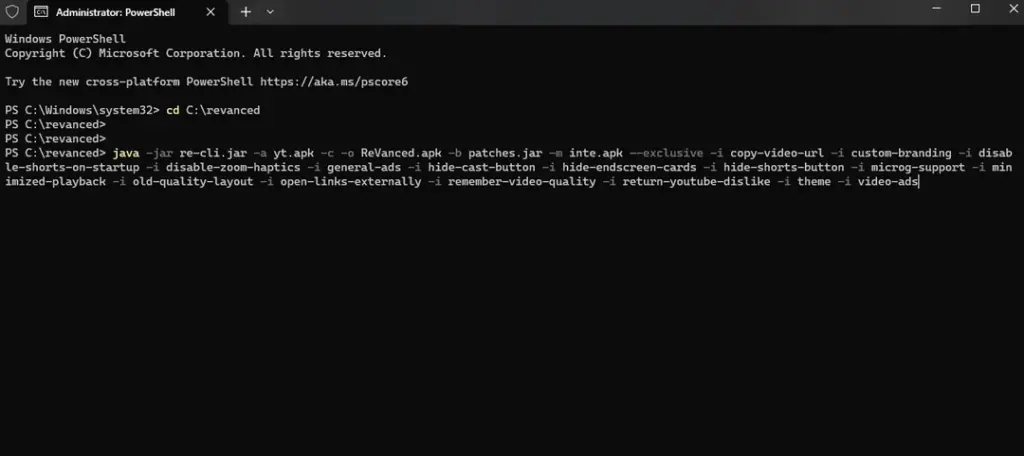
Press enter to run it and after running it also create a file ReVanced.apk, remember need install Vanced MicroG first then install the ReVanced.apk file. All done, enjoy it.

If you want to run the command again, make sure you delete the “.keystore” file to avoid errors.
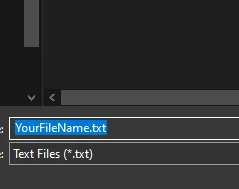
If you encounter any error messages, instead of just taking a screenshot, let use this feature of Windows Terminal. Right click on the tab title of Windows Terminal —> select Export Text:
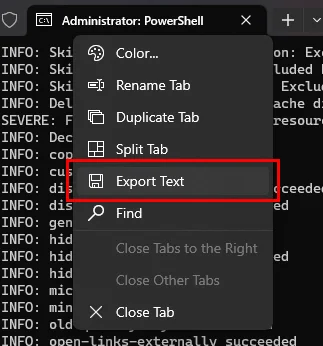
Then save with whatever name you want. This text file will save everything that appears while the command runs, it will make it easy to copy errors to ask or send this file to someone who can help you.
Thank @lethinhrider