How to use SSH for secure connections in macOS
The Secure Shell — SSH — allows you to send secure, encrypted, communications between computers that is nearly impossible to crack. Here’s how to use it in macOS.
Before personal computers, people used time-sharing terminals in computer labs which were attached to mainframe computers. Each user sat at a dumb terminal which was merely a display and keyboard connected to the mainframe computer. Later, as mini computers began to arrive, terminals were connected via a network.
Originally, to access another computer on a network remotely a program called Telnet was used. Telnet was one of the earliest internet applications, and was widely used in university and research settings. Security wasn’t considered an issue at the time, since most people still didn’t use the internet, and mass online fraud wasn’t a problem.
Internet commercialization in the 1990’s changed all that. As time went on, and with the advent of e-commerce, exchanging personal or financial data became ubiquitous.
Telnet still worked, but had one major flaw in the age of internet-everywhere: it sent and received all data in the clear as plain text. This included personal and financial info, and worst of all, passwords — anyone listening in on your network traffic could steal them.
To solve this problem, in 1999, Finnish developer Tatu Ylonen created the Secure Shell (SSH) – both a networking protocol and UNIX tool for sending and receiving data over unsecured networks by means of encryption combined with Public Key Infrastructure (PKI).
Public Key Infrastructure
One of the most difficult problems to solve in computer security is how to guarantee the authenticity of a remote user. Several techniques exist which hackers can use to impersonate users, and it’s difficult for servers and other users to insure impostors don’t gain unauthorized access.
Even long, difficult-to-guess passwords can be cracked by powerful supercomputers. Even the best passwords are insecure. And worst of all, passwords can be stolen.
What is needed is something more secure, which can be verified on both ends of a connection by both parties, which is complex enough not to be guessed or cracked, can’t be stolen, and which can’t be impersonated.
Such a solution is found in Public Key Infrastructure (PKI). We won’t go deep into PKI here as it’s a complex topic, but we’ll summarize briefly how it works.
The basic idea behind PKI is that any given computer user generates a pair of keys – one public, and one private. Both are secured with a password only the user knows, but the password isn’t required for key use.
At key generation, an algorithm creates a long encoded block of scrambled text inside each key called a cryptographic hash. The private key remains on the user’s computer in a file and is never sent or given out – ever. The second or “public” key contains a different hash, but one still related to the private one.
Only the algorithm knows how to unhash and compare both keys.
Hence, only the algorithm can verify or deny any given key pairs’ authenticity. Both keys are required for communication at all times. One key without the other is useless and invalid.
Once a key pair is established, the user publishes their public key on the internet. A user’s public key file can also be given out to others for verification purposes. But, the user’s private key never leaves their computer or possession.
When a user wants to connect to a server or service using PKI, he or she first asks that service’s administrator to add their public key to an authorized keys list which resides on the server or service. This list acts as a sort of verified users list the server can use during user authentication.
Next, when the user tries to connect to the remote server or service, the connecting app sends a handshake from the user’s computer containing their public key. The server looks in its list of known keys, and if it finds the same public key, it sends back a challenge to the requesting computer: what is your private key?
If the sender is legitimate, and the same computer as the original sender, it reads, encrypts, and sends the user’s private key securely over the network. When the server receives the private key, it decrypts it on the server, then reverse-hashes both the user’s public and private keys.
If the algorithm confirms that the key pair matches, it authenticates the user, sends a handshake confirmation back to the sender, and an encrypted, secure connection is established.
The upshot of all of this, of course, is that without the corresponding private key, communication is impossible. No passwords to send, no man-in-the-middle attacks to impersonate servers – the requester either has and sends the private key when challenged by the server or it doesn’t – there’s no middle ground.
Without it, the server will refuse the connection.
Most of this connection action happens transparently – without the user knowing or having to even think about it – all the server cares about is if any given connection request comes from the computer which holds the matching private key or not. If not, no dice. No exceptions.
All of this is a bit of an oversimplification, but in essence is how PKI works.
PKI has the added benefit of being easier to use and less obtrusive – once set up and installed, PKI key pairs eliminate the need for passwords – no more having to type a password every time you log in to a server. Your identity is known and guaranteed – and passwords are a thing of the past.
Using SSH on the Mac
Apple’s macOS, being a full UNIX system, has full support for PKI built-in. It uses OpenSSH – which is part of the OpenBSD project. Setting up your own PKI key pair is fairly easy in macOS. Once your keys are installed on your Mac, you’ll rarely need to access them directly – they will mostly be used by applications in the background silently.
In macOS, SSH keys live in each user’s folder, in a hidden folder called .ssh. This folder is normally hidden (for security reasons) unless you show invisible files in the Finder. If you haven’t yet generated your PKI keys, this folder probably won’t exist – it gets created by the system when you generate the keys.
There are two easy ways to generate a PKI key pair in macOS. Either the Terminal, or a third-party keychain app such as GPGTools can be used.
How to generate a PKI key pair in macOS Terminal
In Terminal type:
ssh-keygen -b 4096 -t rsa…and press Return.
You’ll be prompted for a location to save the key files, with the Terminal responding “Enter file in which to save the key (/Users/username/.ssh/id_rsa)” Just press Return at this point.
Next, you’ll be prompted for a password to use for the key files. In most cases, just press Return. You can enter a password if you want, but note that this password is not needed for key exchange: it’s only used when making local modifications to the key files themselves.
Passwords generally are redundant with PKI – the keys themselves are the security, and passwords, as already discussed, are in general insecure.
The ssh-keygen UNIX command is a tool to generate keys. There are a variety of options and settings for key generation. You can view all ssh-keygen options by typing “man ssh-keygen” in Terminal and pressing Return.
The -b 4096 option tells ssh-keygen to generate a 4096-bit strong key. At current world supercomputing speeds, it takes the fastest supercomputers on earth over one-hundred years to crack a 4096-bit key – which means their security is guaranteed.
How to generate a PKI key pair using GPGTools
Instead of using Terminal to generate keys, you can download and install a third-party keychain app such as GPGTools. Once downloaded, run the installer. When the installer finishes, close it, then open the GPG Keychain app in your Applications folder.
If no keys were previously installed on your Mac, GPG Keychain will prompt for an email address and password to use for key generation. Enter appropriate info, then click Generate. After a few seconds key files will be created in an .ssh folder, just as ssh-keygen did above.
Either way, you now have an .ssh folder inside your user folder. Inside this folder you’ll find five items:
- authorized_keys (remote users you want to allow ssh to authorize to connect to your Mac)
- config (ssh config info)
- id_rsa (your private key)
- id_rsa.pub (your public key)
- known_hosts (a list of known remote servers you want to allow to connect to your Mac).
If you open your id_rsa.pub key file in a text editor such as TextEdit, you’ll see your public key, followed by your local machine’s user and machine name. For example:
ssh-rsa AAAAB3NzaC1yc2EAAAADAQABAAABAQDFYeQoBHJD4aNtuJrClanz02mDC74O/qkVuWqMxSFqTohEB/o/E5eUYia+wPnSRHSo8W2aQo69wZusWXqSMIltjsvadsU51v0j1dw9f3pJNsOQEfOQhVq78HGti+crSI7R/1umbGHkLAUldpEEOhcOqFI+/3UeXTX93SMd1VhD14k32blma8fwbzTY9AUx0osD7FOJWK/Wz7YDEuxjnFmrHUzuPmzDQQGjYR0S8FaO7ICSeoPIzic0ysgWjwcNtfQnDODEXkt+AhWeQUzIdFSMhrxjPDT5fVUbocPwNgCCtDLwnZ74MrFjgm0hARrN+IcyFXbSPkO4KCOOXl1J1n+H [email protected]In fact, do that now: navigate to your Users/~/.ssh folder, open id_rsa.pub in a text editor, and copy the entire thing.
Since both the public and private keys are stored in the two files as text, make sure your private key file is never compromised: if someone else gains access to your private key, they can install it onto another computer and impersonate you.
If all you care about is outgoing connections to remote servers, then you don’t need to worry about most of these files except id_rsa and id_rsa.pub. The other three files are generally used in a server setting for incoming connection requests from other computers. In most cases you won’t need to think about them.
Be sure to make backups of your id_rsa and id_rsa.pub files in a safe place immediately.
Once your key setup is complete, your .ssh folder should look something like this:
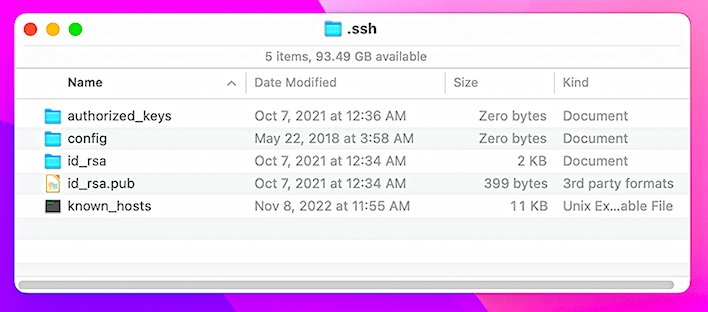
The known_hosts file may or may not get generated by the system until the first time you use SSH to connect to a server, but we’ll discuss that file below.
Server side
Now that your keys are in place and ready for use, you must set up whatever server/service you want to connect to so that they use PKI instead of passwords. How to do this varies depending on your server hosting service.
If your server host is a web hosting service which offers cPanel or a similar web frontend, those services usually offer a section in the cPanel called “Security” or “Terminal”. You’ll need to log in to your cPanel first, then go to the Security pane:
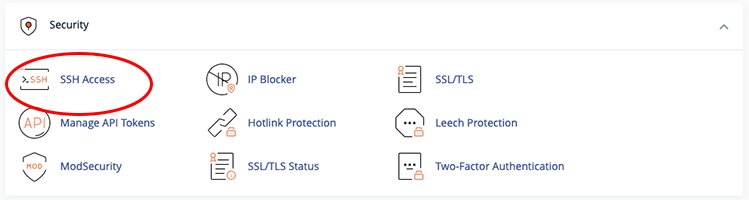
Next, click on “SSH Access”, then click the “Manage SSH Keys” button:

Next, click “Import Key”:

On the next page, fill in a name for the key in the top box (the name doesn’t matter), and in the public key field, paste in your public key:
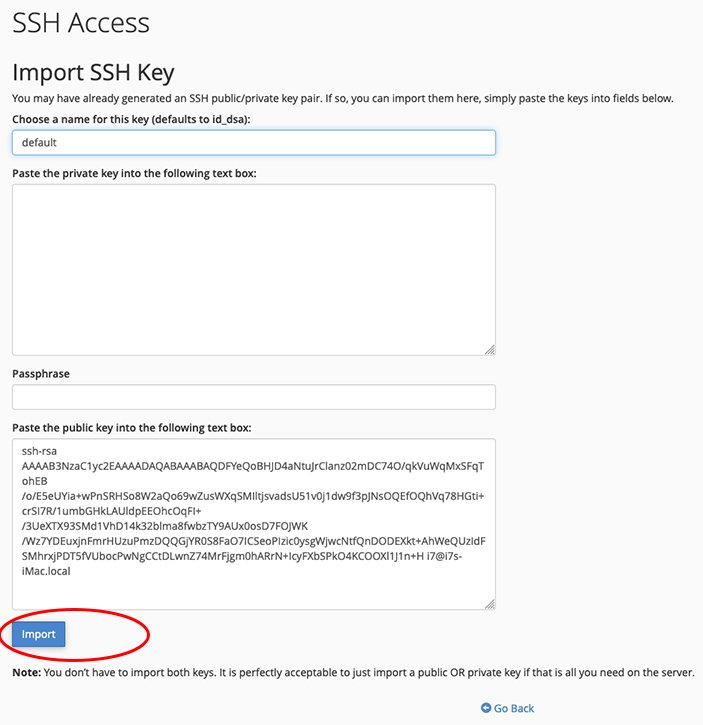
Usually this field has a caption of “Paste the public key into the following text box:” or something similar.
Do not paste anything into the private key text box. This is usually named “Paste the private key into the following text box:”.
While technically your cPanel and web host are secure, you don’t want to take any chances. Besides, it’s not needed — when your computer tries to connect to the server using SSH, the server will ask your local computer for your private key at handshake time.
If you did enter a key password at key generation time, enter it in the “Passphrase” field, otherwise leave this field blank.
Next, click the Import, then the Go Back buttons.
Your public key is now imported to your cPanel and web host, but you still need to authorize it before you can use it. On the cPanel page under “Public Keys” you’ll now see your key listed but you’ll see “unauthorized” next to it. Click the Manage button.

On the next page, click the Authorize button, then the Go Back button. Back on the previous page you should now see “authorized” next to your public key in the list.
If the server you are connecting to doesn’t provide a cPanel or other web interface and only offers bare metal access, you will need to contact your sever admin to have them install your public key. In most cases on UNIX or Linux servers, this is done in the sshd.conf and ssh.conf files, but your mileage may vary, depending on what OS and server software your server is running.
Connecting
Now that your keys are installed, and your server knows how to use them, it’s time to try a connection.
You can test the connection in Terminal by opening a terminal window and typing “ssh username@ip-address” and pressing Return.
Alternatively, you can type “ssh username@domain-name” and press Return.
In the first case you need to know your server’s IP address, and in the second case, you need to know your domain name. On cPanel-based systems, the username is usually the same as your cPanel name, but may be different depedning on how your web host company configured your server.
The default UNIX port SSH connects on is port 22, but most web host providers will have changed the SSH port number to something else for security reasons. If this is the case, you need to know the port number and specify it using the -p option in the ssh command. For example:
ssh -p 4612 username@ip-addressSee the “ssh man” page for more info on using the -p command. If you don’t know the port number, you’ll need to contact your web host provider, or see if it’s mentioned in their online knowledgebase.
Once the above command is executed, your Mac will initiate an SSH session with the server, starting with a handshake in which it sends your public key. The server will then respond by asking for your Mac’s private key. The built-in SSH machinery will read it from disk and send it back to the server in the response.
All of this will happen silently.
Once the server decodes your two keys and verifies them, if it finds they match, it will send a confirmation back to your Mac. If successful, you may see a cryptic message in Terminal such as:
The authenticity of host 'example.domain.com (192.168.2.155)' can't be established. RSA key fingerprint is 45:83:45:4a:e3:29:7e:fa:f3:c3:7d:64:ea:3a:6f:58. Are you sure you want to continue connecting (yes/no)?Type yes and press Return.
Terminal will most likely print a message similar to: Warning: Permanently added ‘example.domain.com,192.168.2.155’ (RSA) to the list of known hosts.
You only need to do this the first time you connect to each server via SSH. After that your Mac will have added that server’s info to your local known_hosts file. Next time you initiate the same SSH connection, it will first look for the server in the known_hosts file. If it finds it, it will connect without displaying any of the above.
Once connected via an SSH connection, all communications between both computers in Terminal including all text and commands you type will be sent and received over a secure, encrypted connection.
Also be aware that if you are using a VPN and it’s connected in another country, your web host provider may deny all remote SSH connections. This is to prevent hackers in other countries from gaining access to your web host. In such cases, you’ll have to disable your VPN and try again.
Since we’re on the subject of VPN’s it’s a good time to talk about…
SSH Tunneling
What you did in the above example was to create a connection based on SSH Tunneling. Tunneling simply means that a connection has created a secure “tunnel” in which all communications in both directions are fully encrypted. Even if a man-in-the-middle attacker intercepts your communications or impersonates you, the data transfered between the two computers is still fully encrypted.
Without access to your private key, an attacker still can’t decrypt your data.
Most commercial and free VPN clients use such tunnellng on various ports to VPN servers in other countries. In fact, most VPN connections will send and receive data across many such servers per session. In most VPN server configurations, there is also a dedicated SSH server located elsewhere, but SSH may also reside on the same VPN server (which is considered a bad security practice).
As your data traverses your VPN, it becomes more and more difficult for anyone eavesdropping on your communications to tell where the data originated, and where it is going. The tunneling encryption adds one more level of security.
SSH Connections Using GUI Apps
Where SSH’s power really shines on the Mac is when using a networking app (such as an FTP client) with a graphical user interface. In such cases, most apps allow you to specify your public key once, then as soon as you make a new connection it just works – no passwords, no more prompts, no hassles.
Everything happens behind the scenes which makes connecting a breeze.
For example, the excellent Transmit app by Panic has a public key button in the connection window:
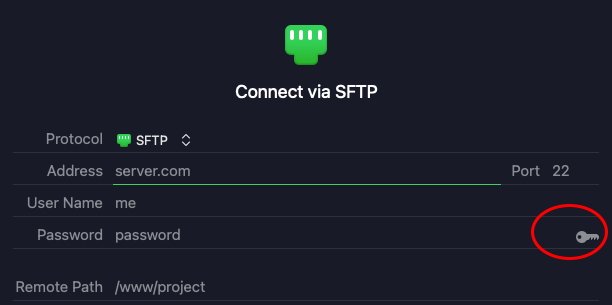
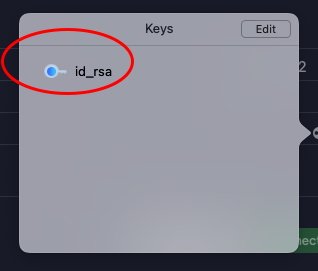
Clicking the key icon displays a small window which will show your default public key, if it’s installed on your system:
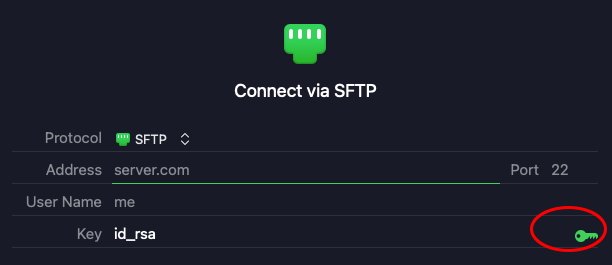
Click your public key, it will be set, and the small key icon in the connection window will turn green:
Now enter your server’s address, custom SSH port, if any, user name, and path on the server you want to access.
Click Connect.
If all goes well Transmit will connect and you won’t be prompted for a password. Transmit may prompt you with a GUI version of the “authenticity of host can’t be established” message the first time you connect, but if you confirm the dialog, it will add the server info to the known_hosts file just like in the Terminal example above.
The next time you make the same connection in Transmit, it should be seamless: no passwords, no prompts, no nothing.
In order to send and receive all FTP data securely, you must use the SFTP protocol instead of plain FTP.
You can also save the connection window settings to Favorites in Transmit and then simply select it from the Favorites list next time for an instant connection – Transmit will remember your key each time automatically.
Panic has a short instructions page on adding SSH keys to connections.
SSH is a powerful part of UNIX infrastructure and we’ve barely scratched the surface. For a deep dive into SSH, consult a good book such as O’Reilly’s SSH: The Secure Shell. You can find a used copy on eBay for around $20.
Using SSH for secure connections can speed up your workflow on the Mac because you won’t need to enter passwords again. Setup takes a little work, but once your keys are installed and servers configured, you’ll wonder how you got along without it.