Murgaa Auto Mouse Click for Mac
The Software presented here is a small Mac Automation Utility with which you can Click at Multiple Screen Locations on Mac. You do not need to know programming in order to use it. There is no need to have knowledge of complex scripting or anything else. This Mac Auto Clicker allows you to script Mouse Clicks. There are configurable Keyboard Shortcuts available in the software which can be of help when creating an automated script with selected Mouse Actions.

Download
How to Create Mouse Automation Script with Mac Auto Mouse Click Software
Given below steps briefly outline how you can use the software to automate clicking of mouse on your Mac. This software is all about clicking Mouse at pre-determined positions. For every Click added to the script using this software, you can define click type, click delay, comment to remember about click and whether you wish to reposition the mouse cursor back to the original position after the specified click has been simulated / automated.
- Launch Auto Mouse Click Utility from Applications Folder of Mac Finder.
- From the Menu of the software, Select File Menu and Click on New.
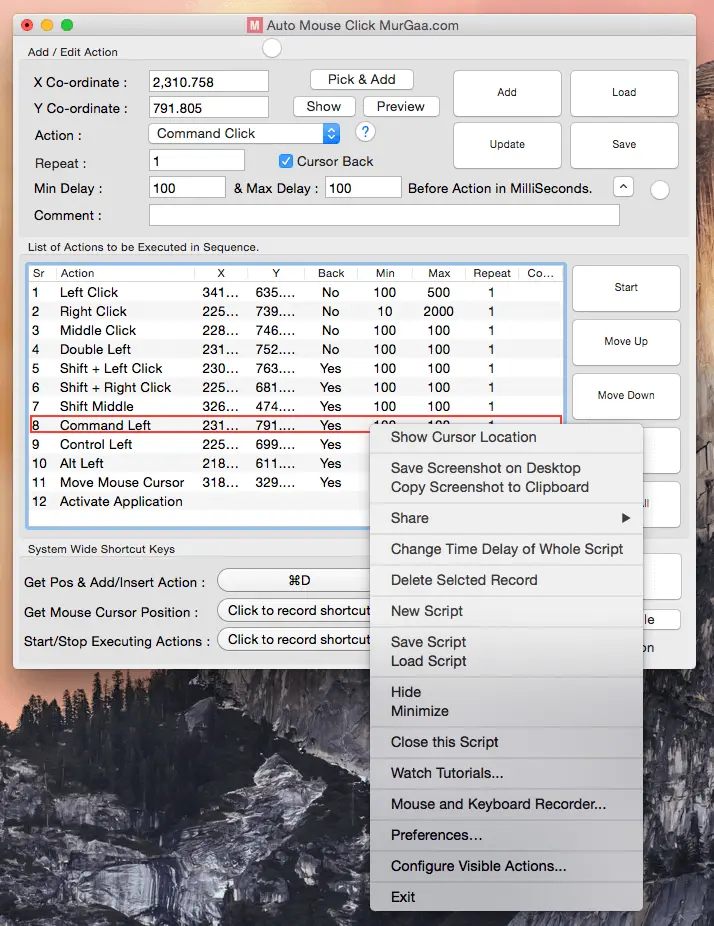
- The above action will display the main window of the software as displayed in the screenshot (without the About Auto Mouse Click Screen) above.
- Look at the bottom of the software screen and select a keyboard shortcut to get the Mouse Cursor Position.
- Once you have selected a Keyboard Shortcut, test it by moving the mouse cursor to some random location on screen and then press the selected shortcut key on keyboard to get the Mouse Cursor Position displayed automatically in the Auto Mouse Click Software.
- The Keyboard Shortcut to get the Mouse Cursor Co-Ordinates can be really handy to know what is the screen co-ordinates of the Mouse Cursor.
- Now Position the Mouse Cursor at the position where you would like this Auto Mouse Click Software to actually click. Press the configured Keyboard Shortcut to get the Screen Co-Ordinates displayed in the software and finally press the Add Button.
- By following the above process, you can add multiple mouse clicks and you can define attributes of every mouse click to be of either Left Mouse Click, Right Mouse Click or Middle Mouse Click. With every Mouse Click, you can define the delay before the click is simulated, a comment so that that later, you can identify as to what a specific mouse click is supposed to do.
- The Added Mouse Clicks will be displayed in a List and newly added clicks will go to bottom automatically. The Newly added Mouse Clicks go to the bottom of the list only if no mouse click is selected in the list.
- In case an existing Mouse Click is selected in the List while you add another Mouse Click to the script, the newly added Mouse Click will be added after the selected Mouse Click and not at the bottom of the list.
- You can Move the Clicks in the List by selecting the Mouse Click to be moved and by pressing the Move Up or Move down button. A selected Mouse Click can be deleted using the Delete button and the whole list of Clicks can be emptied by clicking on the Delete All button in the main screen of the Mac Auto Mouse Click.
- The AutoSave functionality is disabled in Mac Auto Mouse Click and hence, only when you click on the save button, the Mouse Clicks added to the software will be saved as a file. In case you do not wish to save the changes to a Auto Mouse Click file, just click on the Close button and you changes will be discarded.
- The Script Repeat Count determines how many times the Mouse Clicks added to the script must be automated as a bunch.
- Once you are satisfied with the Mouse Clicks added to the script, have a look again to make sure that the mouse clicks as added to the script will precisely do whatever you want to automate.
- There is a button labeled Show at the top of the screen which just moves the Mouse Cursor to the position entered in the X and Y Text Fields. This can be helpful to verify the Mouse Click location without actually running the script.


