Erase a Hard Drive using the Mac Terminal
While the Terminal may not be the first thing you think about using when manipulating disk, it can give you more options and control over your disks. And, if nothing else, it’s a good tool to keep in your back pocket.
I’m going to show you how to locate the disk you want to erase, unmount that disk, and then erase that disk in a particular format. Lastly, I’m going to show you how to do a more secure erase if you need to do that.
I’m going to take this step-by-step and walk you through what each command does so you can understand it. This guide is crafted for those who are newer to the Terminal or just want a little more guidance with it. We’re only going to be focused on erasing the drive in this video; other things like multiple partitions or volumes, encryption, etc. are not going to be covered.
Finding the Disk
For the purposes of my demonstrating this, my external drive will be called “Test”. We need to know the path the Mac uses to connect to it. To do that, open your Terminal folder either from Spotlight or by going to the Applications Folder, then the Utilities folder, then double-clicking on Terminal. Once the Terminal is open, type in the following command
diskutil list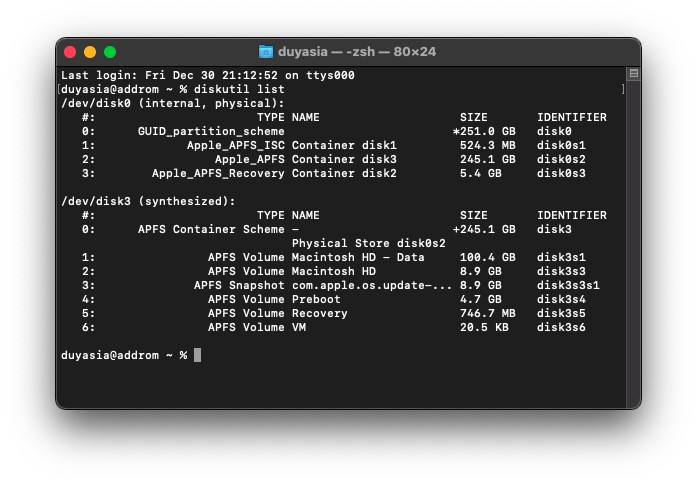
This invokes the Disk Utility function (the same one the app uses) and has it list out the disks, hence the list command. Hit enter on your keyboard, and the Terminal will now list out all the drives connected to your machine. There’s a lot here, but don’t get too intimidated.
This is organized into sections. In this arrangement we have 3 disks that the Mac sees marked as internal, synthesized, and external / physical to help us see. Disk0 is, of course, the drive built into this Mac. The synthesized one, disk1, is how the Apple File System has organized itself into various volumes and partitions for things like booting, recovery mode, data storage, etc. What we’re looking for is our external drive. Since I only have 1 external drive connected to the computer, it only shows the one external disk as disk2. If I had multiple external drives then we’d see them listed under disk3, disk4, etc. Depending on how many drives you have connected to your machine, both inside and out, your drive might have a different number, so just make sure to change that number accordingly.
Under my disk2 there are 3 sections. The first, #0, is the partitioning system for the whole drive, #1 is the EFI for managing it, and #2 is the actual partition for the drive that I use. I can see section 2 is formatted as an ExFAT drive and is named Test, as well as its size, and the “Identifier”. The identifier shows you the disk and sector that the Mac uses for communicating with the drive. Since we’re wiping the entire disk, we just need to know that this is disk2 and won’t worry about the other identifiers.
Unmounting the Disk
Now we need to unmount the disk so we can ensure no other processes are working on it. You can, of course, do this through the GUI either by dragging the drive to the trash can or via right clicking, but since we’re already in the terminal I’m going to show you the command. Type in the following code, but change the # to the number of the disk you found in the previous section. In my case, it would read disk2.
diskutil unmountDisk /dev/disk#Remember to change the number behind disk to whatever number you had listed in your previous list command. Hit enter, and after a second or two the Terminal should say that the drive was unmounted successfully. If the drive couldn’t be ejected, then hit the up arrow on your keyboard to bring up the previous message, then use the left and right arrows to navigate your cursor to just after the unmountDisk command and type in /force. The new command now reads (again with # being replaced with 2 in my case):
diskutil unmountDisk /force /dev/disk#Not surprisingly, this is the same Force Eject command if you’ve ever used it in the GUI.
Basic Erasing
Now we can erase the disk. The next part of the command is the format of the drive, so we need to know how we’re going to use the drive. There’s a bunch that you can do, but here’s the 5 formats you’ll most likely need.
- If you’re only going to be using this drive on modern Macs or as a Mac boot drive, then you should type in APFS
- If you’re only going to be using this on Macs, but it might be used with older Macs (particularly anything older than 10.12) then type in HFS+
- If you’re going to only use this on Windows, type in NTFS
- If you’re going to use this drive on Mac and Windows, type in ExFAT
- Lastly, if you want the most compatibility across systems, are using it with older computers, or making a Linux flash drive, type in FAT32.
There are more filetypes that the Mac can do, but these are the most common. For my case, I’m going to type in ExFAT since this drive is going to be used between Mac and Windows.
So the first part of the code will be diskutil eraseDisk. Now we’re going to type in what we want the drive to be named after being formatted, say ExFAT. I’m going to name mine Success. Finally, we need to point the command to the location of the drive, which is dev/disk2 in my case. The full command now reads
diskutil eraseDisk ExFAT Success /dev/disk2As generally, it looks like this:
diskutil eraseDisk FORMAT DRIVE_NAME /dev/disk#Hit enter, and the drive should start erasing and show its progress. The amount of time it will take will depend partially on the specs of your Mac and the size and type of drive you’re erasing, but typically within a few seconds it will be done. Now we have our drive named “Success” and formatted as ExFAT.
Secure Erasing
Now the erase was just a quick format meaning the data is likely easy to recover. We can instead do a “Secure Erase” to force the drive to be erased in a way that will make it hard to recover.
A couple warnings up front. First, if your drive is a flash drive or SSD and you’re intending to use it afterwards for yourself, then don’t do a secure erase. Flash memory can only be written to so many times, and a secure erase will wear the drive out faster. In all honesty this likely won’t kill the drive as most flash memory from reliable vendors is resilient, but you also don’t want to kill a drive faster than necessary.
Even you know you’re not going to need this drive again, you’re not guaranteed to make the data completely irretrievable, just less likely. Even Apple acknowledges that because of the way modern drives work, some data may not get touched in the erasing process. It’s still not a bad thing to do, but you may also want to consider encrypting a drive and then wiping it if you really want to be safe.
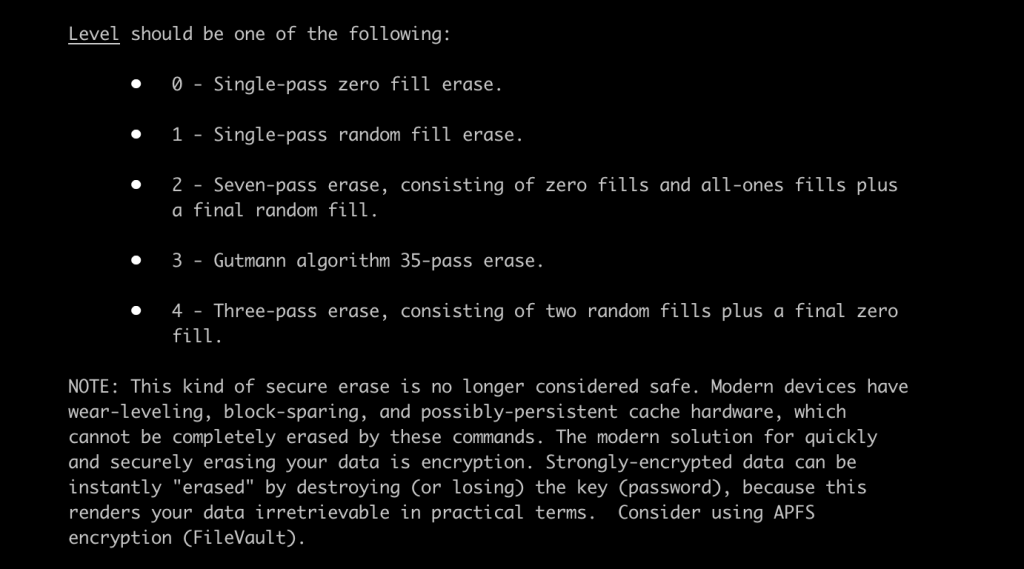
With all that said, here’s how to more securely wipe a drive. First, type in diskutil secureErase. Now we need to select the level of secure erase we want. There are 5 levels of secure erasing you can use labeled from 0-4.
- Level 0 just erases the drive by writing the number zero across every sector of the drive.
- Level 1 does the same but with random data, thus taking longer.
- Level 2 erases the drive 7 times with 1’s and 0’s except the last pass where it uses random data.
- Level 3 is a special algorithm that erases the drives with random data as well as data compiled from a special collection of 1’s and 0’s.
- Level 4 is a little different and erases it 3 times, with random data on the first 2 passes and 1 set of zeroes on the last pass.
Whatever security level you pick is going to be dependent on your personal desires or the needs of your organization. In my case, I just need to do a 3-pass erasure, so I’m going to type in the number 4. Lastly, I need to type in the path of the drive, which is dev/disk2, so my full command now reads:
diskutil secureErase 4 /dev/disk2More generally, the code is formatted
diskutil secureErase LEVEL /dev/disk#Again, remember to change the number after disk to whatever number your drive is currently bound to from the diskutil command. Now hit enter and let it run. The more secure your erasure method, the longer it’s going to take to complete, any where from a few minutes to even days.
When it is done erasing, the drive is not initialized now or formatted for use. To make it a usable drive, you’re going to use the erase command from earlier to partition and format it all in one go.