How to Disable Gatekeeper on macOS
Why?
Since macOS 10.8, Apple requires applications to be signed before they can be run. However, code signing is a paid process (costing a $99/year subscription, and more if you also want to publish to the Mac App Store).
Independent developers may not have the time or budget required to sign their applications or upload them to the Mac App Store. Due to this, many open source applications can’t be run out of the box on macOS.
Recent macOS versions have made it increasingly difficult to disable Gatekeeper. Thankfully, there are still several ways to disable or bypass it as of March 2021.
READ MORE: Step-by-Step Tutorial to Disable Gatekeeper on macOS Sequoia
Usage
Disabling Gatekeeper permanently
- Open a terminal by pressing Cmd + Space, enter “Terminal” and open the application.
- Run the following command:
sudo spctl --master-disableEnter your administrator password when requested.
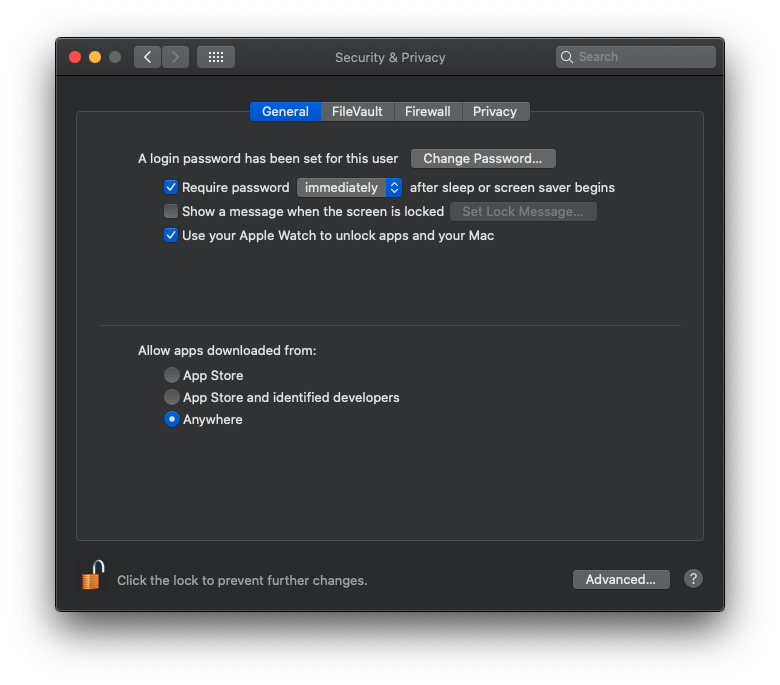
- Gatekeeper is now disabled permanently, go to System Preferences, and you should see the following.

Disabling Gatekeeper for one application only
Using Finder
NOTE:
This method may not work for all applications. If the application still doesn’t run after following the steps below, try following the steps described in Using Terminal instead.- Open Finder and navigate to the application you just downloaded.
- Right-click the application and choose Open.
- Click Cancel in the confirmation dialog that appears. This is required since macOS Big Sur, as the dialog must now be opened twice for the Open button to appear. On macOS Catalina and older, you only have to open this dialog once.
- Right-click the application a second time and choose Open again.
- Click Open in the confirmation dialog that appears.
You only have to do this for the first application start. You can start the application as usual afterwards.
Using Terminal
- Open a terminal by pressing Cmd + Space, enter “Terminal” and open the application.
- Run the following command:
xattr -dr com.apple.quarantine /path/to/Application.appThe path is case-sensitive and must point to the application bundle. (You can use Tab to complete file paths.)
You only have to do this before starting the application for the first time. You can start the application as usual afterwards.
Using curl or wget
You can also download the application using a tool that doesn’t set the quarantine attribute. curl or wget should work for this. Open a terminal then run:
# Quoting the URL is recommended to avoid issues with special characters.
curl -LO "file URL"

# Or, if you have installed wget:
wget "file URL"
This is how Steam and update frameworks like Sparkle are able to download and run applications without requiring them to be signed.
Frequently asked questions
Isn’t it insecure to disable Gatekeeper?
With today’s security threats, antivirus software is becoming less relevant over the years. Many antiviruses are now fooled by malware executables, and other forms of malware aren’t detected by most antiviruses. While perfect security doesn’t exist, it still is a good idea to avoid exposing yourself to modern threats such as ransomware.
To make your computing more secure, consider the following options:
- Block tracking and malware scripts using uBlock Origin. This will also make browsing faster and decrease network traffic.
- Block tracking and malware domains using Dan Pollock’s hosts file. This has the upside of working on all software on your computer, not just Web browsers.
I still can’t run an application after disabling Gatekeeper.
If the application was packaged in a ZIP archive, this could be due to the executable (+x) attribute being missing on the binary contained in the .app bundle. To solve this:
- Open a terminal by pressing Cmd + Space, enter “Terminal” and open the application.
- Run the following command:
chmod +x /path/to/Application.app/Contents/MacOS/*The path is case-sensitive and must point to the application bundle. (You can use Tab to complete file paths.)
You only have to do this before starting the application for the first time. You can start the application as usual afterwards.


