Key Takeaways:
Litlyx is a privacy‑first, open‑source analytics platform you can fully self‑host with Docker and start using in under a minute to track web and product events with an AI-powered dashboard.
What Is Litlyx?
Litlyx is an open-source, modern analytics platform that focuses on privacy, simplicity, and developer-friendly integration. It offers a cookie-less tracking model, no personal data storage, and full GDPR-compliance, making it an attractive alternative to Google Analytics, MixPanel, Matomo, Plausible, Umami, and similar tools.
Instead of being locked into a proprietary SaaS, you can self-host the entire Litlyx stack—dashboard, server, and database—on your own infrastructure using Docker and keep full control over your data. On top of traditional web stats like page views and sessions, Litlyx adds product analytics and custom events, all exposed through a clean, AI-assisted dashboard designed to surface insights quickly.
Core Features Developers Will Care About
Litlyx is built with developers and product teams in mind, with a feature set that maps well to both marketing and product-analytics use cases.
Key capabilities include:
- Cookie-less, privacy-first tracking: No cookies, no personal data, and fully anonymous tracking, so you can often avoid consent banners while staying within EU regulations.
- Self-hosting via Docker: The official repo ships a Docker-based setup so you can run the dashboard, API, and backing services on your own server or VPS.
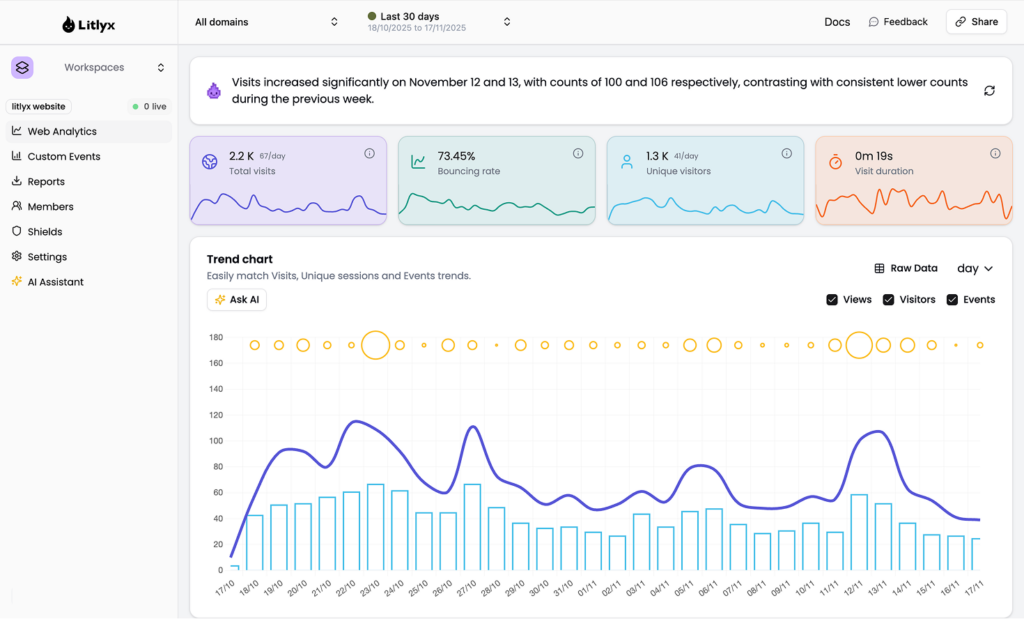
- AI-powered dashboard: Litlyx emphasizes a simple, AI-assisted interface to query your data, generate reports, and highlight trends with minimal configuration.
- Custom events & funnels: Beyond page views, you can track arbitrary events (signups, button clicks, feature usage) and create funnels to understand conversion paths.
- Multi-language support: Client libraries and examples exist for JavaScript and Python, with a dedicated
litlyx-jslibrary and a Python sender module for event tracking.
Litlyx also has a growing open-source community, a dedicated docs site, and real-world adoption by self-hosters and companies that need control over their analytics stack.
Why Choose Litlyx Over Traditional Analytics?
From an SEO and GEO perspective, Litlyx positions itself as a “simple, privacy-first Google Analytics alternative” with product-analytics capabilities. That makes it appealing for:
- Privacy-conscious teams: If you operate in the EU or care deeply about user privacy, cookie-less and GDPR-compliant tracking is a strong advantage.
- Self-hosted stacks: If you’re already running apps, databases, and services on Docker, adding Litlyx fits naturally into your infrastructure.
- Product-led growth: You can track feature usage, retention events, and key user actions with custom event tracking instead of just page views.
Compared with heavier tools, Litlyx aims to keep setup under 30 seconds for the basic integration, so developers can move quickly without spending days on configuration and dashboards.
Prerequisites for Self-Hosting Litlyx
Before you install Litlyx on your own server, make sure you have:
- A Linux VPS or server (or a local dev machine) with Docker and Docker Compose installed.
- Node.js tooling for the helper commands (
npm,ts-node), as the setup expects those to be available. - Basic familiarity with Docker Compose, environment variables, and managing services like MongoDB and Redis.
Litlyx uses MongoDB as its primary data store and Redis for caching and queueing, both managed via the provided docker-compose.yaml file.
Step-by-Step: Install Litlyx With Docker
The official docs include a detailed self-hosting guide; below is a streamlined version tailored to developers comfortable with Docker.
1. Clone the Repository
Clone the Litlyx repo to your server:
git clone https://github.com/Litlyx/litlyx.git
cd litlyx
This workspace includes the dashboard, producer/consumer services, and a docker-compose.yaml that orchestrates MongoDB, Redis, and the app layer.
2. Configure MongoDB Credentials
Open docker-compose.yaml and locate the mongo service. Update the default credentials to your own secure username and password:
environment:
  MONGO_INITDB_ROOT_USERNAME: your_root_username   # change this
  MONGO_INITDB_ROOT_PASSWORD: your_root_password   # change this
Then update the Mongo connection strings in the producer, consumer, and dashboard services to match your chosen credentials, for example:
MONGO_CONNECTION_STRING=mongodb://your_root_username:your_root_password@mongo:27017/Litlyx?authSource=admin
NUXT_MONGO_CONNECTION_STRING=mongodb://your_root_username:your_root_password@mongo:27017/Litlyx?authSource=admin
3. Configure Redis Credentials
In the same file, find the redis service and define a secure password:
command: ["redis-server", "--requirepass", "your_redis_password"]

environment:
  REDIS_PASSWORD: your_redis_password
Make sure the Redis password is replicated consistently in the producer, consumer, and dashboard environment variables, such as:
REDIS_PASSWORD=your_redis_password
NUXT_REDIS_PASSWORD=your_redis_password
The REDIS_USERNAME should remain at its default value, as noted in the docs.
4. Set the Session / JWT Secret
For authentication and sessions in the dashboard, set a strong secret in the dashboard service:
NUXT_SESSION_PASSWORD=your_long_random_session_secretUse a long, random string (e.g., from a password generator) for security.
5. Set Admin Credentials
Litlyx ships with symbolic default admin credentials that you must replace before exposing the instance to the internet. Update:
[email protected]
NUXT_ADMIN_PASSWORD=SuperStrongAdminPassword123
You will use these credentials to log into the Litlyx dashboard after the containers are running.
6. Build and Start the Containers
Before starting Docker, ensure ts-node is installed on the host, as some scripts depend on it:
npm install -g ts-nodeThen build the Docker images and start the stack using the provided scripts:
npm run docker-prepare
docker-compose up -d
Docker will pull the necessary images (or build them) and start MongoDB, Redis, and the Litlyx services. Once everything is running, you can access the dashboard via the configured port (typically http://your-server:3000 or similar, depending on your compose file).
First Login and Basic Configuration
After the containers are up, open the dashboard URL and log in using the admin email and password you configured. Inside the UI, you’ll be able to:
- Create a new project (e.g., for your main website or app).
- Copy the project ID / API key needed for client-side or server-side integration.
- Explore the default overview to verify that tracking works once you send events.
This is also a good time to configure any domain-specific settings and make sure your instance is behind HTTPS (e.g., via a reverse proxy like Nginx or Traefik).
Adding Litlyx to Your Frontend (JavaScript / Nuxt)
For web projects, Litlyx provides a JavaScript client library (litlyx-js) and example integrations like the Nuxt 3 demo.
Basic JavaScript Integration
In a typical SPA or frontend build, you would:
- Install the library (if using a bundler environment):
npm install litlyx-js- Initialize Litlyx early in your app’s lifecycle, such as in your main entry file:
import { Lit } from 'litlyx-js';

Lit.init('YOUR_PROJECT_ID_FROM_DASHBOARD');- Track page views and custom events:
// Automatically track a page view
Lit.pageView();

// Track a custom event, e.g., when a user clicks a CTA
Lit.event('SignupButtonClick', {
 metadata: {
   plan: 'pro',
   source: 'landing_page'
 }
});
Under the hood, these calls send events to your Litlyx instance, where they appear in dashboards, funnels, and reports.
Nuxt 3 Example
The official Nuxt 3 example shows how to initialize Litlyx in a <script setup> block and trigger custom events on button clicks. The flow is:
- Sign up or log into your Litlyx dashboard (self-hosted or cloud).
- Create a project and copy its
project_id. - Call
Lit.init("YOUR_PROJECT_ID")in a Nuxt component or plugin, then useLit.event(...)in your UI handlers to record events.
This pattern works similarly across modern frontend frameworks: initialize once, then pepper your critical UX flows with event calls.
Tracking Backend and Product Events (Python, Services, Jobs)
Beyond browser events, Litlyx can also be used for backend or service-level analytics. A Python module (litlyx-sender) simplifies sending events from scripts, microservices, or cron jobs, so you can:
- Track system-level metrics (e.g., background job success/failure).
- Log product usage events coming from APIs.
- Monitor real-time business KPIs directly inside the same dashboard.
This is particularly useful if you want a unified view of frontend and backend activity without adopting a heavier observability stack.
Getting Value From the AI-Powered Dashboard
Once events start flowing, Litlyx’s dashboard becomes the central place to answer questions such as:
- Which pages or features are most popular right now?
- What’s our bounce rate and average session duration over the last 7 days?
- Where do users drop off in the signup or checkout funnel?
- Which marketing campaigns or referrers bring the most engaged users?
The AI-powered layer is designed to help non-technical stakeholders interact with the data through natural language-style prompts and one-click reports, which is valuable for Generative Engine Optimization (GEO)—your metrics and insights are easier to surface and explain to both humans and AI assistants.
Final Thoughts
Litlyx gives you an open-source, self-hosted analytics platform that can be deployed with Docker, integrated in minutes, and scaled alongside your product. With cookie-less, GDPR-compliant tracking and an AI-powered dashboard, it offers a compelling alternative to traditional analytics tools, especially for developers and teams who care about privacy and control.
If you want to dive deeper, start with the official GitHub repo and docs:
- GitHub: https://github.com/Litlyx/litlyx github
- Self-hosting docs: https://docs.litlyx.com/self-hosting/docker docs.litlyx