AutoAgent lets a meta‑agent iteratively rewrite your AI agent’s harness—prompts, tools, and orchestration—so benchmark performance climbs autonomously while you sleep.
What Is AutoAgent?
AutoAgent is an open-source Python framework by Kevin Gu for autonomous harness engineering—a meta‑agent that edits and optimizes another agent’s harness based on benchmark feedback. Instead of manually tuning system prompts, tool sets, and routing logic, you describe the target behavior in a Markdown program, then AutoAgent hill‑climbs the harness to maximize benchmark scores.
In practice, AutoAgent plugs into Harbor‑style benchmarks and runs thousands of short experiments, modifying agent.py, running tasks, measuring scores, and retaining only changes that improve the overall result. This shifts the bottleneck from human trial‑and‑error to an automated optimization loop that can run overnight on your own infrastructure.
Harness Engineering vs Prompt Engineering
Prompt engineering focuses on crafting the text prompt fed to an LLM, while context engineering expands to retrieval, tools, and surrounding context. Harness engineering goes one level up: it covers the full environment around an agent—system prompts, tool definitions, task routing, feedback loops, logging, and evaluation plumbing.
AutoAgent targets this harness layer directly. Instead of only tweaking prompts, it can introduce new tools, adjust orchestration strategies, refine how tasks are decomposed, and modify verification sub‑loops that decide whether to re‑try or escalate. The result is an agent that not only “sounds better” but actually scores higher on quantitative benchmarks.
Core Architecture and Repository Layout
The AutoAgent repository is deliberately minimal and opinionated to make the harness surface easy for a meta‑agent to edit.
Key components:
agent.py– The entire task agent harness in a single Python file: config, tools, routing, orchestration, and the Harbor adapter boundary.program.md– The only file you edit by hand; it contains the directive and high‑level instructions for the meta‑agent about what sort of agent to build.tasks/– Benchmark payloads in Harbor’s open task format (spreadsheet tasks, terminal tasks, or custom domains).jobs/– Output directory for Harbor runs, containing per‑experiment logs and scores.results.tsv– An automatically maintained experiment log tracking each harness mutation and its resulting score, enabling the meta‑agent to hill‑climb effectively over time.
You can browse the full structure and source code at the official GitHub repository: AutoAgent on GitHub.
Why AutoAgent Matters
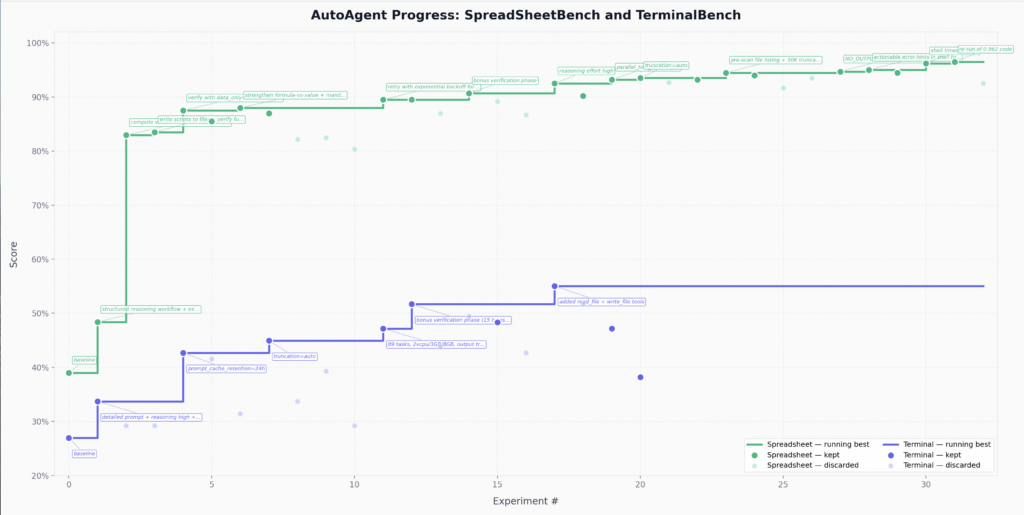
On several public benchmarks, AutoAgent has already demonstrated that a self‑optimizing meta‑agent can beat hand‑engineered harnesses. In particular, reported runs show first place on SpreadsheetBench (around 96.5 percent) and the top GPT‑5 score on TerminalBench after roughly 24 hours of autonomous optimization. Every competing entry on those leaderboards was human‑engineered; AutoAgent’s harness was not.
For practitioners, this means:
- Less time on repetitive prompt/tool tinkering loops.
- Faster convergence to high‑performing harnesses in new domains.
- A reproducible, logged experiment history you can analyze and extend.
Prerequisites and Environment Setup
AutoAgent is designed to run inside Docker with tasks executed through Harbor, and dependencies managed via uv (Astral’s Python package manager). Before installing, ensure you have:
- A Unix‑like environment (Linux or macOS recommended).
- Docker installed and running.
curlfor installinguv.- Access to an LLM provider (for example, OpenAI) and corresponding API keys.
If you are integrating custom Harbor benchmarks, you must also have Harbor CLI installed and configured for your task suite.
Step‑by‑Step Installation Guide
This section walks through installing AutoAgent from source for a local development workflow.
1. Clone the AutoAgent Repository
Use git to clone the official repository:
git clone https://github.com/kevinrgu/autoagent.git
cd autoagent
The repo mirrors the layout described earlier (agent.py, program.md, tasks/, etc.).
2. Install uv (If You Don’t Have It)
AutoAgent’s Python dependencies are managed through uv for reproducible, fast environments.
curl -LsSf https://astral.sh/uv/install.sh | shAfter installation, ensure uv is on your PATH (typically via shell init scripts).
3. Sync Python Dependencies
Inside the cloned repository, run:
uv syncThis will create and resolve the Python environment (similar to pip install -r requirements.txt, but with uv’s dependency solver and lockfile).
4. Configure Environment Variables
AutoAgent relies on environment variables for LLM provider credentials and any runtime‑specific configuration. A common pattern is to create a .env file in the project root:
cat > .env << 'EOF'
OPENAI_API_KEY=your_openai_api_key_here
# Add any other keys or runtime config you need
EOF
You can load this .env via uv/Harbor integration or your own process manager (such as direnv, Docker --env-file, or a shell export script).
5. Build the Base Docker Image
AutoAgent uses a base Docker image defined in Dockerfile.base to encapsulate the runtime used for Harbor evaluations.
docker build -f Dockerfile.base -t autoagent-base .This image will be referenced when Harbor executes tasks against your harness.
6. Add or Configure Tasks
Populate the tasks/ directory with Harbor‑formatted tasks for your benchmark domain. For example, you might add spreadsheet manipulation tasks, shell‑oriented tasks, or your own proprietary evaluation workloads.
Each benchmark you care about can live in its own branch or directory structure, with AutoAgent remaining agnostic to the domain as long as the tasks follow Harbor’s open format.
Running AutoAgent on Benchmarks
Once the environment is ready, you can invoke Harbor to run tasks using your current agent.py harness.
1. Run a Single Benchmark Task
The following pattern runs a single Harbor task using AutoAgent’s harness:
rm -rf jobs
mkdir -p jobs

uv run harbor run \
  -p tasks/ \
  --task-name "<task-name>" \
  -l 1 \
  -n 1 \
  --agent-import-path agent:AutoAgent \
  -o jobs \
  --job-name latest > run.log 2>&1
Key flags:
-p tasks/– Path to your Harbor tasks.--task-name– Specific task to run, useful for debugging.--agent-import-path agent:AutoAgent– Tells Harbor to use theAutoAgentclass fromagent.pyas the harness.-o jobs– Output directory for results and artifacts.
After completion, check jobs/ and run.log to inspect task outputs, tool traces, and scores.
2. Run All Tasks in Parallel
To launch a larger optimization run over the entire benchmark suite:
rm -rf jobs
mkdir -p jobs

uv run harbor run \
  -p tasks/ \
  -n 100 \
  --agent-import-path agent:AutoAgent \
  -o jobs \
  --job-name latest > run.log 2>&1
Here, -n 100 denotes concurrency, allowing Harbor to execute many tasks in parallel inside Docker containers. This is the mode you will typically use for overnight optimization cycles driven by the meta‑agent.
How the Meta‑Agent Improves the Harness
A typical AutoAgent loop can be summarized as:
- Edit the harness (
agent.pyand related config) in response to failure traces and scores. - Run the updated harness on a slice of tasks via Harbor.
- Measure performance and update
results.tsvwith scores and metadata. - Keep modifications that improve aggregate metrics; revert regressions.
- Repeat this cycle thousands of times until improvements plateau.
The meta‑agent’s behavior is driven by the high‑level directive in program.md, which may describe, for example, “build a spreadsheet‑oriented assistant with strong verification loops and conservative tool usage.” Over time, AutoAgent discovers richer tool sets, better prompting strategies, and orchestrations tailored to the benchmark’s failure modes.
Editing program.md: Steering the Optimization
You do not directly hand‑edit agent.py; instead, you modify program.md to change AutoAgent’s research direction.
A simplified program.md might include:
- A high‑level description of the target agent (domain, risk tolerance, performance priorities).
- Guidelines about tool introduction (e.g., when to add spreadsheet formulas, shell commands, or external APIs).
- Preferences around verification, retry behavior, and logging detail.
When you rerun AutoAgent after editing program.md, the meta‑agent’s search trajectory changes, exploring different harness designs while still evaluating against the same Harbor tasks.
Practical Usage Examples
Here are some realistic scenarios where AutoAgent is particularly effective:
SpreadsheetBench‑Style Workflows
If you are building an agent that needs to perform structured spreadsheet transformations, you can:
- Populate
tasks/with representative spreadsheet tasks and gold outputs. - Define in
program.mdthat the agent should prioritize deterministic formulas and cautious row/column operations. - Let AutoAgent experiment with new tools (for example, CSV parsers, formula generators, or validation steps) and orchestration patterns to maximize spreadsheet task success.
TerminalBench‑Style Workflows
For terminal‑oriented tasks (DevOps automation, code diagnostics, or CLI tooling), you can:
- Provide shell‑script benchmark tasks via Harbor.
- Start with a very minimal harness that only exposes a bash tool.
- Allow the meta‑agent to progressively introduce higher‑level wrappers, better error handling, and multi‑step repair loops to reduce command failures and timeouts.
In both cases, AutoAgent uses the same optimization loop; only the task set and directive change.
Best Practices for Using AutoAgent in Production Settings
To integrate AutoAgent into a professional engineering or MLOps stack:
- Isolate optimization runs – Keep AutoAgent experiments in a dedicated branch or environment, and only promote harnesses that show stable gains across multiple runs.
- Instrument aggressively – Ensure Harbor tasks capture rich logs and error traces; the meta‑agent relies on these signals to propose useful edits.
- Track results centrally – Ingest
results.tsvinto your analytics stack (for example, a warehouse or dashboard) to visualize hill‑climbing behavior and identify promising harness variants. - Constrain edit surfaces – Keep the Harbor adapter and critical safety boundaries fixed, allowing AutoAgent to explore only the parts of the harness you consider safe to mutate.
You can monitor project updates, open issues, and community discussions directly at the GitHub repo: https://github.com/kevinrgu/autoagent/.
By treating harness design as a search problem and letting AutoAgent run that search loop for you, you free your engineering time for higher‑level system design while still converging on competitive benchmark performance in your domain.