How to give your AI Agent long-term memory with mem0 (Self-hosted guide)

Have you ever wished your AI assistant could actually remember what you told it last week?
Most AI tools – ChatGPT, Claude, Copilot – start with a blank slate every single conversation. You end up repeating yourself: your tech stack, your coding style, your project context. It’s like talking to someone with amnesia, every single day.
mem0 fixes that. It’s an open-source memory layer that sits behind your AI agents, quietly remembering everything important – your preferences, your projects, your past conversations – and surfacing exactly the right context when you need it.
In this guide, you’ll learn how to self-host mem0 on your own machine with Docker, and how to connect it to AI platforms like OpenClaw for a truly personalized AI experience.
What Is mem0?
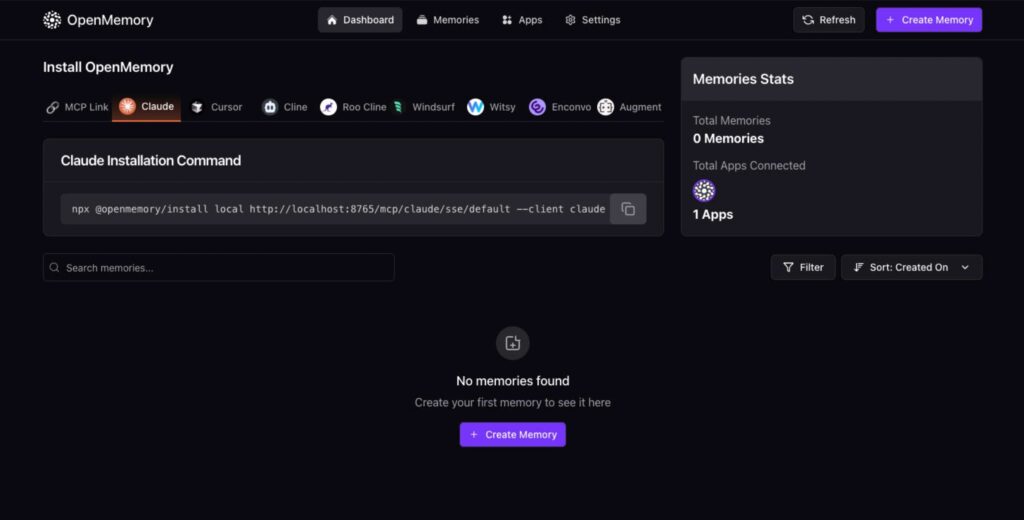
mem0 (also called OpenMemory) is a memory infrastructure for AI applications. Think of it as a long-term brain for your LLM-powered agents.
Here’s what makes it special:
- Semantic Search – Finds relevant memories by meaning, not just keywords. Ask about “my favorite language” and it recalls that you mentioned Python three weeks ago.
- Graph Memory – Automatically extracts entities and relationships (e.g.,
Alice → works at → Acme Corp) using a knowledge graph powered by Neo4j. - MCP Protocol – Connects to any AI Agent platform that supports Model Context Protocol – like Claude Desktop, Cursor, or OpenClaw.
- Self-Hosted – Your data stays on your machine. No cloud dependency, no privacy concerns.
How Does mem0 Work?
When you (or an AI agent) send a piece of text to mem0, here’s what happens under the hood:
- The text is sent to an LLM (OpenAI) which extracts key facts.
- Each fact is converted into a vector embedding and stored in Qdrant (a vector database) for semantic search.
- Entities and relationships are extracted and stored in a Neo4j knowledge graph.
- When queried later, mem0 searches both the vector space and the graph to return the most relevant memories.
This dual approach – vectors for meaning + graphs for structure – is what gives mem0 its superpowers.
What You’ll Need
Before we start, make sure you have:
| Requirement | Details |
|---|---|
| Docker | Docker Desktop, OrbStack (macOS), or Docker Engine (Linux) |
| RAM | 2 GB minimum, 4 GB+ recommended |
| Disk | At least 5 GB of free space |
| OpenAI API Key | Required for embeddings and entity extraction |
Tip: On macOS with Apple Silicon, OrbStack is significantly faster than Docker Desktop and uses far less memory.
Option A: Automated Setup (Recommended)
The fastest way to get mem0 running is with our automated setup script. It handles everything – Docker Compose generation, Neo4j configuration, driver installation, and health checks.
Step 1: Clone and Run
mkdir -p ~/self-hosted && cd ~/self-hosted
git clone https://github.com/duynghien/auto.git && cd auto/mem0
chmod +x setup.sh mem0.sh
./setup.sh
Step 2: Enter Your API Key
The script will prompt you for your OpenAI API key. If you’ve already set the OPENAI_API_KEY environment variable, it will use that automatically.
Step 3: Wait for the Build
The first build takes 3–8 minutes (it compiles from source). Subsequent runs use cached layers and start in seconds.
Step 4: Verify
./mem0.sh statusYou should see all four services running:
API:      OK
Qdrant:   OK
Neo4j:    OK
UI:       OK
That’s it – you now have a fully functional AI memory server running locally.
Option B: Manual Docker Setup
If you prefer full control, here’s how to set it up manually.
Step 1: Clone the mem0 Repository
git clone --depth=1 https://github.com/mem0ai/mem0.git
cd mem0/openmemory
Step 2: Configure Environment Variables
Create api/.env:
OPENAI_API_KEY=sk-your-key-here
API_KEY=sk-your-key-here
USER=your_username
NEO4J_URI=bolt://neo4j:7687
NEO4J_USERNAME=neo4j
NEO4J_PASSWORD=choose_a_secure_password
Create ui/.env:
NEXT_PUBLIC_API_URL=http://localhost:8765
NEXT_PUBLIC_USER_ID=your_username
Step 3: Add Neo4j to Docker Compose
The default docker-compose.yml only includes Qdrant. You’ll need to add a Neo4j service manually:
neo4j:
  image: neo4j:5
  restart: unless-stopped
  environment:
    - NEO4J_AUTH=neo4j/choose_a_secure_password
    - NEO4J_PLUGINS=["apoc"]
  ports:
    - "7474:7474"
    - "7687:7687"
  volumes:
    - neo4j_data:/data
Step 4: Build and Start
docker compose up -d --buildStep 5: Install Drivers
The API container needs additional Python packages:
docker exec openmemory-openmemory-mcp-1 pip install "qdrant-client>=1.9.1" "neo4j>=5.0.0"
docker compose restart openmemory-mcp
Using mem0: A Quick Tour
Adding a Memory
curl -X POST http://localhost:8765/api/v1/memories/ \
  -H "Content-Type: application/json" \
  -d '{
    "user_id": "alice",
    "text": "I work at Acme Corp as a backend engineer. I prefer TypeScript over JavaScript and always use PostgreSQL."
  }'
Behind the scenes, mem0 will:
- Store the full text as a vector in Qdrant
- Extract graph entities:
alice → works at → Acme Corp,alice → prefers → TypeScript,alice → uses → PostgreSQL
Searching Memories
curl -X POST http://localhost:8765/api/v1/memories/filter \
  -H "Content-Type: application/json" \
  -d '{"user_id": "alice", "search_query": "what database does she use?"}'
Even though you didn’t mention “PostgreSQL” in the query, mem0’s semantic search will find it because the meaning matches.
Browsing the Dashboard
Open http://localhost:3000 in your browser. You’ll see all stored memories, their metadata, and associated users – all in a clean web interface.
Exploring the Knowledge Graph
Visit http://localhost:7474 (Neo4j Browser) to visually explore the entity relationships mem0 has extracted. Log in with:
- Username:
neo4j - Password: The one you set in your
.envfile
Managing Your mem0 Instance
The mem0.sh helper script provides all the commands you need:
| Command | What It Does |
|---|---|
./mem0.sh start | Start all containers |
./mem0.sh stop | Stop all containers |
./mem0.sh restart | Restart all services |
./mem0.sh status | Full health check (API, Qdrant, Neo4j, UI, drivers) |
./mem0.sh logs | View combined logs |
./mem0.sh logs neo4j | View logs for a specific service |
./mem0.sh test | Run a smoke test (adds a test memory) |
./mem0.sh update | Pull latest code and rebuild |
./mem0.sh purge | ⚠️ Delete all containers and data volumes |
Connecting mem0 to OpenClaw via MCP
OpenClaw is an open platform for orchestrating AI agents. It supports the Model Context Protocol (MCP), which means it can talk to mem0 natively.
How to Connect
- Open your OpenClaw admin panel.
- Navigate to MCP Servers → Add Server.
- Choose SSE as the transport protocol.
- Enter the mem0 MCP endpoint:
http://YOUR_MEM0_IP:8765/mcp/openclaw/sse/YOUR_USER_ID- Save. OpenClaw will auto-discover mem0’s tools.
What Tools Does OpenClaw Get?
Once connected, your OpenClaw agents gain access to:
add_memory– Store new informationsearch_memory– Find relevant past memoriesupdate_memory– Modify existing memoriesdelete_memory– Remove specific memories
These tools are called automatically by the agent when it determines they’re relevant to the conversation.
Why mem0 + OpenClaw Is a Game-Changer
Here are the real-world benefits of pairing mem0 with OpenClaw:
1. Your Agent Remembers Across Sessions
Without mem0, every conversation starts from zero. With mem0, your agent remembers your coding style, your project architecture, and your preferences – permanently. Tell it once that you use Tailwind CSS, and it will never suggest Bootstrap again.
2. Smarter Context, Lower Costs
Instead of stuffing huge system prompts with context (which burns tokens and money), mem0 acts as a targeted retrieval system. It pulls only the memories relevant to the current conversation, keeping your prompts lean and your API bills low.
3. Automatic Knowledge Graphs
Every interaction enriches your agent’s understanding. Mention that Project X uses PostgreSQL, and later that Project Y is a fork of X – mem0 connects the dots. When you ask about Y’s database, it already knows.
4. True Personalization at Scale
mem0 stores memories per user ID. In a team setting, each user gets their own personalized agent experience without interfering with others.
5. Privacy by Design
Since mem0 is self-hosted, your memories – which might include proprietary code, internal architecture decisions, or personal preferences – never leave your infrastructure.
Frequently Asked Questions
Is mem0 free?
Yes. mem0 is open-source under the Apache 2.0 license. The only cost is your OpenAI API usage for embeddings and entity extraction.
Can I use a local LLM instead of OpenAI?
mem0 supports Ollama and other local LLM providers. You can configure this through the API’s config endpoint or by modifying the configuration in the database.
How much disk space does mem0 use?
The Docker images total around 3–4 GB. Actual memory storage depends on usage, but even thousands of memories only take a few hundred MB.
Can I run mem0 on a Raspberry Pi?
Yes! Our setup script supports Raspberry Pi 4 (4GB+) and Pi 5. It automatically configures swap space and memory limits for low-RAM devices.
Does mem0 work with Claude Desktop or Cursor?
Absolutely. mem0 exposes MCP endpoints specifically for Claude Desktop and Cursor:
# Claude Desktop
npx @openmemory/install local http://localhost:8765/mcp/claude/sse/$USER --client claude

# Cursor
npx @openmemory/install local http://localhost:8765/mcp/cursor/sse/$USER --client cursor
What’s Next?
You now have a self-hosted AI memory layer that’s private, fast, and deeply integrated with your tools. Here are some ideas for what to do next:
- Connect it to Claude Desktop for a coding assistant that truly knows your codebase
- Build a custom agent in OpenClaw that uses mem0 to maintain project context across weeks
- Explore the Neo4j graph at
localhost:7474to see how your knowledge graph grows over time
The future of AI isn’t just smarter models – it’s models that know you. And with mem0, that future is running on your own hardware.