Key Takeaways:
Virtual Mac on iPad brings macOS to select jailbroken M1 and M2 iPads, but compatibility is limited to specific hardware and iPadOS versions.
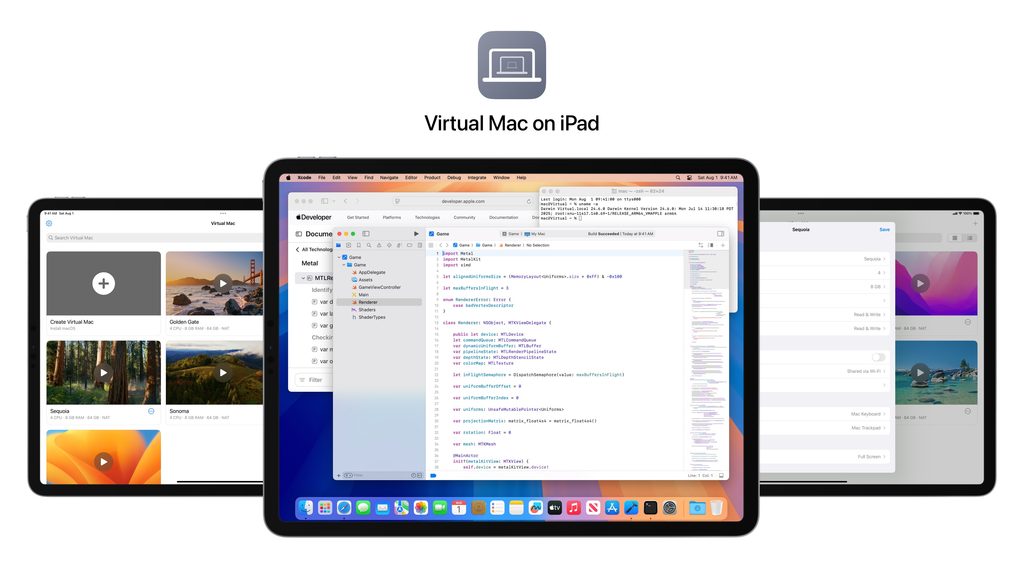
Virtual Mac on iPad is an open-source project that runs macOS as a virtual machine on compatible Apple Silicon iPads. Instead of mirroring a Mac with Sidecar or connecting remotely to another computer, it loads a macOS environment directly on the iPad.
This makes it possible to use desktop applications such as Xcode, Terminal, Final Cut Pro, Logic Pro, and Pixelmator Pro on supported iPad hardware. The project is aimed at developers, power users, security researchers, and Apple enthusiasts who want to explore the limits of Apple Silicon virtualization.
Virtual Mac uses hardware CPU virtualization and paravirtualized graphics acceleration. As a result, it is significantly more capable than a traditional software-only emulator, although performance and application compatibility vary depending on the macOS version and iPad configuration.
Before beginning, review the official Virtual Mac on iPad GitHub repository. The repository contains the latest installation instructions, releases, troubleshooting advice, and compatibility updates.
Virtual Mac Compatibility
Virtual Mac on iPad is not a universal macOS installer for every iPad. Its compatibility depends on the device’s Apple Silicon chip, iPadOS version, available virtualization capabilities, and jailbreak environment.
You need:
- An iPad Pro with an M1 or M2 chip, or an iPad Air with an M1 chip.
- iPadOS 14 through iPadOS 16.3.1.
- A jailbroken iPad with Sileo installed.
- Sufficient free storage for macOS, virtual machine files, and applications.
- A recent backup of important iPad data.
- A willingness to troubleshoot experimental software.
The project’s documentation identifies iPad Pro models with 1 TB or 2 TB of storage as particularly attractive because some configurations include 16 GB of RAM. More memory can help when running macOS alongside demanding applications such as Xcode or Final Cut Pro.
Newer iPads and iPadOS versions should not be assumed to work. Compatibility is tied to low-level operating system functionality, so an iPad that looks more powerful on paper may still be unsupported.
Prepare Your iPad
Before installing anything, open Settings > General > About and confirm the iPad model, chip generation, iPadOS version, storage capacity, and available space.
Create a complete backup before jailbreaking or installing Virtual Mac. Jailbreaking changes the security model of iPadOS and can introduce crashes, package conflicts, or recovery problems. Do not use your only work or school device unless you have a reliable restoration plan.
Virtual Mac does not support the Dopamine-roothide environment. If you are using Dopamine-roothide, consult the project documentation before switching to the official version of Dopamine.
It is also a good idea to begin with a clean jailbreak environment. Avoid installing multiple tweaks before Virtual Mac works correctly, because unrelated system modifications can make errors difficult to diagnose.
Install Virtual Mac
The installation has two main parts: jailbreak the compatible iPad and install the Virtual Mac package through Sileo.
Jailbreak the iPad
Use the jailbreak instructions appropriate for your exact iPad model and iPadOS version. Jailbreak tools and supported exploits can change, so follow current documentation rather than relying on an old video or forum post.
After the jailbreak is complete, open Sileo and confirm that it loads correctly. If the jailbreak process fails, the project documentation recommends trying another exploit option in the jailbreak application’s settings.
Do not manually modify system files while the device is in an uncertain state. If the jailbreak reports an error, restart the process carefully and verify that the device remains on a supported firmware version.
Add the Virtual Mac Repository
Open Sileo and add the following package repository:
https://nfzerox.github.io/cydia/Refresh Sileo’s package sources, search for Virtual Mac, and install the latest available version. Respring or restart the iPad if Sileo requests it.
If Virtual Mac does not appear, verify the repository address, refresh package sources again, and confirm that the device is compatible. Installing the newest package is important because updates may fix launch failures, scrolling issues, graphics problems, and system stability bugs.
Install macOS
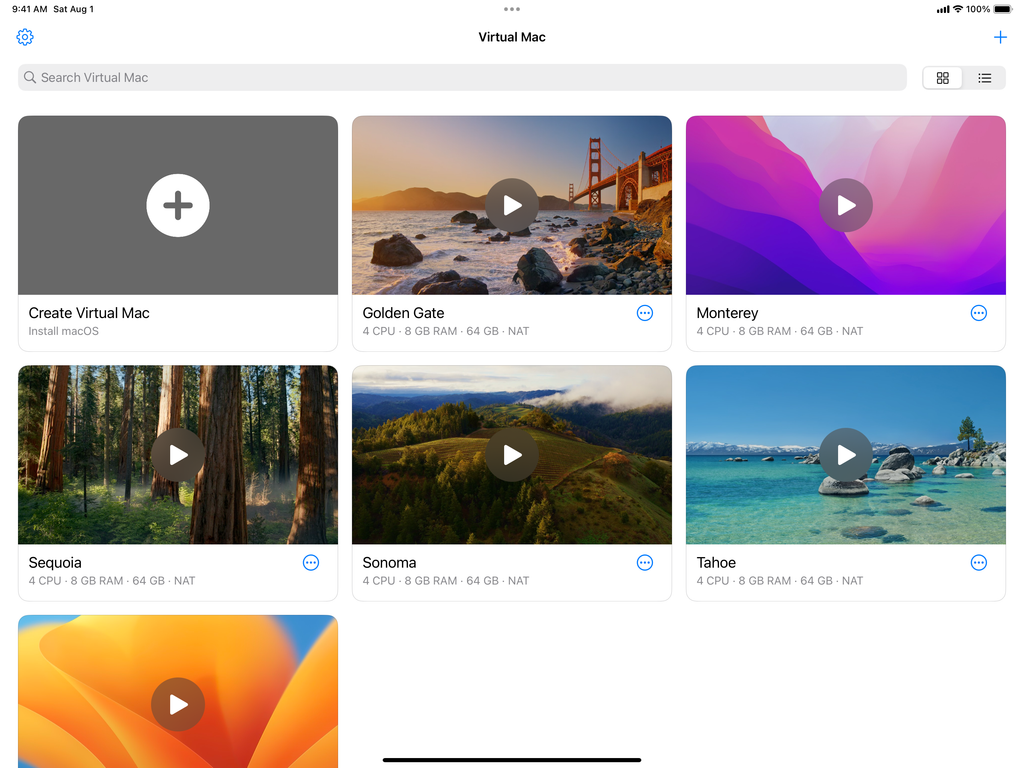
After installing Virtual Mac, open the application and create a new virtual Mac. The app will guide you through configuring the virtual machine and selecting a compatible macOS restore image or installer resource.
Use a macOS image you are legally entitled to use. Follow the project’s current instructions for obtaining and preparing the image, because the installation process may change between releases.
Virtual Mac supports macOS versions beginning with macOS 12 Monterey, with newer versions also available depending on the project’s compatibility status. macOS 15 Sequoia is a practical starting point for users who want a modern desktop environment while avoiding some of the newest experimental features.
During setup, macOS may ask you to sign in with an Apple Account. Choose Set Up Later instead. Apple Account and iCloud sign-in are not supported in this environment, so services that require those credentials should not be part of your workflow.
Allow the installation to finish without closing Virtual Mac or interrupting the iPad. The first boot may take longer than subsequent launches. After macOS reaches the desktop, complete the basic local setup and install applications gradually.
Use macOS with Touch Controls
A Magic Keyboard is useful for development and long-form typing, but it is not required. Virtual Mac includes an on-screen control interface designed for touchscreen use.
Common controls include:
- Tap once to perform a normal click.
- Tap with two fingers to perform a secondary click.
- Drag with two fingers to scroll.
- Tap the keyboard icon to open the virtual keyboard.
- Press and hold the keyboard control to switch to Floating mode.
- Move the heads-up display to another corner or hide it through the More menu.
If the controls disappear, press and hold the Virtual Mac icon on the iPad Home Screen and select Show Virtual Mac Controls.
Touch controls are suitable for checking applications, managing files, browsing the web, and demonstrating macOS. A physical keyboard and trackpad provide a better experience for Terminal, Xcode, programming, and extensive text editing.
If your Magic Keyboard does not have a hardware Escape key, use Command + Period instead. You can also map another key to Escape through Settings > General > Keyboard > Hardware Keyboard > Modifier Keys.
Configure Startup
Virtual Mac can be configured to launch a preferred virtual Mac automatically.
First, open macOS settings and enable automatic login through System Settings > Users & Groups > Automatically log in. Then open System Settings > Lock Screen and set the system not to lock immediately.
Next, open Virtual Mac’s in-app settings and change Start on Launch from Show Library to the name of your virtual Mac.
These settings are convenient for a dedicated device, but automatic login reduces security. Avoid enabling it on an iPad that other people can access.
Improve Performance
Keep the iPad cool and close unnecessary iPadOS applications before launching macOS. Thermal throttling can reduce responsiveness during long workloads, especially when compiling software or rendering video.
Start with conservative virtual machine settings and increase them gradually. Allocating too many resources can make the host operating system unstable or cause iPadOS to terminate the virtual machine.
For development, choose an Xcode release that matches the installed macOS version. The newest Xcode build may require a newer macOS release than the one installed in your virtual machine.
Metal acceleration is available in supported configurations, while OpenGL, OpenCL, and some professional applications may depend on specific macOS versions. Newer macOS releases can offer additional features but may also introduce experimental behavior.
Troubleshoot Common Problems
Start by opening Sileo and updating Virtual Mac. Many installation and launch problems are fixed in newer releases.
For “install-launcher failed: Permission denied,” update Virtual Mac first. If the problem continues, follow the repository’s troubleshooting instructions for the /var/root permissions issue.
For “Unexpected device state DFU expected RestoreOS,” update Virtual Mac and review the project’s guidance concerning the usbmuxd package.
For “launcher cannot become root” or “Internal Virtualization error,” check whether Choicy or another tweak is interfering with Virtual Mac. Try disabling tweak injection for the application or temporarily removing the conflicting tweak.
If the app crashes, export diagnostics from Virtual Mac Settings > Export Diagnostics. When opening a GitHub issue, include reproduction steps, a screenshot or screen recording, the iPad model, iPadOS version, macOS version, and the diagnostics file.
Remove conflicting tweaks one at a time instead of changing several variables simultaneously. As a final recovery option, remove the jailbreak, restore the iPad, and reinstall only after confirming that the hardware and firmware remain supported.
Is Virtual Mac Worth Trying?
Virtual Mac on iPad is best understood as an advanced community project rather than a polished replacement for a Mac. It is especially interesting for developers, researchers, and enthusiasts who want to experiment with macOS virtualization on portable Apple Silicon hardware.
The trade-offs are substantial: you need a compatible older iPad, jailbreaking is required, Apple Account services are unavailable, and some macOS versions or applications may be experimental.
For the latest compatibility details, installation guidance, and known issues, review the Virtual Mac on iPad project on GitHub before installing or upgrading.