Quick takeaways
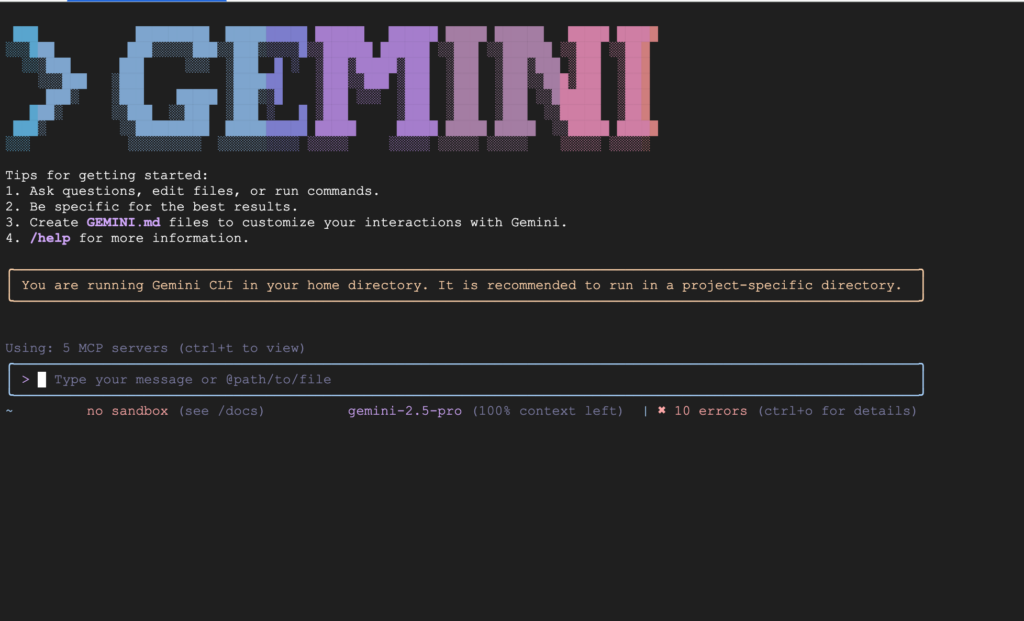
- Gemini CLI is Google’s open-source AI agent for working with Gemini directly from your terminal.
- It is useful for codebase Q&A, log analysis, file-aware workflows, shell-assisted development tasks, and automation.
- The official quick-start command is
npx @google/gemini-cli; long-term installs can usenpm install -g @google/gemini-cliorbrew install gemini-cli.- The official installation docs list Node.js 20.0.0+ as a runtime requirement.
- For commands that can edit files or run shell operations, use Git, a test workspace, and sandboxing whenever possible.
What is Gemini CLI?
Gemini CLI is an open-source AI agent that brings Gemini into the command line. Instead of switching to a browser, copying logs, and pasting them into a chat UI, you can ask questions from inside a project folder and let the CLI work with local context.
According to the official README, Gemini CLI includes built-in capabilities such as Google Search grounding, file operations, shell commands, web fetching, and MCP (Model Context Protocol) support for custom integrations. The project is licensed under Apache 2.0.
When should you use Gemini CLI?
Gemini CLI is a good fit when you want to:
- Ask questions about a local codebase from the terminal.
- Summarize README files, logs, source files, or technical documentation.
- Run one-off prompts non-interactively from scripts.
- Experiment with an AI agent that can use files, shell commands, and web fetches.
- Extend a terminal workflow with MCP integrations.
It is not something you should run blindly in sensitive production folders. If a tool can read files, modify files, or execute commands, you need a clear review and rollback workflow.
Prerequisites
The official installation documentation lists these practical requirements:
- Node.js 20.0.0+.
- Bash, Zsh, or PowerShell.
- 4GB+ RAM for casual usage; 16GB+ RAM for larger codebases or long sessions.
- An authentication method: Google sign-in, Gemini API key, or Vertex AI depending on your account and use case.
- A safe working directory, preferably a Git repository or test project where changes can be reviewed and reverted.
For most individual users, the official authentication docs recommend starting Gemini CLI and signing in with a personal Google account. Company, school, Google Workspace, or some licensed organization accounts may require a Google Cloud project.
How to install or try Gemini CLI
Run instantly with npx
For a quick trial without a permanent global install, the official README lists:
npx @google/gemini-cliThis is the easiest way to test the login flow and interactive interface.
Install globally with npm
For regular use, install the package globally:
npm install -g @google/gemini-cliThen start it with:
geminiInstall with Homebrew on macOS/Linux
The official installation docs also list Homebrew:
brew install gemini-cliInstall with MacPorts on macOS
sudo port install gemini-cliUse Anaconda in restricted environments
For restricted environments, the official docs show a conda-based path:
conda create -y -n gemini_env -c conda-forge nodejs conda activate gemini_env npm install -g @google/gemini-cliAuthentication options
For most individual developers, the simplest path is:
1. Run gemini or npx @google/gemini-cli. 2. Choose Google sign-in when prompted. 3. Complete the browser authentication flow.
If you prefer a Gemini API key from Google AI Studio, the official authentication docs show setting GEMINI_API_KEY. On macOS/Linux:
export GEMINI_API_KEY="YOUR_GEMINI_API_KEY"Do not commit API keys to Git, paste them into public screenshots, or share them in logs.
If your account requires a Google Cloud project, the docs show adding a project ID to ~/.gemini/.env:
GOOGLE_CLOUD_PROJECT="your-project-id"Basic usage
Start interactive mode
geminiUse interactive mode when you want a multi-turn session inside a project directory.
Ask a single question and exit
The CLI reference lists gemini -p "query" for non-interactive usage. The README includes this example:
gemini -p "Explain the architecture of this codebase"You can adapt the prompt:
gemini -p "Summarize this repository and list the main entry points"Process piped content
The CLI reference includes a pipe-based pattern:
cat logs.txt | geminiThis is useful for summarizing logs or long text. Redact tokens, cookies, private keys, and customer data before piping real logs into any AI tool.
Use JSON output for automation
The README shows JSON output:
gemini -p "Explain the architecture of this codebase" --output-format jsonFor real-time event streams, the README also shows:
gemini -p "Run tests and deploy" --output-format stream-jsonUse automation carefully: keep prompts scoped, use test environments, and review results before applying critical changes.
Example safe workflow for a code project
A practical workflow looks like this:
1. Create a new Git branch. 2. Make sure the working tree is clean. 3. Ask Gemini CLI to inspect and explain before requesting changes.
gemini -p "Explain the architecture of this codebase and identify the safest files to inspect first"4. If changes are needed, ask for a plan first. 5. Run your project’s tests and lint commands yourself. 6. Review the Git diff before committing.
Helpful Git checks:
git status git diffThese are not Gemini CLI-specific commands, but they are essential when using any AI agent that can modify files.
How to enable sandboxing
Gemini CLI’s sandbox documentation says sandboxing isolates potentially dangerous operations, such as shell commands or file modifications, from the host system.
You can enable sandboxing with a command flag:
gemini --sandbox -y -p "your prompt here"Or with an environment variable:
export GEMINI_SANDBOX=docker gemini -p "build the project"The official docs list sandbox options such as true, docker, podman, sandbox-exec, runsc, and lxc. The best choice depends on your operating system and container setup.
Sandboxing reduces risk, but it does not remove all risk. Use the most restrictive profile that still allows the work, and avoid exposing secrets in the workspace.
How to verify that Gemini CLI works
After installation and authentication, run a small safe prompt:
gemini -p "Say hello and explain what folder you are currently in"If the CLI responds without an authentication error, the basic setup is working.
To test piped input, create a harmless demo file:
printf "error: demo log line" > demo-log.txt cat demo-log.txt | geminiDo not use real production logs unless you have already removed sensitive data.
Common issues
Node.js is too old
The official installation docs require Node.js 20.0.0+. If Gemini CLI fails to install or run, check your Node.js version first:
node --versionGoogle Workspace or organization login fails
The authentication docs explain that company, school, Google Workspace, or certain licensed accounts may require a Google Cloud project. Check your account type and project configuration.
API key is not detected
If using an API key, confirm GEMINI_API_KEY is set in the same shell session where you run Gemini CLI. Avoid storing the key in public files.
Sandbox blocks a command
The sandbox docs mention issues such as “Operation not permitted,” missing commands inside a container, or network restrictions. You may need to adjust mounts, proxy settings, sandbox profile, or use a custom image for project-specific dependencies.
The agent asks to run a command you do not understand
Stop and inspect the command. Be extra careful with commands that delete files, overwrite data, deploy code, change system configuration, or send data over the network.
Safety and legal notes
- Do not expose API keys, cookies, private keys, customer data, or confidential source code unless your policy allows it.
- Do not use Gemini CLI to bypass licenses, break DRM, access systems without authorization, or exfiltrate data.
- Review diffs before committing.
- Prefer sandboxing and test folders for commands with side effects.
- In business environments, check AI usage, data handling, and Google Cloud policies before rollout.
FAQ
Is Gemini CLI free?
The official README mentions a free tier for personal Google accounts: 60 requests per minute and 1,000 requests per day. Quotas, terms, and billing can vary by account type, region, license, and Google Cloud setup, so verify the official quota documentation for your case.
Is Gemini CLI open source?
Yes. The official repository uses the Apache License 2.0.
Do I need Node.js?
Yes. The official installation docs list Node.js 20.0.0+ as the runtime requirement.
Can Gemini CLI be used in scripts?
Yes. The README and CLI reference show gemini -p "query", --output-format json, and --output-format stream-json for non-interactive and automation workflows.
Should I let Gemini CLI modify production files directly?
No. Use a separate branch, a clean Git state, sandboxing where appropriate, tests, and a manual diff review before merging changes.