AgentScope is the premier multi-agent system framework for building observable, scalable, and trustworthy AI agents with minimal coding overhead.
Why AgentScope exists: from black boxes to observable agents
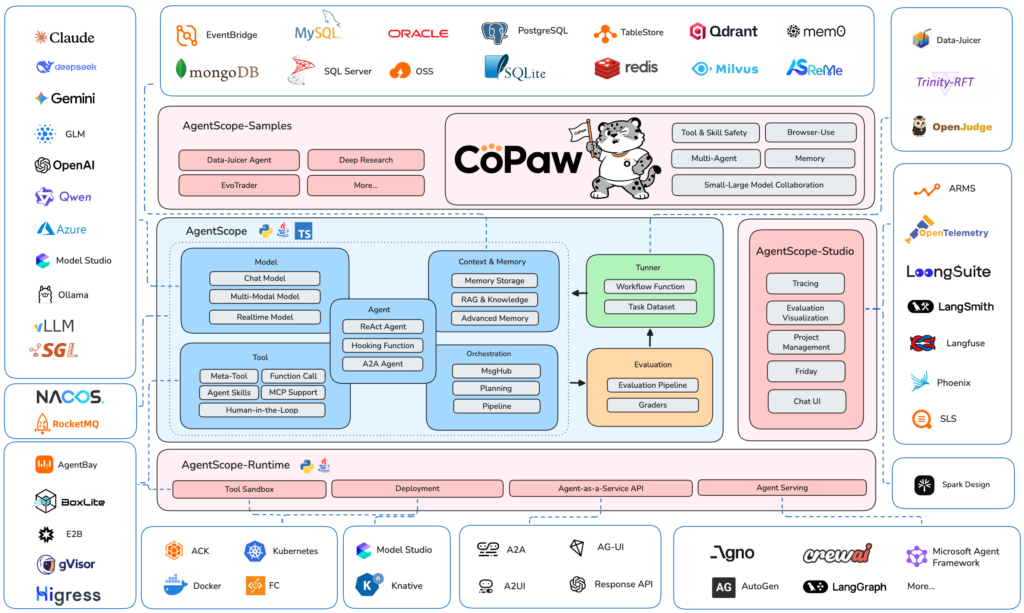
AgentScope is a developer-centric multi-agent platform that puts message exchange and observability at the core of its design, rather than treating agents as opaque black boxes.
Developed by Alibaba’s Tongyi Lab and the open source community, it provides structured message passing, a rich service (tool) layer, and visual interfaces so you can see, understand, and trust how your AI agents behave in production.
The platform bundles multiple UX layers—annotated terminals, a web UI, and a drag‑and‑drop zero‑code AgentScope Workstation (Studio)—to let you trace conversations, tool calls, and costs without custom instrumentation.
In contrast to more “magic” frameworks, AgentScope’s core principle is transparency: multi-agent orchestration, prompt flows, and tool usage remain explicit and inspectable for the developer.
Core architecture and concepts
Message-based communication protocol
In AgentScope, messages are the first-class primitive for all interaction—between users, agents, tools, and external systems.
Each message is a Msg object with four fields: name (sender identity), role (system / assistant / user), content (text or multimodal blocks), and metadata (structured information that doesn’t pollute prompts).
For example, a simple textual message looks like this:
from agentscope.message import Msg

msg = Msg(
    name="User1",
    role="user",
    content="Summarize the latest research on multi-agent system frameworks."
)
Under the hood, the same message format also supports images, audio, video, tool calls, and tool results via content blocks like TextBlock, ImageBlock, ToolUseBlock, and ToolResultBlock, enabling rich multi‑modal AgentScope tutorials and workflows.
Service layer: tools and external capabilities
AgentScope’s service (tool) layer provides a unified way for agents to call external capabilities—code execution, shell commands, file ops, RAG pipelines, and custom APIs—through a Toolkit abstraction.
Tool functions are ordinary Python functions with docstrings that are automatically converted into JSON Schema, supporting synchronous/asynchronous execution, streaming responses, interruption, and autonomous tool management by agents.
The framework ships with a built‑in tool library under agentscope.tool, including helpers like execute_python_code, execute_shell_command, and text file read/write utilities, so you can build trustworthy AI agents without reinventing basic infrastructure.
Workstation & Studio: visual monitoring and zero-code workflows
On top of the core library, AgentScope provides AgentScope Studio and Workstation—web-based visualization and editing environments.
- AgentScope Studio is a local web UI toolkit (installable via
@agentscope/studio) that gives you dashboards, run history, OpenTelemetry-based tracing, and evaluation views for your agent runs. - Workstation is a drag‑and‑drop canvas in Studio for building multi-agent workflows as node graphs, allowing zero‑code authoring of pipelines that compile down to JSON or Python.
These tools make AgentScope stand out among multi-agent system frameworks: you can monitor agent communication, execution timing, and even financial costs visually, not just in logs.
Prerequisites for working with AgentScope
Before following this AgentScope tutorial, make sure your environment meets these requirements:
- Python 3.9+ – The official installation guide recommends Python 3.9 or higher and suggests using a dedicated virtual environment for AgentScope.
- LLM API keys – You can use OpenAI, DashScope (Qwen), and other providers via model configs; Qwen and OpenAI are common defaults in examples.
- Terminal and Git – Needed if you choose to install from source or keep in sync with the latest multi-agent system framework enhancements.
- Optional: Docker – While not required, containerizing your AgentScope app is a practical way to isolate dependencies and safely expose observability endpoints, especially in team environments.
If you plan to experiment with distributed mode or high‑concurrency deployments, you may also want extra dependencies like agentscope[distribute] and additional infrastructure (multiple machines or processes).
Installation guide: pip install agentscope and beyond
Step 1: Create and activate a Python environment
The docs recommend a fresh environment, either via Conda or virtualenv.
Using Conda:
conda create -n agentscope python=3.9
conda activate agentscope
Using virtualenv:
pip install virtualenv
virtualenv agentscope --python=python3.9
source agentscope/bin/activate  # On Windows: agentscope\Scripts\activate
Step 2: Install AgentScope from PyPI
For centralized (single‑process) multi-agent applications, one command is enough:
pip install agentscopeIf you know you’ll use distributed mode, install the extra dependency group:
# Windows
pip install "agentscope[distribute]"

# macOS / Linux (escaping brackets for some shells)
pip install agentscope\[distribute\]
Alternatively, to track the latest development version from GitHub:
git clone https://github.com/modelscope/agentscope.git
cd agentscope
pip install -e .
This gives you the full open source AI observability stack right in your Python environment.
Step 3: Setting up AgentScope Studio / Workstation
Studio (which includes the Workstation) is the visual companion to the core library.
To start Studio from Python:
import agentscope

agentscope.studio.init()
Or directly from the terminal:
# Once Node.js/npm is installed:
npm install -g @agentscope/studio
as_studio
By default, Studio runs at http://127.0.0.1:5000 (or :3000 in some distributions), where you can open dashboards, inspect run histories, and use the Workstation drag‑and‑drop editor.
You can also bind Studio to specific run directories to visualize historical executions:
import agentscope

agentscope.studio.init(
    host="127.0.0.1",
    port=5000,
    run_dirs=[
        "/path/to/project_a/runs",
        "/path/to/project_b/runs",
    ],
)
Building your first AgentScope conversation
Let’s walk through a minimal AgentScope tutorial: a user agent talking to an assistant agent, with observability hooks ready for Studio.
Step 1: Initialize AgentScope and model configs
AgentScope uses a configuration dictionary (or JSON) to describe your models.
import agentscope

model_configs = {
    "default_openai": {
        "model_type": "openai_chat",
        "model_name": "gpt-4",
        "api_key": "<YOUR_OPENAI_API_KEY>",
    }
}

agentscope.init(
    model_configs=model_configs,
    project_name="demo-chat",
    studio_url="http://127.0.0.1:5000",  # send traces to Studio
)
The studio_url parameter ensures all agent messages and metrics are forwarded to AgentScope Studio’s dashboard, so you can visually inspect this “hello world” conversation.
Step 2: Define a dialog agent and a user agent
A common pattern in AgentScope is to use a DialogAgent (LLM-backed assistant) and a UserAgent that represents the human’s presence in the multi-agent system framework.
from agentscope.agent import DialogAgent, UserAgent

assistant = DialogAgent(
    name="research_assistant",
    sys_prompt="You are a precise AI researcher who explains concepts clearly.",
    model_config_name="default_openai",
)

user = UserAgent(name="developer")
Here, DialogAgent uses the configured model and system prompt to answer questions, while UserAgent handles terminal input or custom UI callbacks (which can be overridden to connect to Studio, Gradio, or your own front end).
Step 3: Create a simple conversation loop
Now we wire messages between user and assistant using the message API:
from agentscope.message import Msg

history = []

while True:
    user_text = input("You: ")
    if user_text.strip().lower() in {"exit", "quit"}:
        break

    user_msg = Msg(name=user.name, role="user", content=user_text)
    history.append(user_msg)

    # Let the assistant respond; many agents are callable on Msg objects
    assistant_reply = assistant(history)
    history.append(assistant_reply)

    print(f"{assistant.name}: {assistant_reply.content}")
Run this script with Studio connected and you will see each Msg rendered in the dashboard along with timing, token usage, and (if configured) cost estimates—exactly the kind of open source AI observability you want when you build trustworthy AI agents.
From here you can extend:
- add tools to the assistant via a
Toolkit, - swap the model to DashScope’s Qwen,
- or transform this simple chat into a full multi-agent pipeline with message hubs and workflows.
Advanced features: distributed mode and tools
Distributed mode for high concurrency
AgentScope implements a distributed/parallel mode based on the actor model to support high‑concurrency and large-scale multi-agent simulations.
Each agent becomes an independent actor with its own state; the runtime automatically parallelizes operations across processes or machines without requiring you to change your application logic.
Enabling distributed mode is intentionally minimal: instead of constructing an agent directly, you call .to_dist() during initialization:
from agentscope.agent import DialogAgent

# Traditional (local) agent
assistant = DialogAgent(...)

# Distributed agent with the same logic
assistant = DialogAgent(...).to_dist()

x = Msg(name="user", role="user", content="Fetch 5 URLs in parallel.")
y = assistant(x)
Because the code is compatible between single-process and distributed modes, you can start in local development and later migrate to a distributed, high‑throughput deployment with essentially zero migration cost—one of the core design goals highlighted in the AgentScope papers.
Built-in tool library and service toolkit
The tool subsystem is another major differentiator in “AgentScope vs AutoGPT” comparisons: AgentScope offers a strongly typed, schema‑driven tool API designed for reliable execution and observability.
Key capabilities include:
- Automatic tool parsing from Python function signatures and docstrings.
- Support for synchronous and asynchronous tools, including streaming responses.
- Dynamic tool schema extension and signal‑based interruption.
- Autonomous tool selection and management by agents.
A simple custom tool might look like:
from agentscope.tool import ToolResponse, Toolkit

toolkit = Toolkit()

def add(a: int, b: int) -> ToolResponse:
    """Add two integers and return the sum.
    Args:
        a (int): First integer.
        b (int): Second integer.
    """
    return ToolResponse(text=str(a + b))

toolkit.register_tool(add)
You can then attach this toolkit to a ReAct-style agent that reasons about when to call tools, all while Studio displays each tool invocation and result for debugging and trust.
AgentScope vs AutoGPT: observability and multi-agent focus
Both AgentScope and AutoGPT aim to make LLM-based agents more capable than a raw API call, but they occupy different spaces:
- AutoGPT focuses on autonomous single- or few-agent task completion, with an emphasis on self-prompting and continuous execution; its observability is primarily log- and CLI-based.
- AgentScope is a full multi-agent system framework with explicit message passing, actor-based distributed execution, and deep open source AI observability via Studio and Workstation.
If your primary goal is to quickly spin up a single autonomous AI agent that completes a long-running task, AutoGPT remains compelling; if you want to build trustworthy AI agents with transparent communication, tooling, and scaling across many agents, AgentScope is engineered for that from the ground up.