Key Takeaway:
Automate Faceless Content gives you a complete blueprint to go from validated ideas to fully edited, scheduled faceless videos on autopilot, so you can scale content output without scaling your workload.
What Is Automate Faceless Content?
Automate Faceless Content is an open-source GitHub repository created by Chris Porter that bundles together a full course, workflow guides, and automation patterns for faceless video creation. The core promise is simple: learn how to automate faceless short-form and long-form video content and dominate YouTube, TikTok, Facebook, and Instagram on autopilot—from idea, to script, to video, to scheduled posts.
Instead of being “just another script,” the repo functions as a complete learning and execution system: it combines 10+ modules of training, platform-specific playbooks, and step-by-step implementation guides. The result is a repeatable framework you can plug into your existing stack (Python, n8n, Syllaby.io, scheduling tools, etc.) to build your own automated video factory.
The Pain It Solves For Modern Creators
If you’ve tried to run a serious faceless channel before, you know the pain points are not just “editing is slow.” The real bottlenecks usually show up earlier and later in the pipeline:
- Finding validated content ideas that your audience actually wants.
- Turning those ideas into high-retention scripts, not just generic AI fluff.
- Generating video assets (stock footage, B‑roll, subtitles, voiceover) at scale.
- Posting consistently across multiple platforms with correct formats and timing.
Automate Faceless Content is designed around these exact chokepoints: it teaches you how to systematize idea research, create scripts that platforms reward, and connect that to faceless video generation and multi-platform scheduling. For creators, marketers, and automation nerds, the value is that you’re not just copying a single script—you’re adopting a proven content factory model.
Inside The Automate Faceless Content System
At a high level, the repository gives you three big building blocks.
- A structured course: Modules cover foundations, platform requirements, monetization, and long-term growth, so you understand both the technical workflow and the business side.
- Step-by-step workflows: Guides walk you through going from audience research to ideas, scripts, faceless video generation, and bulk scheduling.
- Platform & revenue guides: You’ll find platform requirements (like YouTube monetization thresholds) and revenue strategies so your automated system is built for real monetization, not just views.
One of the standout pieces is the “Faceless Video Generator” workflow—a guided, step-by-step process for turning ideas into complete videos in minutes, aimed at both beginners and advanced users. The system is built around Syllaby.io for idea validation and scripting, then layers on distribution and monetization patterns so you can stack multiple revenue streams.
Installation & Setup Guide
Even though Automate Faceless Content is primarily a course and workflow repository, the best way to work with it is to clone it locally and treat it like a technical playbook you can extend with your own scripts and automations.
1. Clone The Repository
Open your terminal and clone the official GitHub repo:
git clone https://github.com/cporter202/automate-faceless-content.git
cd automate-faceless-content
This gives you access to the full course content, guides, and any sample automation assets included in the repo.
I recommend bookmarking the online version as well, since GitHub’s UI makes it easy to browse modules and guides directly in the browser:
2. Create A Python Environment (Optional But Recommended)
If you plan to build your own scripts or adapt any example agents mentioned in the ecosystem around this project (e.g., “one Python script, one Reddit link, one finished video”), you’ll want an isolated Python environment.
From inside the repo:
# Create and activate a virtual environment (Unix/macOS)
python -m venv .venv
source .venv/bin/activate

# On Windows (PowerShell)
# python -m venv .venv
# .venv\Scripts\Activate.ps1
Next, check the root of the repository for any dependency files like requirements.txt or pyproject.toml and install them if present:
# If the repo provides a requirements file
pip install -r requirements.txt
Because the repo is evolving and centered on workflows and course content, always follow whichever setup notes are in the current README or /guides/getting-started section.
3. Configure External Services (Syllaby.io, Platforms, etc.)
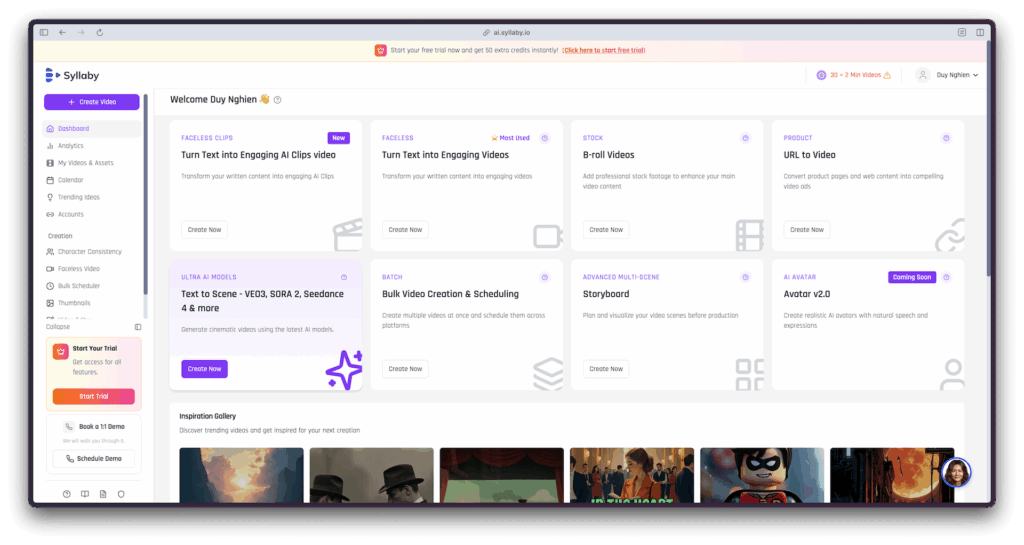
The core workflow is built around Syllaby.io, which handles a lot of the audience research, idea generation, and scripting logic for you. In early modules you’re guided to set up a Syllaby.io account so you can plug directly into the recommended pipeline.
In practice, your setup will usually include:
- A Syllaby.io account for idea validation and script generation.
- Connected YouTube, TikTok, Facebook, and Instagram accounts for publishing.
- Optional: an automation layer (n8n, Make, custom Python scripts) that calls your AI tools, video generator, and social APIs on a schedule.
You’ll find platform-specific guides (for example, a YouTube guide outlining monetization requirements and optimization tactics) inside the repository’s guides/platforms folder.
Practical Usage: From Idea To Scheduled Post
Once you’ve cloned the repo and skimmed the early modules, the real power comes from wiring the conceptual framework into your own automation stack. Let’s walk through how a full run might look in practice.
Step 1: Generate & Validate Ideas
The course shows you how to turn audience research into content pillars and idea lists, often using Syllaby.io as the engine.
A typical flow looks like this:
- Define your niche and target viewer (e.g., “AI tools for solo creators”).
- Use the course prompts and Syllaby.io workflows to generate a batch of content ideas and titles.
- Tag each idea with platform, format (shorts vs long-form), and intent (educational, story, list-based).
You can store these ideas in a spreadsheet, Airtable base, or database that your automation layer reads from.
Step 2: Turn Ideas Into High-Retention Scripts
Next, you convert validated ideas into scripts designed to hold attention on YouTube, TikTok, and other platforms.
The Automate Faceless Content materials walk through:
- Using hooks, pattern interrupts, and pacing that align with platform algorithms.
- Structuring short-form vs long-form scripts so each segment earns the next 3–5 seconds of attention.
- Adapting scripts for different platforms while keeping a consistent brand voice.
If you’re building your own Python or n8n workflow on top of this, a “script generation” step might look like:
from my_agents import IdeaToScriptAgent

agent = IdeaToScriptAgent(
    idea_source="airtable",
    model="gpt-4.1-mini",
    style_profile="faceless_ai_tutorials"
)

script = agent.generate_script(idea_id="yt-2026-001")
agent.save_script(script)
This isn’t shipped code from the repo; it’s an example of how you might wrap the course patterns into an agent-style workflow in your own stack.
Step 3: Generate The Faceless Video
The faceless-video-generator guide describes a complete step-by-step workflow that turns your scripts into finished faceless videos in minutes. Broadly, it covers:
- Scheduling and metadata setup (titles, descriptions, thumbnails).
- Video creation using AI voiceover, B‑roll or stock footage, and auto-captions.
- Checks to ensure aspect ratios and durations match each platform (e.g., 9:16 shorts vs 16:9 long-form).
In a no-code/low-code setup, this might be an n8n workflow that:
- Watches for a “Ready for production” script in Airtable.
- Sends the script to an AI voice/visual tool.
- Sends the rendered video file to a captioning/templating service.
- Stores the final asset URL and metadata back to your database.
A conceptual Python-style command to trigger a job could look like:
python automate_job.py \
  --mode idea-to-video \
  --source airtable \
  --output-bucket content_faceless_yt
Again, the exact script name depends on how you implement your stack, but the pattern lines up with the “one Python script, one link in, one finished video out” story that’s being shared around this repo.
Step 4: Schedule & Post Across Platforms
The final piece is distribution: the whole point of automation is that your videos go out on time, in the right format, to every relevant platform without you manually uploading.
Automate Faceless Content offers:
- Platform guides explaining video specs, posting best practices, and monetization requirements (e.g., YouTube’s 1,000 subscribers and 4,000 watch hours threshold).
- Workflows for bulk scheduling so you can batch-produce 10+ videos and drip them out over weeks.
In practice, your automation layer might:
- Read pending videos from your production log.
- Use platform APIs or a scheduling tool to create posts at recommended times for YouTube, TikTok, Facebook, and Instagram.
- Mark each video as “posted” and log view/engagement metrics back into your database for later optimization.
For you as a creator or marketer, that translates into:
- Faster experimentation: you can test new channels, niches, or formats without rebuilding the system each time.
- More consistent publishing: automation ensures your content machine runs even when you’re busy or offline.
- Better leverage of AI: instead of scattered tools, you’re following a cohesive, battle-tested framework that treats automation like a product, not a hack.
If you’re serious about building or scaling a faceless channel in 2026, this repo is one of the rare resources that combines a full course, platform strategy, and automation-friendly workflows in a single package.