 By
By How to Set Up Google Analytics MCP Server: Connect GA4 to Claude & Cursor
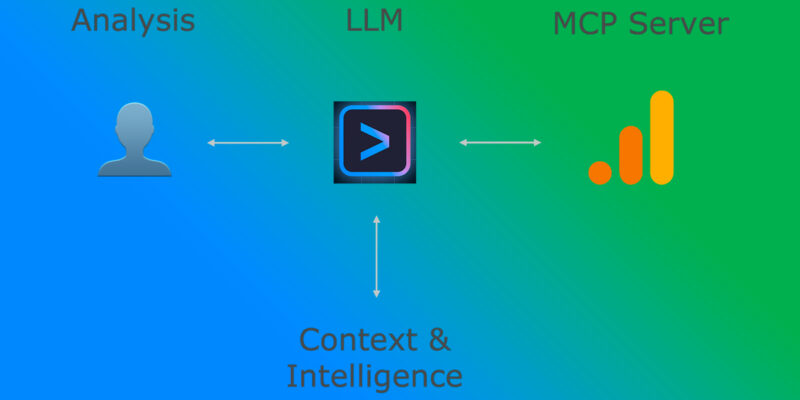
The Model Context Protocol (MCP) has changed the way developers interact with external tools and databases. Instead of navigating the complex Google Analytics 4 (GA4) dashboard, exporting CSVs, and manually sorting tables, you can now query your website traffic and user behavior directly within your AI chat interface using natural language.
In this guide, we will walk you through setting up the official Google Analytics MCP Server (using the analytics-mcp package) for client applications like Claude Desktop and Cursor.
What Can the Google Analytics MCP Server Do?
Once configured, the MCP server empowers your AI assistant with the following capabilities:
- Property Discovery: Fetch account hierarchies, property IDs, and Google Ads links (
get_account_summaries,list_google_ads_links). - Core Reporting: Query active users, screen pageviews, user engagement, and conversion funnel stats for any custom date range (
run_report,run_funnel_report). - Real-time Analytics: Pull live stats from the last 30 minutes to see instant user activity (
run_realtime_report).
Prerequisites
Before starting the installation, ensure your local system has:
- Python 3.10 or higher installed.
- pipx installed (recommended for running isolated Python-based MCP servers).
- macOS (via Homebrew):
brew install pipx && pipx ensurepath - Windows:
pip install pipx && pipx ensurepath
Step 1: Set Up Google Cloud Platform (GCP)
To allow the MCP server to communicate securely with Google’s API, you need to create a Service Account and download a credential key.
- Go to the Google Cloud Console. Create a new project or select an existing one.
- Search for and enable the following APIs in the API Library:
- Google Analytics Data API (required for retrieving reports).
- Google Analytics Admin API (required for fetching account metadata).
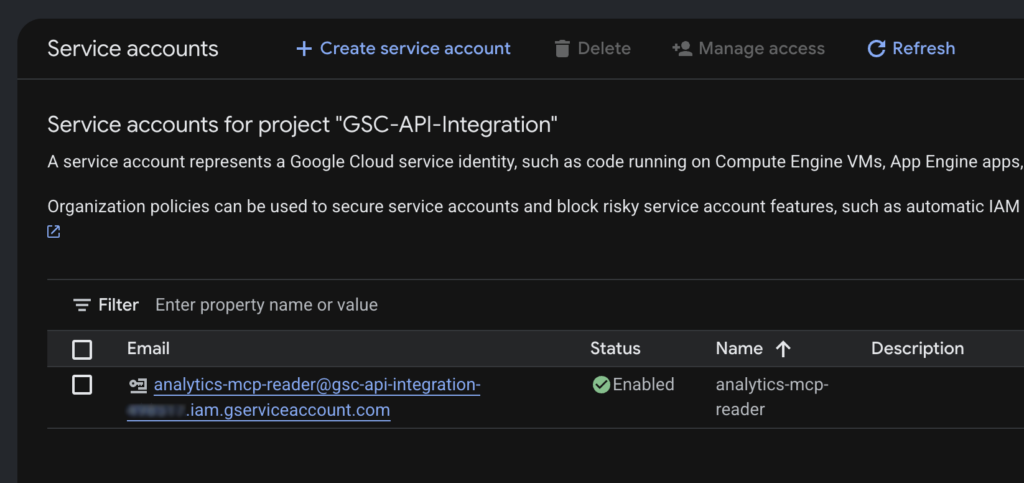
- Navigate to IAM & Admin -> Service Accounts and click Create Service Account.
- Give it a name (e.g.,
analytics-mcp-reader) and click Create and Continue, then click Done. - Find the newly created Service Account in the list, click its email, and navigate to the Keys tab.
- Click Add Key -> Create new key. Choose JSON and click Create.
- A
.jsonfile containing your private key will be downloaded to your computer. Save it in a secure location and copy its absolute path (e.g.,/Users/username/.config/gcloud/analytics-key.json).
Step 2: Grant Read Permissions in GA4
You must authorize the Service Account to access your website’s GA4 property.
- Log in to your Google Analytics dashboard.
- Click Admin (the gear icon in the bottom-left corner).
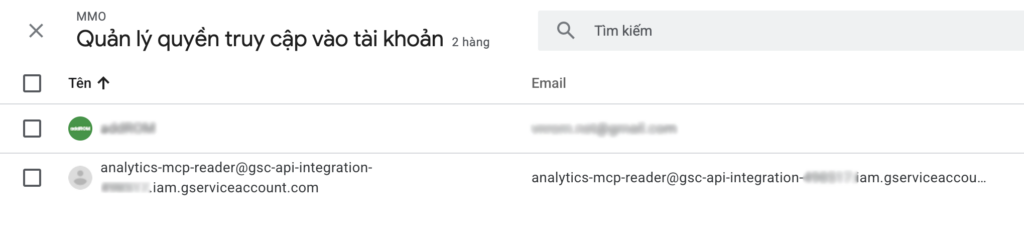
- Under the property column, select Property Access Management.
- Click the blue
+icon in the top-right corner -> Select Add users. - Paste the email address of the Service Account you created in Step 1 (e.g.,
[email protected]). - Under direct roles, select Viewer and click Add.
Step 3: Configure Your AI Client
Now, configure your AI workspace client to launch the MCP server.
Option A: Configuration for Claude Desktop
Open the configuration file at the following path based on your OS:
- macOS:
~/Library/Application Support/Claude/claude_desktop_config.json - Windows:
%APPDATA%\Claude\claude_desktop_config.json
Add the analytics-mcp configuration under the mcpServers object:
{
  "mcpServers": {
    "analytics-mcp": {
      "command": "pipx",
      "args": ["run", "analytics-mcp"],
      "env": {
        "GOOGLE_APPLICATION_CREDENTIALS": "/path/to/your/analytics-key.json",
        "GOOGLE_PROJECT_ID": "your-google-cloud-project-id"
      }
    }
  }
}
(Make sure to use forward slashes / for file paths on all systems, including Windows, inside the JSON file).
Option B: Configuration for Cursor
- Go to Cursor Settings -> Features -> MCP.
- Click + Add New MCP Server.
- Set the following fields:
- Name:
analytics-mcp - Type:
command - Command:
pipx run analytics-mcp
- Click Environment Variables and add:
- Key:
GOOGLE_APPLICATION_CREDENTIALS| Value:/path/to/your/analytics-key.json - Key:
GOOGLE_PROJECT_ID| Value:your-google-cloud-project-id
- Click Save and restart Cursor.
Common Prompt Examples to Test Your Server
Once the server status shows a green dot (indicating a successful connection), you can start chatting with your data:
- Verify connection: “List all the Google Analytics properties I have access to.”
- Check traffic: “How many active users and pageviews did my website get in the last 30 days?”
- List top pages: “What are the top 10 most viewed pages on my site this week?”
- Real-time check: “Show me the real-time active users on my site over the last 30 minutes.”
Troubleshooting
1. Error: “403 Request had insufficient authentication scopes”
- Why it happens: This occurs if you attempt to authenticate using your personal Google account credentials via
gcloud auth application-default login. Google blocks default CLI clients from requesting sensitive scopes like Google Analytics. - How to fix: Follow the Service Account setup in Step 1. Using a dedicated GCP Service Account with a private JSON key bypasses this restriction and provides a secure, permanent connection.
2. Error: “File not found” for JSON credentials
- Why it happens: The file path specified in
GOOGLE_APPLICATION_CREDENTIALSis incorrect, or the AI client cannot read it due to system permission restrictions. - How to fix: Double-check the absolute path of your JSON key file. Ensure the folder permissions allow reading, and do not use relative paths like
~/.
Conclusion
Setting up the Google Analytics MCP Server is a powerful way to bring business intelligence directly into your coding or writing workspace. Whether you are analyzing traffic drops, auditing SEO changes, or checking real-time campaign performance, doing it via natural language saves time and streamlinies your workflow. Happy analytics querying!