Key Takeaways: Sshwifty turns any modern browser into a secure Web SSH & Telnet client, making it easy to reach your servers from anywhere without installing traditional terminal apps.
What is Sshwifty?
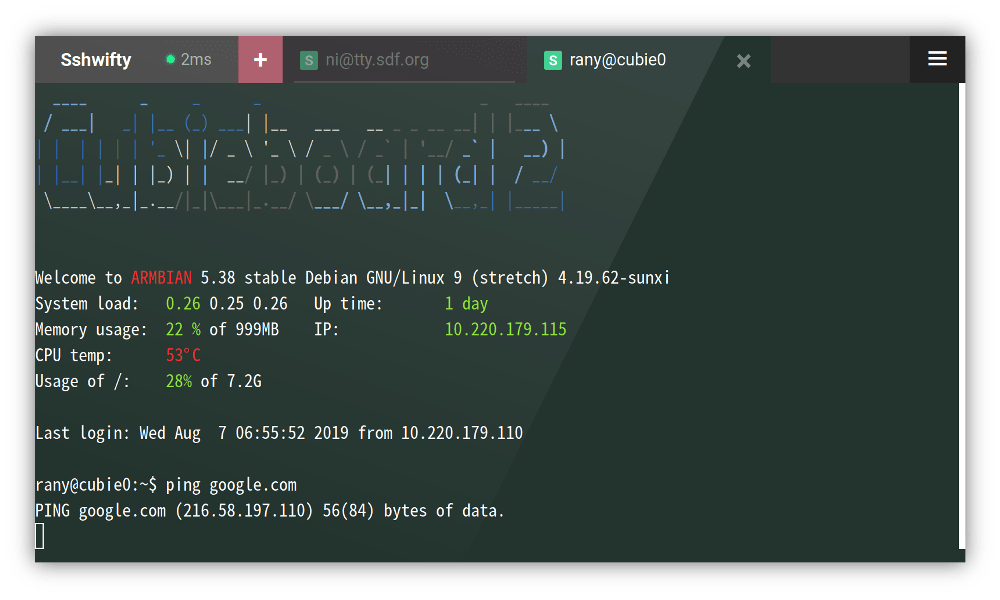
Sshwifty is a Web SSH & WebTelnet client that lets you connect to SSH and Telnet servers directly from your browser, without installing native terminal software on each device. You deploy Sshwifty on a server or NAS, then access it via a standard HTTPS URL, using its web interface as your gateway to remote shells and services. It supports both SSH and Telnet protocols, is licensed under AGPL‑3.0, and is written primarily in Go and JavaScript with a Vue‑based frontend.
For admins, homelab builders, and DevOps engineers, Sshwifty provides a centralized, browser‑friendly way to manage servers from locked‑down laptops, tablets, or shared devices where you might not have permission to install full terminal software.
- GitHub repository: https://github.com/nirui/sshwifty
- Project page: https://nirui.org/projects
Why a web‑based SSH & Telnet client is useful
Traditional SSH workflows rely on native clients like OpenSSH, PuTTY, or terminal emulators, which may not be available on every device or may be blocked by corporate policies. Sshwifty sidesteps that problem by moving the client logic into a web app, so you only need a browser and access to the Sshwifty URL to reach your servers. Because it supports presets, access passwords, and reverse proxy setups, you can expose a single HTTPS endpoint that teams use to reach multiple internal hosts in a controlled, auditable way.
In cloud‑native environments, Sshwifty also becomes a handy “jump host” for SSH that lives behind your reverse proxy or load balancer, simplifying secure access to Kubernetes nodes, VPS machines, or on‑prem boxes from any location.
Key features you get with Sshwifty
Browser‑native SSH & Telnet
Sshwifty implements a custom wire protocol between the browser and backend, using WebCrypto where available, to obscure and encrypt traffic between client and server. As long as you access Sshwifty over HTTPS and use a modern browser, you get a secure tunnel that forwards SSH or Telnet sessions from the backend to your browser tab.
Multiple deployment options
You can run Sshwifty as:
- A standalone binary compiled from source on Linux servers.
- A Docker container, recommended for isolation and easy restart policies.
- A prebuilt executable from the GitHub Releases page for popular platforms.
This flexibility makes it simple to drop Sshwifty into existing Docker stacks, NAS setups (Synology, QNAP), or bare‑metal hosts.
Configuration and presets
Sshwifty uses a JSON configuration file (sshwifty.conf.json) or environment variables to control HTTP host, shared access password, listen ports, timeouts, SOCKS5 proxy settings, and more. You can define “Presets” for known remotes—complete with titles, host, colors, authentication and encoding settings—so users can connect with one click instead of filling in forms manually.
Installation paths: Docker, prebuilt binaries, and source
Sshwifty’s README describes three main installation approaches: prebuilt executables, Docker images, and compilation from source.
Option 1: Deploy Sshwifty with Docker (recommended)
Running Sshwifty in Docker is the easiest and most portable way to get started, especially on VPS or NAS environments.
- Pull the Docker image
docker pull niruix/sshwifty:latestNote the image name includes an x: niruix/sshwifty.
- Run the Sshwifty container
docker run --detach \
  --restart unless-stopped \
  --publish 8182:8182 \
  --name sshwifty \
  niruix/sshwifty:latest
This exposes port 8182 to all clients, allowing browser access via http://<server-ip>:8182.
- Restrict to local access (optional)
If you want Sshwifty only accessible from localhost (e.g., behind an Nginx or Traefik reverse proxy), use:
docker run --detach \
  --restart unless-stopped \
  --publish 127.0.0.1:8182:8182 \
  --name sshwifty \
  niruix/sshwifty:latest
This forces all remote clients to access Sshwifty through your reverse proxy.
- Enable TLS directly in the container (optional)
When you don’t want to mount volumes for certificates, you can pass cert data using environment variables:
openssl req \
  -newkey rsa:4096 -nodes -keyout domain.key \
  -x509 -days 90 -out domain.crt

docker run --detach \
  --restart always \
  --publish 8182:8182 \
  --env SSHWIFTY_DOCKER_TLSCERT="$(cat domain.crt)" \
  --env SSHWIFTY_DOCKER_TLSCERTKEY="$(cat domain.key)" \
  --name sshwifty \
  niruix/sshwifty:latest
This starts Sshwifty with HTTPS enabled directly on port 8182 using the provided certificate pair.
Most setups, however, will terminate TLS at the reverse proxy and keep Sshwifty itself speaking plain HTTP behind the scenes.
Option 2: Use prebuilt executables
If you prefer not to use Docker, Sshwifty offers prebuilt executables for several platforms under the Releases section on GitHub.
You download an archive like sshwifty_0.3.1-beta-release_linux_amd64.tar.gz, extract it, and run the binary on your server:
wget https://github.com/nirui/sshwifty/releases/download/0.3.1-beta-release-prebuild/sshwifty_0.3.1-beta-release_linux_amd64.tar.gz
tar -xf sshwifty_0.3.1-beta-release_linux_amd64.tar.gz
./sshwifty_linux_amd64
From there, you configure listen interfaces, ports, and TLS as needed in sshwifty.conf.json.
Because the releases are built by an automated pipeline and not manually verified for every platform, the author recommends reporting any unusual failures via GitHub issues.
Option 3: Compile from source (for developers)
If you want full control or are packaging Sshwifty for a platform not covered by prebuilt binaries, build it from source.
You’ll need:
gitto clone the repository.nodeandnpmto build the frontend.goto build the backend.
Then run:
git clone https://github.com/nirui/sshwifty
cd sshwifty
npm install
npm run build
When the build completes, you’ll find a sshwifty binary in the working directory, ready to run with your configuration file or environment variables.
The Dockerfile in the repo documents the full build pipeline, which is useful if you run into compiler or dependency issues.
Basic configuration and hardening
Once Sshwifty is running, you should configure access controls and timeouts to match your security posture.
Set a shared access password
In sshwifty.conf.json, the SharedKey field defines a web interface access password:
"SharedKey": "WEB_ACCESS_PASSWORD",When non‑empty, users must enter this password before reaching the connector page, acting as a first‑layer gate on the web UI.
If you leave SharedKey blank, Sshwifty allows public access to the interface, which is generally only safe behind additional authentication layers like VPN or reverse proxy auth.
Listen interfaces and ports
Under Servers in the config, each Sshwifty HTTP server defines:
"ListenInterface": "0.0.0.0",
"ListenPort": 8182,
"InitialTimeout": 3,
"ReadTimeout": 60,
"WriteTimeout": 60,
"HeartbeatTimeout": 20,
"TLSCertificateFile": "",
"TLSCertificateKeyFile": ""- Use
0.0.0.0to listen on all interfaces or a specific IP for tighter scoping. - Set
TLSCertificateFileandTLSCertificateKeyFileto enable HTTPS directly if you’re not terminating TLS at a proxy.
Timeouts and heartbeat settings help protect against idle clients and hung connections.
Using environment variables instead of files
If you prefer twelve‑factor‑style configuration, you can set environment variables such as:
SSHWIFTY_HOSTNAME
SSHWIFTY_SHAREDKEY
SSHWIFTY_LISTENPORT
SSHWIFTY_LISTENINTERFACE
SSHWIFTY_TLSCERTIFICATEFILE
SSHWIFTY_TLSCERTIFICATEKEYFILE
SSHWIFTY_PRESETS
These correspond to the JSON fields and are handy for containerized deployments and CI/CD pipelines.
Everyday usage: connecting to SSH & Telnet from your browser
Once Sshwifty is configured and secured, using it is straightforward.
- Reach the web UI
Browse to your Sshwifty URL, e.g.https://ssh.yourdomain.comorhttps://<server-ip>:8182. Enter the shared access password if configured. - Create a new connection
In the connector window, click the + icon, choose SSH or Telnet, and fill in host, port, user, authentication method (password or private key), and encoding. - Use presets for common endpoints
If your admin configured presets, simply click a preset in the “Known remotes” tab; Sshwifty will prefill the form for you, improving consistency and reducing typos. - Confirm fingerprints and connect
On first connect, Sshwifty can display the server public key fingerprint, which you should verify before accepting, then proceed to login. - Operate via console toolbar
Once connected, Sshwifty presents a browser‑based terminal with a toolbar for special key combinations, useful on mobile devices or when your keyboard lacks specific keys.
Because the entire session runs inside the browser tab, you can connect from Chromebooks, locked‑down workstations, or phones, as long as they support WebCrypto and HTTPS.