Key Takeaways: vphone-cli transforms your Apple Silicon Mac into a fully virtualized, jailbroken iPhone lab running iOS 26, enabling advanced mobile development, security testing, and automation workflows without physical hardware.
What Is vphone-cli?
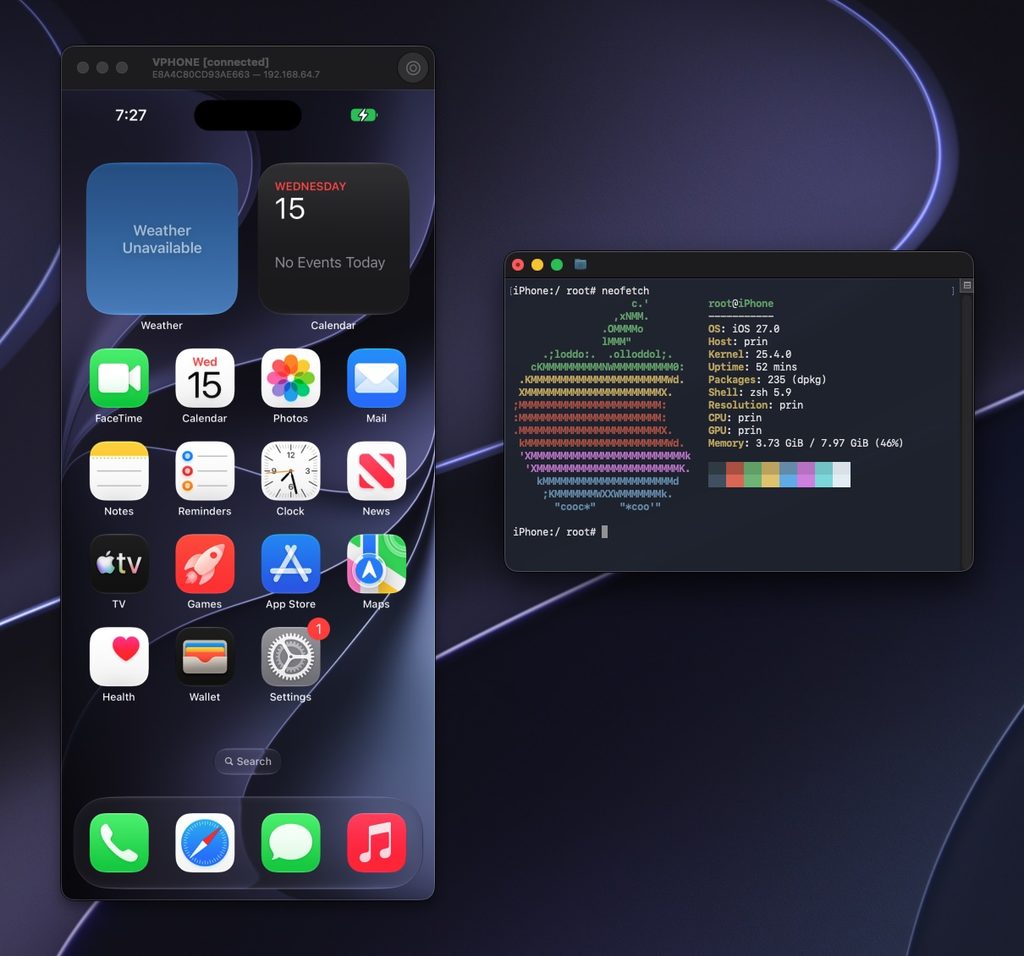
vphone-cli is an innovative open-source command-line tool that allows you to boot a virtual iPhone running iOS 26 on Apple Silicon Macs. Built on Apple’s Virtualization.framework and leveraging PCC research VM infrastructure, this project brings unprecedented capabilities to developers, security researchers, and iOS enthusiasts who need a flexible, reproducible iPhone environment.
The tool creates a fully functional virtual iPhone that can be jailbroken, customized, and accessed through multiple protocols including SSH, VNC, and RPC. This makes it ideal for mobile application security testing, automation development, tweak development, and general iOS experimentation without risking your primary device.
Why Use vphone-cli?
For Developers and Security Researchers
vphone-cli provides a safe, isolated environment for testing iOS applications, security vulnerabilities, and jailbreak tweaks. You can experiment with system modifications, test malware behavior, or develop mobile security tools without affecting your personal iPhone.
For Automation and AI Workflows
The virtual iPhone can be integrated into automated testing pipelines, AI agent frameworks, and continuous integration workflows. Multiple VMs can be created and managed simultaneously, making it perfect for scaling mobile testing operations.
For Learning and Experimentation
Whether you’re learning about iOS internals, jailbreak mechanisms, or mobile security, vphone-cli offers a hands-on platform to explore these topics in a controlled environment.
Prerequisites
Before installing vphone-cli, ensure your system meets the following requirements:
- Hardware: Apple Silicon Mac (M1, M2, M3, or M4 series)
- Operating System: macOS 15 (Sequoia) or later – this is mandatory for PV=3 virtualization support
- Disk Space: At least 100 GB of free storage
- Xcode: Full Xcode installation (not just Xcode Command Line Tools)
- Network: Stable internet connection for downloading firmware and dependencies
- Administrator Access: You’ll need admin privileges to modify system security settings
Step-by-Step Installation Guide
Step 1: Disable macOS Security Restrictions
vphone-cli requires reduced security restrictions to run unsigned binaries and access private Apple frameworks. This is a one-time setup performed in Recovery Mode.
Option A: Full Disable (Recommended for First-Time Users)
- Completely shut down your Mac
- Hold the power button until “Loading startup options” appears
- Click Options, then Continue to enter Recovery Mode
- Open Terminal from the Utilities menu
- Run the following commands:
csrutil disable
csrutil allow-research-guests enable- Restart your Mac normally
- Open Terminal (in normal mode) and run:
sudo nvram boot-args="amfi_get_out_of_my_way=1 -v"- Restart your Mac again
Option B: Using amfidont or amfree (Advanced)
For more granular control, you can use specialized tools:
# Using amfidont
xcrun python3 -m pip install amfidont
sudo amfidont --path [PATH_TO_VPHONE_DIR]

# OR Using amfree
brew install retX0/tap/amfree
sudo amfree --path [PATH_TO_VPHONE_DIR]
Step 2: Install Xcode and Accept License
- Download and install Xcode from the Mac App Store
- Launch Xcode once and accept the license agreement
- Run these commands in Terminal:
sudo xcode-select -s /Applications/Xcode.app/Contents/Developer
sudo xcodebuild -license accept
xcrun -sdk iphoneos --show-sdk-path
Step 3: Install Homebrew
If you don’t have Homebrew installed, run:
/bin/bash -c "$(curl -fsSL https://raw.githubusercontent.com/Homebrew/install/HEAD/install.sh)"Step 4: Install Required Dependencies
Install all necessary tools for downloading, compressing, signing, and handling firmware:
brew install aria2 wget gnu-tar openssl@3 ldid-procursus sshpass keystone libusb ipsw zstdStep 5: Clone the vphone-cli Repository
Download the project with all its submodules:
git clone --recurse-submodules https://github.com/Lakr233/vphone-cli.git
cd vphone-cli
Step 6: Build and Setup the Virtual Machine
The automated setup process handles everything from building the tool to booting your first virtual iPhone.
Build the tool:
make buildRun the complete automated setup:
make setup_machineThis single command performs the following operations:
- Installs Homebrew dependencies
- Creates a Python virtual environment
- Builds required tools and vphone-cli
- Creates a default 64 GB virtual disk
- Downloads iPhone IPSW and cloudOS firmware
- Merges and patches the boot chain
- Starts the virtual machine in DFU mode
- Obtains SHSH data
- Restores the virtual iPhone
- Mounts the virtual disk offline and installs the CFW
- Performs first-boot initialization
For a jailbroken VM with Sileo and TrollStore:
make setup_machine JB=1For experimental features:
make setup_machine EXP=1The setup process can take 30-60 minutes depending on your internet connection and system specifications.
Using Your Virtual iPhone
Booting the VM
Once setup is complete, boot your virtual iPhone with:
make bootFor DFU mode booting:
make boot_dfuAccessing the Virtual iPhone
vphone-cli provides multiple access methods:
SSH (Jailbroken):
ssh -p 2222 [email protected]
# Password: alpine
SSH (Regular/Developer):
ssh -p 2222 [email protected]
# Password: alpine
VNC (Graphical Interface):
open vnc://127.0.0.1:5901Or use any VNC client to connect to 127.0.0.1:5901
RPC (Remote Procedure Call):
rpcclient -p 5910 127.0.0.1Managing Multiple VMs
You can create multiple virtual iPhones with different configurations:
make vm_new # Create a new VM directory with manifestEach VM gets its own configuration in a separate directory, allowing you to maintain different iOS versions, jailbreak states, and configurations simultaneously.
Advanced Configuration
Customizing VM Resources
Edit the config.plist file in your VM directory to adjust:
- CPU allocation
- Memory size
- Disk capacity
- Network settings
Installing Tweaks and Applications
With a jailbroken VM, you can:
- Install Sileo or other package managers
- Add tweak repositories
- Sideload IPA files using tools like Filza
- Test jailbreak tweaks in a safe environment
Automation and Scripting
The virtual iPhone can be controlled programmatically through:
- SSH commands for file operations and package installation
- VNC for GUI automation
- RPC for low-level system interactions
- Custom Python scripts using pymobiledevice3
Troubleshooting Common Issues
Build Failures
If make build fails, ensure:
- Xcode is fully installed and licensed
- All Homebrew dependencies are installed
- You’re running on Apple Silicon (not Intel)
- macOS version is 15 or later
Boot Issues
If the VM fails to boot:
- Check that SIP and AMFI are properly disabled
- Verify you have sufficient disk space (100+ GB)
- Try running
make setup_machineagain - Check Terminal output for specific error messages
Network Connectivity
If SSH or VNC connections fail:
- Ensure the VM is fully booted
- Check that port 2222 (SSH) or 5901 (VNC) isn’t blocked
- Verify the VM network configuration in
config.plist
Performance Optimization
Improving VNC Quality
For better graphical performance:
socat TCP-LISTEN:5901,fork,reuseaddr TCP:127.0.0.1:5901Resource Management
- Allocate CPU cores based on your workload (2-4 cores recommended)
- Set memory to 4-8 GB for smooth operation
- Use SSD storage for better I/O performance
Use Cases and Applications
Mobile Security Testing
- Test application vulnerabilities
- Analyze malware behavior
- Develop and test security tools
- Practice penetration testing techniques
Development and QA
- Test apps across different iOS configurations
- Automate UI testing workflows
- Validate jailbreak compatibility
- Debug system-level interactions
Research and Education
- Study iOS internals and architecture
- Learn about jailbreak mechanisms
- Experiment with system modifications
- Develop educational content about iOS security
Getting Help and Contributing
The vphone-cli project is actively maintained on GitHub. For issues, questions, or contributions:
- Visit the GitHub repository
- Check existing issues and discussions
- Read the documentation in the
docs/directory - Contribute improvements via pull requests
Conclusion
vphone-cli represents a significant advancement in iOS virtualization, providing developers, researchers, and enthusiasts with a powerful tool for mobile development and security testing. By following this guide, you can set up a fully functional virtual iPhone on your Apple Silicon Mac, opening up new possibilities for automation, testing, and experimentation.
The combination of jailbreak capabilities, multiple access protocols, and the ability to run multiple VMs simultaneously makes vphone-cli an invaluable tool for anyone working in the iOS ecosystem. Whether you’re developing security tools, testing applications, or simply exploring iOS internals, vphone-cli provides the flexibility and control you need.
Remember to always use this tool responsibly and ethically, respecting Apple’s terms of service and applicable laws in your jurisdiction.