QwenPaw turns your personal AI assistant into a deploy-anywhere, multi-app hub with pluggable skills and memory that stay entirely under your control.
QwenPaw in a Nutshell
Imagine we’re at a cafe, laptop open, and you tell me you want “one AI that follows me across apps, remembers context, and lives on my own hardware.” QwenPaw is exactly that. The name stands for “Qwen Personal Agent Workstation,” and the project positions itself as a personal assistant that runs in your own environment, not on somebody else’s black-box SaaS.
Out of the box, QwenPaw can be installed on your local machine or deployed to a server in the cloud, then wired into multiple chat channels so you can talk to one brain from different apps. It’s built on the AgentScope ecosystem, so underneath the friendly layer you get a proper agent runtime, long‑term memory, and a skills system for extending what it can do.
The Problem QwenPaw Is Solving
Most of us end up with a messy mix of bots: one on Telegram, another on Discord, a local CLI agent, maybe something glued into WeChat or Slack. Each one has its own prompt, its own memory (or none), and its own configuration story; if you want persistence or advanced tools, you’re usually pushed into a hosted service you don’t fully control.
QwenPaw goes after three pain points in particular:
- Scattered conversations: It centralizes memory and skills while speaking over multiple channels like DingTalk, Feishu, QQ, and others, so your assistant feels consistent no matter where you message it.
- Lack of control: It runs entirely in environments you own—local workstation or your own cloud VM—rather than a proprietary backend.
- Rigid bots: It exposes an extensible skills layer, so adding capabilities like document analysis, scheduled jobs, or custom APIs is a configuration and coding task, not a new product.
Standout Features for Self‑Hosters and Developers
Deploy locally or in the cloud
QwenPaw is packaged as a Python‑based application (with a PyPI package and runtime integration) and also supports Docker‑based deployment, which makes it equally comfortable on your laptop or a cloud VM. You choose where it lives, and you’re not locked into a single provider.
Multi‑app, one assistant
In practice, you can connect QwenPaw to multiple chat channels at once, so the same assistant talks to you on Telegram, Matrix, Mattermost, and mainstream Chinese platforms like DingTalk, Feishu, QQ, and WeChat. Under the hood, each channel is just another configuration entry pointing into the same agent runtime and memory.
Skills, tools, and memory
QwenPaw’s skills system lets you plug in capabilities such as PDF/Office processing, scheduled tasks, or news digests, and newer releases include a refactored long‑term memory module with pluggable backends and automatic summarization. The idea is that your assistant not only remembers what you discussed, but can also call tools and skills to act on that context.
Installing QwenPaw Locally (Python Environment)
Let’s start with a “developer‑friendly” local setup—something you can spin up on your workstation to get a feel for the assistant before you think about cloud deployment.
Prerequisites
- Python 3.10 or newer.
- A modern OS (Linux, macOS, or Windows with WSL2 for best results).
- Basic familiarity with Python virtual environments.
Step 1: Create and activate a virtual environment
In a fresh project directory:
python -m venv .venv
# On Linux / macOS
source .venv/bin/activate
# On Windows (PowerShell)
# .venv\Scripts\Activate.ps1
Keeping QwenPaw in its own virtualenv stops it from fighting with your global Python packages.
Step 2: Install QwenPaw from PyPI
QwenPaw is published as a qwenpaw Python package, so installation is a single pip command:
pip install -U qwenpawThat pulls in the QwenPaw core plus the dependencies needed for the personal assistant runtime.
Step 3: Verify the CLI
Once install completes, you can confirm the CLI is on your path:
qwenpaw --helpYou should see usage information including commands related to running the console, managing channels, and inspecting configuration; if you don’t, make sure your virtualenv is activated and your PATH is correct.
One‑Click Script Installation (Comfortable Default)
For folks who don’t want to manage Python environments manually, QwenPaw also provides script‑based installers referenced in its documentation and issue templates, similar to the older CoPaw one‑line scripts. The idea is:
- You open a terminal (or PowerShell on Windows).
- You run an install script from the official QwenPaw site.
- The script sets up Python dependencies, the runtime, and a default config directory.
Because script URLs and details can change between releases, the safest move is to grab the current one‑line commands directly from the official homepage at http://qwenpaw.agentscope.io/ or the GitHub repository.
Running QwenPaw in Docker (Local or Cloud)
When you’re ready to put QwenPaw on a permanent machine or share it with a team, Docker is usually the cleanest route.
Step 1: Pull the official image
QwenPaw supports Docker‑based installs, documented as an option alongside pip and desktop apps in the docs. The pattern typically looks like:
docker pull <official-qwenpaw-image>Replace <official-qwenpaw-image> with the image name specified in the current QwenPaw documentation or GitHub README (for example, an agentscope-ai/qwenpaw‑style image when published).
Step 2: Run the container with a data volume
To persist configuration, logs, and memory, mount a host directory as a volume and expose the web console port:
mkdir -p $PWD/qwenpaw-data

docker run -d --name qwenpaw \
  -p 8080:8080 \
  -v $PWD/qwenpaw-data:/data \
  -e DASHSCOPE_API_KEY="your_qwen_or_llm_key" \
  <official-qwenpaw-image>
Here we’re wiring in a Qwen (DashScope) API key as an environment variable, just like you would for AgentScope Runtime examples. The container exposes a web console on port 8080, with its internal state living under /data so you can back it up or move it between hosts.
Step 3: Access the console
Once the container is running, open:
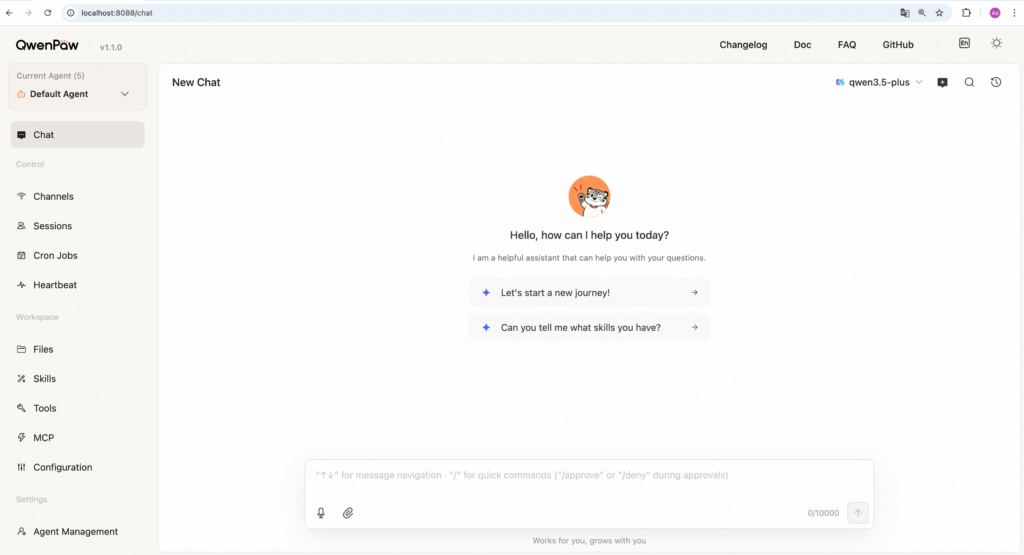
http://localhost:8080From there you can walk through QwenPaw’s UI‑driven onboarding: choose your model backend, create your first personal agent, and enable some built‑in skills.
Cloud Deployment Pattern (VPS or Home Server)
Deploying QwenPaw to the cloud is essentially “Docker on a remote machine plus a bit of networking”:
- Provision a small VM (e.g., a 2–4 vCPU box with 8 GB RAM) on your preferred provider or your home server.
- Install Docker and log in via SSH.
- Reuse the Docker run command above, but bind to
0.0.0.0:8080inside the VM and put a reverse proxy (Caddy, Nginx, Traefik) in front with your domain and HTTPS. - Lock down access using firewall rules, VPN, or an auth proxy so your personal assistant console is not wide open to the internet.
Because QwenPaw is just an app in your own stack, you retain full control over logs, memory backends, and what outbound calls the agent is allowed to make. For a quick reference, keep the GitHub repository handy at https://github.com/agentscope-ai/QwenPaw as you tweak your deployment.
Integrating QwenPaw with Chat Apps
Once QwenPaw is up, the real fun is wiring it into your daily communication tools so it feels less like a dashboard and more like a colleague living in your chats.
Supported channels at a glance
QwenPaw’s releases and package metadata highlight support for multiple messaging platforms, including:
- DingTalk, Feishu, QQ, and other Chinese‑centric platforms.
- Telegram with an interactive CLI configuration flow for bot tokens, proxies, and typing indicators.
- Matrix and Mattermost for open‑protocol and team collab use cases.
- WeChat via an iLink Bot channel in newer versions.
The point is: you run one QwenPaw instance and fan it out into as many channels as you want, each with its own policies and instructions.
Conceptual channel configuration
Under the hood, QwenPaw maintains channel definitions in configuration files or through the console, using fields like channel type, credentials, and behavior settings such as require_mention. A simplified YAML‑style example to illustrate the idea:
channels:
  telegram-main:
    type: telegram
    bot_token: "123456:ABC-telegram-bot-token"
    require_mention: true
    session_scope: "user"
    model: "qwen-max-latest"

  discord-lab:
    type: discord
    bot_token: "discord-bot-token"
    require_mention: true
    guild_allowlist: ["123456789012345678"]
    instructions: |
      You are my lab assistant. Keep responses concise and link to docs when helpful.
The actual schema can evolve between releases, but the pattern stays consistent: each channel entry tells QwenPaw how to authenticate, how to scope sessions (per user or group), and what model or system prompt to use.
Practical Everyday Workflows with QwenPaw
Let’s talk about how this feels day‑to‑day, because that’s what will sell you more than another feature list.
Single brain, many frontends
You might:
- Chat with QwenPaw on Telegram from your phone while commuting.
- Use Matrix or Mattermost at work to ask the same assistant to summarize threads, triage notifications, or format responses.
- Keep a WeChat channel or DingTalk/Feishu bot running for contacts who live in those ecosystems.
Because it’s the same runtime and memory behind all of them, follow‑up questions on one platform can draw on history and context built up elsewhere, depending on how you configure session scope and memory policies.
“Assistant with a toolbox,” not just chat
QwenPaw’s skills architecture lets you wire in capabilities like:
- Long‑term memory with pluggable backends and automatic summarization every N turns.
- File and document skills for PDFs or Office docs, so you can send a file from Telegram or Matrix and ask for a breakdown.
- Scheduled jobs—think daily digests, project check‑ins, or reminders—implemented as skills the agent can call.
A high‑level TOML‑style config might conceptually look like this:
[skills.news_digest]
entry = "skills.news:NewsDigestSkill"
schedule = "0 8 * * *"  # every day at 08:00
channels = ["telegram-main", "matrix-room-ops"]
[skills.todo_manager]
entry = "skills.todo:TodoSkill" channels = ["discord-lab"]
Again, the exact syntax comes from QwenPaw’s docs, but this illustrates how you attach skills to channels and, optionally, schedules so your assistant “pushes” value instead of only answering questions.
Extending QwenPaw Like a Developer Tool, Not a Black Box
What I like most, and what tends to resonate with self‑hosters, is that QwenPaw behaves more like a developer platform than a closed product. You can:
- Hack on skills in a repo you own and let QwenPaw auto‑discover them via its runtime’s plugin registration.
- Swap model backends—local Qwen variants, hosted Qwen, or other providers—by changing configuration and API keys rather than switching products.
- Evolve memory and context behavior as releases ship improvements to the long‑term memory module.
If you want to get deeper into the stack, bookmark the official site at http://qwenpaw.agentscope.io/ and the GitHub repo https://github.com/agentscope-ai/QwenPaw, then treat this post as the mental model while those docs give you the exact commands and schemas for your environment.