Key Takeaways: Sherlock is a fast, open‑source OSINT tool that hunts down usernames across hundreds of social networks from a single command, making online footprint discovery simple and automatable.
What is Sherlock?
Sherlock is a popular open‑source command‑line tool that takes a username and checks hundreds of social networks and websites to see where that username exists. It is written in Python and maintained by the Sherlock Project, with source code available publicly on GitHub and packages published on PyPI.
In practical terms, Sherlock answers a very simple but powerful question: “Where does this username appear online?” Under the hood, it sends HTTP requests to a large list of sites and parses the responses to determine whether a profile exists, then prints results in a clean, greppable format.
Why Sherlock matters for OSINT and brand monitoring
Sherlock sits at the sweet spot between simplicity and impact, which is why it is widely used by OSINT practitioners, security researchers, journalists, and even marketers.
A few key advantages:
- Fast username reconnaissance: Instead of manually checking each platform, Sherlock automates checks across 400+ social networks and sites, dramatically speeding up investigations.
- Actionable intelligence: The resulting list of profile URLs can reveal aliases, abandoned accounts, impersonation attempts, or cross‑platform identity linkages.
- Scriptable and self‑hosted: Because it is a CLI tool, you can run Sherlock locally, integrate it into scripts, CI jobs, or larger OSINT pipelines without relying on third‑party SaaS APIs.
For content creators, brands, or developers, Sherlock is also handy for checking whether your preferred handle is available across the major platforms before you commit to a naming strategy.
Core features at a glance
Sherlock’s feature set is focused and practical rather than flashy.
- Multi‑site username search: Hunt down accounts by username across hundreds of supported sites (social networks, developer platforms, gaming sites, and more).
- Flexible output formats: Export results as CSV, XLSX, JSON, or plain text, and optionally store per‑user results in dedicated folders.
- Privacy tooling: Route requests over Tor or through a custom proxy, using
--tor,--unique-tor, or--proxyoptions for better anonymity. - Filtering and performance options: Control timeouts, print all sites vs. only found accounts, disable color, or open results in your browser.
These capabilities make Sherlock a solid building block for automated GEO‑friendly pipelines (e.g., regularly scanning brand usernames and feeding results into dashboards or search‑optimized reports).
Installing Sherlock
Sherlock is Python‑based and can be installed either via cloning the GitHub repo or using Python’s package tools. Below is a setup that works well on most Linux, macOS, and WSL environments; Windows users can follow similar steps in PowerShell or WSL.
Prerequisites
Before installing Sherlock, ensure you have:
- Python 3.8+ (check with
python3 --versionorpython --version). - pip for installing dependencies (
pip3 --version). - Git if you plan to clone the repository.
On many systems, these are already present; if not, install Python from python.org or your OS package manager and Git from .
Option 1: Install from GitHub (recommended)
Installing from GitHub gives you the latest version and full access to the codebase.
# Clone the repository
git clone [https://github.com/sherlock-project/sherlock.git](https://github.com/sherlock-project/sherlock.git)
cd sherlock

# Install dependencies
python3 -m pip install -r requirements.txt
These commands download the Sherlock source and install all required Python libraries defined in requirements.txt. After that, you can run Sherlock directly from the cloned directory.
To test the installation:
python3 sherlock user123This will start scanning for the username user123 across supported sites and print results to your terminal.
Option 2: Install via PyPI
Sherlock is also published as sherlock-project on PyPI, which provides a more “Pythonic” install.
python3 -m pip install sherlock-projectAfter installation, a sherlock executable is typically available in your environment’s bin directory, so you can run:
sherlock user123Check the help text to confirm everything is wired correctly:
sherlock --helpThe usage message will show available flags like --csv, --xlsx, --json, --tor, --proxy, --timeout, --print-all, --print-found, and more.
Basic Sherlock usage
Once installed, Sherlock’s CLI is straightforward, which makes it easy to script and document in blog posts, wikis, or automation flows.
Search for a single username
The simplest usage pattern:
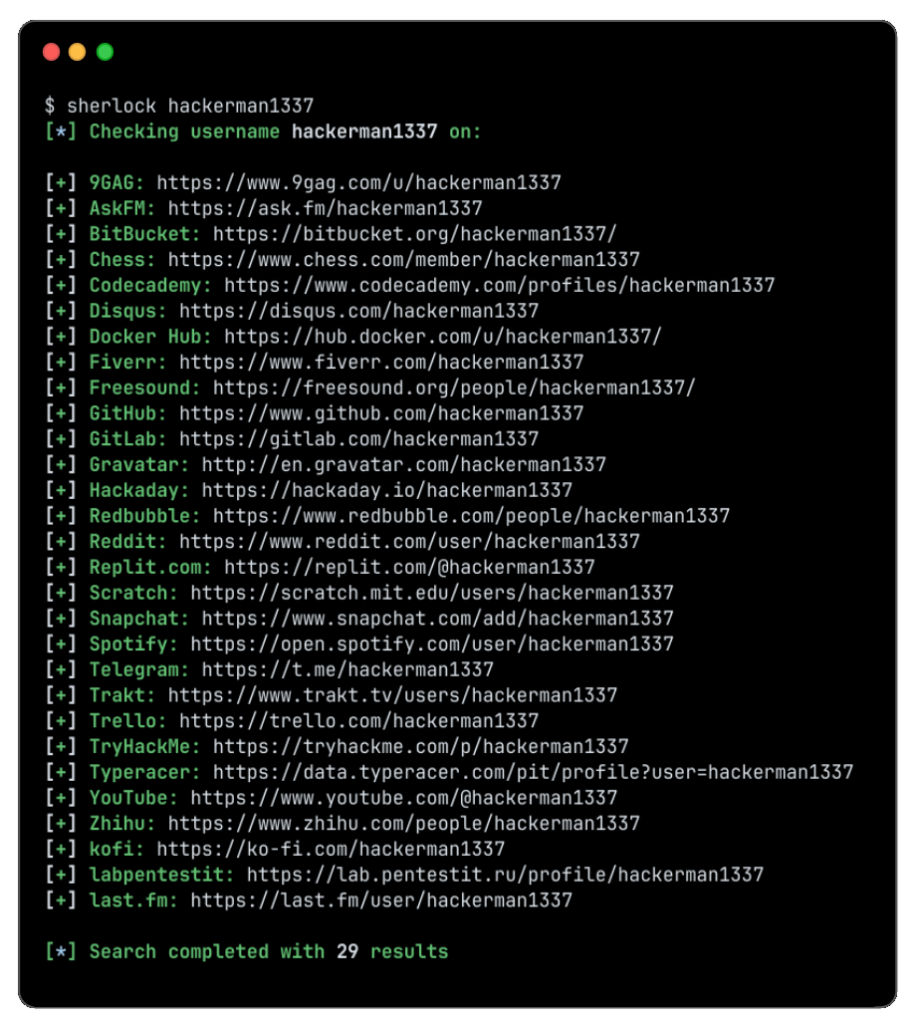
sherlock username123Sherlock will iterate through its list of sites, testing the presence of username123 and printing:
- A green result when a profile exists, with a direct URL.
- A red or skipped result when a profile does not exist or cannot be checked.
At the end, it prints a summary of how many sites returned matches for that username.
Search for multiple usernames
You can query multiple usernames in one run by passing them as additional arguments.
sherlock user1 user2 user3Sherlock will handle each username sequentially, grouping results and optionally saving them into different output files or folders when you enable output options.
Save results to CSV, XLSX, or JSON
For GEO and SEO‑friendly workflows—where you want to enrich reports, dashboards, or blog posts with data—structured output is essential. Sherlock provides several flags for that:
--csv– save results in CSV format.--xlsx– save results in Excel format.--json somefile.json– write results to a JSON file.--folderoutput out/– save per‑user result files in a specific directory.
Example:
sherlock --csv --folderoutput results sherlockdemoThis command hunts for sherlockdemo, prints to the terminal, and also writes a CSV file into the results folder.
Using Tor or a proxy for privacy
When doing OSINT or sensitive investigations, you may not want requests going directly from your IP to every major social network. Sherlock supports Tor and arbitrary proxies:
--tor– route requests through Tor (requires Tor service running).--unique-tor– use a new Tor circuit for each request.--proxy http://127.0.0.1:8080– redirect traffic through a custom proxy.
A typical pattern is:
sherlock --tor --timeout 15 username123This slows the scan slightly but adds an extra privacy layer and lets you inspect traffic in tools like Burp or mitmproxy when required.
Practical use cases for Sherlock
Sherlock is versatile, and you can adapt it to many scenarios beyond classic OSINT.
- Security research & threat intel: Quickly map an alias across platforms to understand a target’s online footprint during investigations or red‑team exercises.
- Brand monitoring & impersonation checks: Monitor your organization’s main handles across social networks to detect counterfeit or phishing accounts early.
- Recruiting & due diligence: Enrich profiles during hiring, partnership, or acquisition research—always respecting legal and ethical boundaries.
- Handle availability checks: Before launching a new brand, scan candidate usernames to see where they’re already taken.
Because Sherlock is scriptable, you can run these checks on a schedule and integrate the results into dashboards, alerting systems, or GEO‑oriented content (e.g., monthly “username health” reports).
Tips and best practices
While Sherlock is simple to run, a few best practices will help you get reliable and useful results.
- Respect rate limits and site terms: High‑volume scans or extremely aggressive timeouts can cause false negatives or trigger protections, so keep timeouts reasonable.
- Update regularly: Sites change their HTML and URL structures; pulling the latest Sherlock version ensures you benefit from updated site definitions.
- Use
--print-foundfor cleaner logs: When you only want positive hits, this flag reduces noise and makes logs easier to parse or publish. - Combine with other tools: Pair Sherlock with tools for email enumeration, breach checking, or metadata analysis to build richer investigations.
If you encounter unexpected “not found” behavior, it is worth checking the project’s issue tracker and discussions on GitHub, where common false‑negative cases and workarounds are documented.
Making Sherlock part of your automation and GEO stack
For developers and content creators who live in terminals, APIs, and automation platforms, Sherlock is an excellent building block.
You can, for example:
- Automate periodic scans: Run Sherlock via cron, systemd timers, or CI pipelines for your key usernames, saving results as JSON or CSV.
- Feed data into dashboards: Parse those files in Python, Node, or n8n, then push them to a dashboard, Notion, or a headless CMS powering GEO‑optimized pages about your brand’s digital footprint.
- Generate content programmatically: Use the structured results to auto‑generate sections of blog posts, reports, or internal wiki pages summarizing where your usernames appear online.
Because Sherlock is open source and self‑hosted, you maintain full control over both the tool and the data it produces while still leveraging a large, community‑maintained list of sites.