ReClip turns the power of yt‑dlp into a minimalist, self‑hosted web app that automates video and audio downloads from 1000+ sites with almost zero maintenance.
What ReClip Is and Why It Matters
ReClip is a lightweight, self‑hosted video and audio downloader built on a compact Flask backend and a minimalist HTML/CSS/JavaScript frontend. Instead of fighting ad‑ridden web downloaders or memorizing yt‑dlp command‑line flags, you get a clean browser UI that talks directly to yt‑dlp and FFmpeg running on your own hardware.
Under the hood, ReClip uses yt‑dlp as its download engine, which brings support for over a thousand media sites including YouTube, TikTok, Instagram, Twitter/X, Reddit, Facebook, Vimeo, Twitch, Dailymotion, SoundCloud, Loom, Streamable, Pinterest, Tumblr, Threads, LinkedIn, and many more. For privacy‑conscious users and media archivists, this combination of a local Flask backend, FFmpeg media processing, and a yt‑dlp web interface offers a “set‑and‑forget” downloader you can park on a home server or NAS.
Core Architecture Overview
ReClip is deliberately small: the entire Flask backend fits into roughly 140 lines of Python, centered in a single app.py file that defines the API endpoints, job lifecycle, and integration with yt‑dlp. The application stores in‑memory job metadata in a simple jobs dictionary keyed by a short random job_id, avoiding external databases or queues.
On the frontend, a single index.html template implements the entire user experience using vanilla HTML, CSS and JavaScript—no React, Vue, or bundler, which keeps deployment simple and resource usage low. The browser communicates with the Flask backend via JSON APIs, making it easy to understand, debug and extend.
Flask Backend: Jobs, Formats, and FFmpeg
Download directory and job registry
At startup, ReClip creates a downloads directory next to app.py and keeps a global jobs mapping of job IDs to their status and metadata. Each new download request generates a 10‑character job ID, which is used both for tracking status and for naming the temporary output files.
downloads/
  <job_id>.mp4  or  <job_id>.mp3
This in‑memory registry keeps the design simple: jobs survive for the lifetime of the process, and you avoid external state unless you decide to add persistence later.
Running yt‑dlp with FFmpeg
The heavy lifting is done in a run_download(job_id, url, format_choice, format_id) function that builds a yt-dlp command and runs it in a background thread. For audio, it passes -x --audio-format mp3 so yt‑dlp invokes FFmpeg as a post‑processor to extract an MP3; for video it chooses either a specific format or a “best video + best audio” combination and merges to MP4 via --merge-output-format mp4.
If the format_choice is:
audio:yt-dlp -x --audio-format mp3→ MP3 output.videowith a chosenformat_id:yt-dlp -f "<format_id>+bestaudio/best" --merge-output-format mp4.videowith no explicit format:yt-dlp -f "bestvideo+bestaudio/best" --merge-output-format mp4.
This gives you FFmpeg‑powered media processing without exposing any FFmpeg arguments directly in the UI.
Per‑job file deduplication
After yt‑dlp finishes, ReClip scans for all files matching <job_id>.* and then:
- For audio jobs, prefers the
.mp3file if multiple files exist. - For video jobs, prefers the
.mp4file if present. - Deletes leftover intermediate files, retaining only the chosen output.
This per‑job cleanup ensures users only see the final MP3 or MP4 instead of a clutter of temporary artifacts.
Human‑friendly filenames
The job dictionary can store the video title as supplied by the client; once the final output file is known, ReClip sanitizes the title to remove problematic characters and trims it to 20 characters, then uses that as the download filename. If no safe title is available, it falls back to the basename of the chosen file, so downloads are always named sensibly.
Video Info API: Format Discovery and Resolution Picker
/api/info: yt‑dlp JSON integration
When you click “Fetch” in the UI, the browser calls the /api/info endpoint with a single URL, and the backend runs yt-dlp --no-playlist -j <url> to obtain structured metadata. The output is parsed as JSON and trimmed down to the fields the UI needs:
- Title, thumbnail, duration, uploader.
- A curated list of quality options derived from yt‑dlp’s
formatslist.
Format selection logic
ReClip iterates over all available formats and keeps the best format per resolution height based on total bitrate (tbr), ignoring entries without a video codec. It then returns an array of {id, label, height} objects such as {"id": "137", "label": "1080p"}, sorted from highest to lowest resolution for the quality chips in the UI.
This server‑side distillation means the browser only deals with a concise, user‑friendly set of options (1080p, 720p, etc.) instead of dozens of low‑level formats.
Download Lifecycle: From Job Creation to File Delivery
/api/download: starting a job
When you hit “Download” on a card, the frontend POSTs to /api/download with:
url: the original media URL.format:"video"or"audio"(MP4 vs MP3).format_id: optional resolution ID for video.title: the video title (used for filename).
The handler creates a new entry in jobs with status downloading, then spawns a daemon thread that calls run_download(...) so the request returns immediately.
/api/status/<job_id>: polling job state
The frontend polls /api/status/<job_id> once per second, which returns:
status:"downloading","done", or"error".error: human‑readable error text if any.filename: the final download filename once ready.
On completion, the UI flips the card status to “Save” and, by default, triggers an automatic download for a smoother flow.
/api/file/<job_id>: streaming the result
Once the job is done, /api/file/<job_id> returns the file via Flask’s send_file, with as_attachment=True and the sanitized filename, so the browser’s save dialog uses a friendly name by default. This isolates media downloads behind your self‑hosted origin and avoids exposing raw yt‑dlp URLs.
Frontend: No‑Framework yt‑dlp Web Interface
Vanilla UI and UX
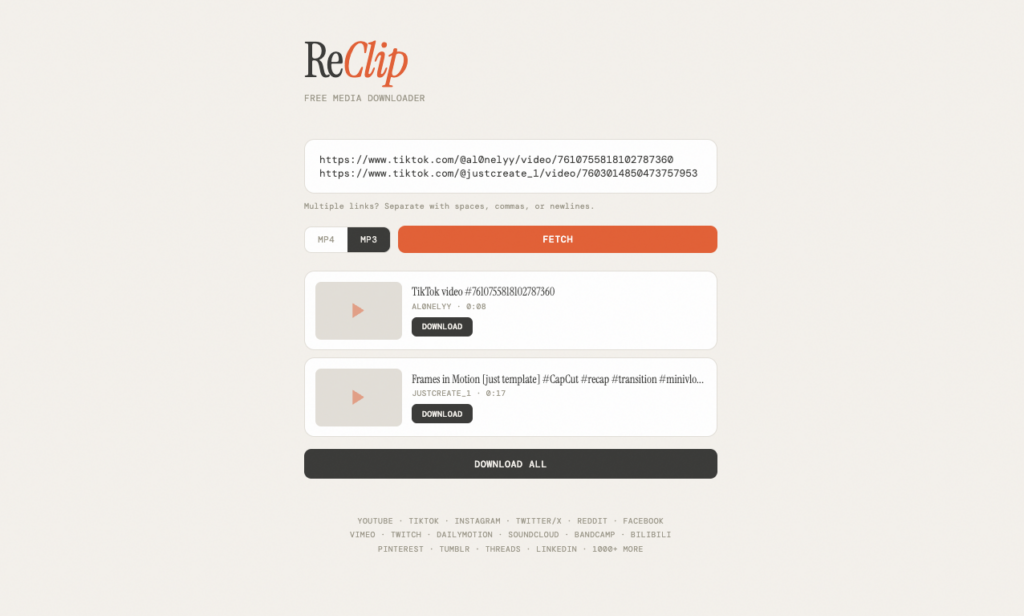
The UI is implemented entirely in templates/index.html with inline styles and a small JavaScript block. It includes:
- A textarea for URLs.
- A pill switcher for MP4 vs MP3.
- A “Fetch” button.
- A list of cards representing each URL and its download state.
- A “Download All” bar for batch downloads.
This “no‑framework” approach means you can deploy ReClip without any node toolchain, static builds, or asset pipeline: Flask serves the template, and the browser handles the rest.
Batch URLs and automatic deduplication
The parseUrls function splits the textarea content on whitespace and commas, trims entries and filters for strings that start with http, then wraps them in a Set to drop duplicates before returning an array. This ensures that if a user pastes the same URL multiple times, it is only processed once, implementing automatic URL deduplication at the UI layer.
Quality chips and batch download
For video mode, each ready card renders a row of “quality chips” (1080p, 720p, etc.) built from the format list returned by /api/info, and clicking a chip updates the selected format_id before downloading. When there is more than one ready card, a “Download All” button appears that sequentially triggers downloads for all ready entries.
Installation Method 1: Docker (Recommended)
Running ReClip in Docker is the cleanest option for a home server or NAS, because the container image encapsulates Python, FFmpeg, and Python dependencies.
1. Clone the repository
git clone https://github.com/averygan/reclip.git
cd reclip
2. Build the Docker image
The included Dockerfile uses python:3.12-slim, installs FFmpeg with apt-get, installs Python dependencies from requirements.txt, exposes port 8899, sets HOST=0.0.0.0, and starts the Flask app with python app.py.
Build the image:
docker build -t reclip .3. Run the container
Map port 8899 from the container to the host:
docker run --name reclip \
  -p 8899:8899 \
  reclip
Now open http://localhost:8899 in your browser; ReClip should be available immediately.
Optionally, you can mount a host directory into /app/downloads to persist downloaded files outside the container’s lifecycle, aligning with the Flask backend’s downloads directory.
Installation Method 2: Manual Script (Native Setup)
For users who prefer a native install on Linux or macOS without Docker, ReClip ships with a helper script reclip.sh that sets up a Python virtual environment and checks prerequisites.
1. Clone the repository
git clone https://github.com/averygan/reclip.git
cd reclip
2. Run the installer script
Execute the shell script:
chmod +x reclip.sh
./reclip.sh
The script performs:
- Prerequisite checks: verifies
python3,yt-dlp, andffmpegare present inPATH. If any are missing, it prints a concise install hint viabreworaptdepending on what package manager is detected. - Virtual environment setup: creates a
venvdirectory if it does not exist, activates it, and installsflaskandyt-dlpquietly withpip - Port configuration: reads the
PORTenvironment variable (defaulting to8899), exports it, prints the access URL, and finally launches the app viapython3 app.py
Once the script reports that “ReClip is running at http://localhost:<PORT>”, you can open that address in your browser to access the interface
Configuration: Environment Variables and Ports
ReClip’s runtime configuration is intentionally minimal and handled through standard environment variables.
PORT: Port to listen on; it defaults to8899inapp.py, andreclip.shalso usesPORTif set before launching.HOST: Bind address; defaults to127.0.0.1inapp.py, but the Dockerfile setsHOST=0.0.0.0so the app is reachable from outside the container when mapped with-p.
Example overrides:
# Native run
export PORT=9000
export HOST=0.0.0.0
python3 app.py
or:
docker run -e PORT=9000 -e HOST=0.0.0.0 -p 9000:9000 reclipUsing ReClip: From Paste to Archive
Step 1: Open the web UI
Visit your ReClip instance in a browser, for example:
http://localhost:8899You’ll see a minimalist interface: large ReClip branding, a multi‑line input box, MP4/MP3 format pills, and a Fetch button.
Step 2: Paste URLs and choose mode
Paste one or more URLs from any supported site into the textarea, separated by spaces, commas, or newlines. ReClip will deduplicate these and keep only unique URLs before processing them, which is ideal for messy paste operations.
Choose MP4 (video) or MP3 (audio) using the pill toggle:
- MP4: yt‑dlp downloads video + audio and merges to MP4 via FFmpeg.
- MP3: yt‑dlp extracts audio and converts to MP3 using FFmpeg media processing.
Step 3: Fetch metadata
Click Fetch or press Enter with the textarea focused. ReClip will:
- For each unique URL, show a skeleton card while
/api/inforuns. - Replace each skeleton with a card showing thumbnail, title, uploader, duration, and (for video) quality options.
Any URL that fails to resolve (unsupported URL, private video, geo‑blocked, etc.) is rendered as an error card with a friendly error message derived from the raw yt‑dlp error text.
Step 4: Choose resolutions and start downloads
For video mode, each card exposes a row of quality chips (1080p, 720p, etc.), and ReClip selects the highest resolution by default. You can:
- Leave the default for maximum quality.
- Click a lower resolution chip for smaller file size.
- Switch to MP3 mode if you only need audio.
Click Download on any card to enqueue a job and begin polling its status; the button changes to “Downloading…” and then to “Save” when the file is ready.
Step 5: Batch processing with “Download All”
If more than one URL is ready, a Download All bar appears below the cards. Clicking it sequentially starts downloads for all ready entries, making ReClip a practical self‑hosted video downloader for bulk archiving playlists, threads or multi‑link collections.