 By
By Expose: The Open-Source PHP Tunneling Service That Puts ngrok to Shame
Expose is a free, fully open-source tunneling service written in pure PHP that creates secure, publicly accessible URLs for any HTTP or HTTPS service running on your local machine. Created by Marcel Pociot of Beyond Code, it is the definitive open-source alternative to ngrok for PHP and Laravel developers — and its self-hostable, extensible architecture makes it compelling for virtually any backend developer who needs to share local sites or test webhooks without paying for proprietary infrastructure.
When you run Expose, it opens a persistent tunnel between your local development server and a publicly accessible endpoint on either the managed Expose network or your own self-hosted Expose server. Anyone with the public URL can interact with your local application as though it were deployed to the internet — through any firewall, NAT router, or VPN — without any network reconfiguration on your end.
Expose ships with a beautiful terminal UI for monitoring incoming requests, a full web-based dashboard on port 4040 for inspecting request and response details, and a growing library of request plugins that make webhook debugging a first-class experience. The entire project is distributed as a single PHP Archive (PHAR) file or as a global Composer package, making installation a matter of seconds.
The project is licensed under the MIT License and is actively maintained on GitHub at github.com/exposedev/expose, where it has accumulated over 4,500 stars.
Why Expose Exists: The Problem with Closed Tunneling Services
Tunneling services exist to solve one of the most persistent friction points in web development: your local machine is not on the internet. This creates concrete problems every day.
When a payment provider sends a webhook to confirm a transaction, it needs a public URL. When a client wants to review a design in progress, they need a live URL. When you want to test how a page renders on a physical mobile device, the device needs to reach your server. And when you are debugging an API integration with a third-party service, you need to see exactly what is being sent and received in real time.
Commercial tunneling services like ngrok solve this problem, but their closed-source nature means you have no control over your traffic, their pricing tiers limit free usage with session timeouts and randomized URLs, and extending their behavior for your workflow is simply not possible.
Expose takes a different philosophy: the core is fully open source under MIT, you can self-host the entire server component on your own domain, you can extend the client with custom request plugins and response modifiers, and the developer experience has been a design priority from the beginning rather than an afterthought.
Core Features
Terminal UI and Web Dashboard
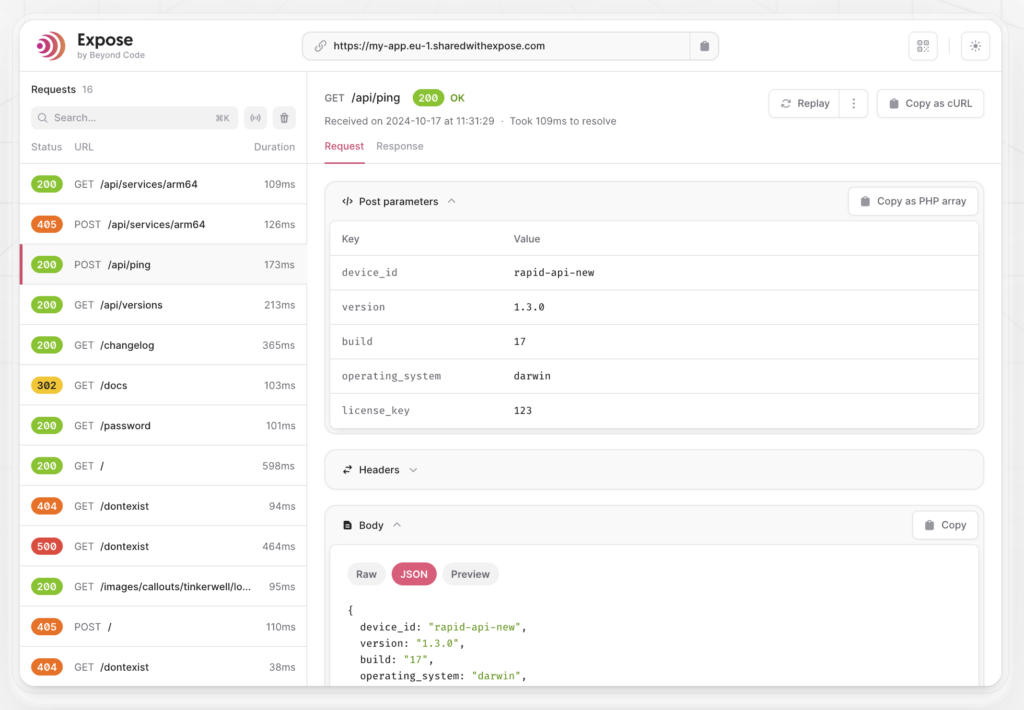
Every time you share a local site with Expose, it launches a real-time terminal display showing all incoming HTTP requests with their method, path, status code, and response time. This gives you an instant read on what traffic is hitting your application without ever opening a browser.
For more detailed inspection, Expose simultaneously starts a web-based dashboard on http://127.0.0.1:4040. This dashboard shows every request in full detail, including all request and response headers, the complete body payload, timing information, and any metadata extracted by the active request plugins. You can click into any request to examine it thoroughly.
The dashboard introduced in Expose 3 also generates a QR code when you start sharing a site. Scanning this QR code with a mobile device takes you directly to your tunnel URL, making it trivial to test your application on a real phone or tablet without copying and pasting URLs.
Request Replay with Modification
One of Expose’s most practically useful features is the ability to replay any incoming request directly from the dashboard without triggering the original event again. This is transformative for webhook development. Instead of repeatedly creating test orders on Stripe or Paddle to generate webhook payloads, you can trigger the event once, capture the request in Expose, and then replay it as many times as you need while iterating on your handler code.
Expose 3 extended this capability by allowing you to modify a request before replaying it. You can change the request headers, the URI path, or the body payload, and then fire the modified version against your local server. This makes it possible to simulate edge cases and error conditions without needing the third-party provider to generate those payloads organically.
Request Plugins
Request plugins are modular components that teach Expose how to interpret and display specific types of incoming webhooks. Without plugins, every POST request to your tunnel looks the same: a method, a path, a status code. With plugins, Expose reads the webhook payload, identifies the event type, and surfaces the relevant information directly in both the terminal output and the web dashboard.
Expose 3 ships with two built-in plugins:
- GitHubPlugin: Recognizes
push,pull_request,issues, andpingevents from GitHub webhooks. The event type is displayed in the request list alongside the method and path, and the detailed view presents the relevant payload fields in a structured table. - PaddleBillingPlugin: Extracts the
event_typefrom Paddle Billing webhooks (such astransaction.completed,payment_method.saved,subscription.created) and displays it inline in the terminal and dashboard sidebar.
Both plugins are enabled by default. You can view, enable, and disable plugins using the expose plugins and expose plugins:manage commands. If your webhook provider is not covered by a built-in plugin, you can generate a custom plugin scaffold with the expose make:plugin command, implement your extraction logic, and contribute it back to the open-source repository.
Vite Detection
A common source of frustration when sharing local sites is that CSS and JavaScript assets served by Vite’s development server (via npm run dev) become unavailable through the public tunnel URL, because the Vite dev server binds to localhost and is not accessible through the Expose tunnel by default.
Expose 3 eliminates this problem entirely through automatic Vite detection. When you share a local site, Expose checks whether a Vite development process is currently running. If it detects one, it automatically creates a separate tunnel for the Vite process and rewrites your shared site to reference the Vite tunnel URL. The result is that sharing a local site while Vite is running simply works, with no additional commands or configuration required.
Catch-All Mode
The expose catch-all command spins up an Expose tunnel that accepts every incoming request and responds with 200 OK regardless of the path or payload. This is a focused productivity tool for the earliest stage of webhook integration, when you want to confirm that a third-party service is actually sending webhooks to your URL and inspect the exact payloads being sent before you have written any handler code. It removes all application-layer noise from the process of payload discovery.
Per-Project Configuration with expose.yml
Expose supports a per-project YAML configuration file named expose.yml placed in the root directory of your project. When you run expose or herd share from that directory, Expose picks up the configuration automatically and applies all specified parameters. This is particularly useful for teams, because it ensures every developer working on the same project always uses the same tunnel configuration without any manual steps.
A typical expose.yml looks like this:
local-url: https://myapp.test/
subdomain: my-app-dev
custom-domain: share.mycompany.com
expose-server: eu-1
auth:
  username: reviewer
  password: s3cur3pass
Self-Hosted Server with Admin Interface
When you host your own Expose server, you gain full control over who can connect, how long connections can remain open, and what messages users see when they interact with the server. The self-hosted server ships with a web-based admin interface accessible at http://expose.your-domain.com (the subdomain is configurable) protected by HTTP Basic Auth.
Through the admin interface you can:
- List, add, and delete authorized users stored in a SQLite database
- View all currently connected sites with their assigned subdomains and connection timestamps
- Disconnect any active tunnel immediately with a single click
- Toggle authentication token validation on or off at runtime
- Set a message of the day shown to clients on successful connection
- Configure a maximum connection duration in minutes after which clients are automatically disconnected
- Customize the error messages shown for authentication failures and subdomain conflicts
All settings made through the admin UI are also reflected in the Expose server configuration file, allowing you to commit persistent settings to version control.
Installation Guide
Prerequisites
Expose requires a working PHP installation. PHP 7.3 or later is required, though PHP 8.x is strongly recommended for performance and compatibility with modern dependencies. Composer is required if you choose the global Composer installation path. No other dependencies or language runtimes are needed for the client.
Option 1: Laravel Herd (Recommended for Laravel and PHP Developers)
If you use Laravel Herd as your local development environment, Expose is already bundled and available from your terminal. No separate installation is required. Simply set up your authentication token and start sharing sites immediately.
To configure your token within Herd, open the Herd preferences and navigate to the Expose settings panel, then paste your token from the Expose platform.
Option 2: PHP Archive (PHAR)
This is the recommended installation method for anyone not using Herd. It downloads a self-contained PHAR that bundles all dependencies and requires only that PHP be available on your system path.
Step 1 — Download and make the archive executable
curl https://github.com/exposedev/expose/raw/master/builds/expose \
  -L --output expose

chmod +x expose
Step 2 — Move it to a directory on your PATH
sudo mv expose /usr/local/bin/exposeAfter this step, the expose command is available from any directory in your terminal.
Step 3 — Verify the installation
expose --versionYou should see the current Expose version number printed to your terminal.
Keeping Expose up to date
expose self-updateThis command downloads and replaces the current PHAR with the latest stable release.
Option 3: Global Composer Install
If you prefer to manage Expose as a Composer dependency alongside your other global PHP tools, you can install it globally:
Step 1 — Install via Composer
composer global require exposedev/exposeStep 2 — Ensure the global Composer bin directory is on your PATH
Add the following line to your ~/.bash_profile, ~/.bashrc, or ~/.zshrc (depending on your shell):
export PATH=~/.composer/vendor/bin:$PATHReload your shell configuration:
source ~/.bash_profileStep 3 — Verify
expose --versionSetting Up Authentication
Expose requires an authentication token to use the managed Expose network. If you plan to use only a self-hosted server, you can skip this step or configure token validation on your own server as described in the server setup section.
To obtain a token, create a free account at expose.dev/register. After logging in for the first time, you will see your authentication token and a ready-to-use setup command on the welcome screen.
Configure the token on your local machine:
expose token YOUR_TOKEN_HEREThis command writes the token to the Expose configuration file. Once set, all subsequent expose share commands will authenticate automatically using this token.
Sharing Your First Local Site
With Expose installed and authenticated, you are ready to create your first public tunnel.
Sharing a URL Directly
The most explicit way to share a local site is to pass its URL directly to expose share:
# Share a Node.js server running on port 3000
expose share http://localhost:3000

# Share a local PHP site accessible by IP
expose share http://192.168.2.100

# Share a named local development site
expose share my-local-site.dev

# Share a local site that already uses HTTPS
expose share https://my-local-site.dev
After running the command, Expose prints your public tunnel URL to the terminal alongside the local URL being shared, the dashboard URL, and a QR code. Copy the public URL and share it with anyone you want to give access to your local application.
Sharing from the Current Directory
If you use Laravel Herd, Laravel Valet, or any other development environment that maps directory names to .test domains, you can share the current project without specifying a URL:
# In ~/Sites/my-project/, this shares my-project.test
cd ~/Sites/my-project
expose
Expose infers the local URL from the directory name and creates the tunnel automatically.
Specifying a Custom Subdomain
Custom subdomains require either a self-hosted Expose server or an Expose Pro subscription. They allow you to use the same tunnel URL every time you connect, which is essential for webhook integrations where the callback URL is registered once in a third-party system.
expose share my-site.test --subdomain=my-siteYou can also specify which regional server to connect to:
expose share my-site.test --subdomain=my-site --server=eu-1If the subdomain you request is already taken by another connected client, Expose will report an error and close the connection.
Protecting a Tunnel with Basic Authentication
To add HTTP Basic Auth to a shared tunnel — useful when sharing work-in-progress with clients who should not be able to share the URL further:
expose share my-site.test --auth=username:passwordAnyone accessing the public tunnel URL will see a browser authentication prompt before they can view the site. The credentials you set are entirely independent of the Expose platform credentials.
Using the Catch-All Mode
When you want to inspect what a third-party service is sending before implementing any handler logic:
expose catch-allEvery request sent to this tunnel receives a 200 OK response. All request details are visible in both the terminal and the dashboard at http://127.0.0.1:4040.
Using the Web Dashboard
The web dashboard is available at http://127.0.0.1:4040 while any expose share or expose catch-all command is running. Open it in a browser to access the full request inspection interface.
The left sidebar lists all incoming requests in reverse chronological order, showing the HTTP method, path, response status code, timestamp, and any labels added by active request plugins (such as the webhook event type for GitHub or Paddle requests). Clicking any entry in the list loads the full detail view in the main panel.
The detail view shows:
- The full request URL, method, and HTTP version
- All request headers as a key-value table
- The raw request body, formatted as JSON when the content type permits
- The response status code and all response headers
- The response body
- Plugin-specific structured data when a request plugin matched the incoming request
Replaying Requests
To replay a request exactly as it was received, click the replay button in the detail view. The request is re-sent to your local server using the same headers, method, and body as the original.
To replay a request with modifications, click the edit-and-replay button. This opens an editor in which you can change any header value, modify the request URI, or rewrite the body before sending. This capability is most useful when you want to test how your handler responds to edge-case payloads (such as a failed payment or a deleted resource) without needing to trigger those events in the third-party system.
Managing Request Plugins
From the terminal, run the following command to see which plugins are currently installed and whether each is active:
expose pluginsTo toggle plugins on or off interactively:
expose plugins:manageThe interactive selector allows you to enable or disable each available plugin. Restart your running expose share command for the changes to take effect.
To scaffold a new custom plugin:
expose make:pluginThis command prompts you for a plugin name and generates the plugin class file in the appropriate location. Implement the shouldHandle method to define the condition under which your plugin activates, and implement the handle method to extract and return the structured data you want displayed in the terminal and dashboard.
Self-Hosting the Expose Server
Self-hosting the Expose server gives you complete control over your tunneling infrastructure, eliminates reliance on any third-party service, and allows you to configure behavior that the managed Expose network does not expose to free-tier users. The server component is available in a separate repository and is fully open source.
Installing the Server
Clone the Expose server repository and install its dependencies:
git clone https://github.com/exposedev/server.git expose-server
cd expose-server
composer install
Starting the Server
Start the server by passing the domain name you want to use:
./expose-server serve my-domain.comBy default, the server listens for incoming client connections on port 8080. To use a different port:
./expose-server serve my-domain.com --port=3000To require all connecting clients to present a valid authentication token:
./expose-server serve my-domain.com --validateAuthTokensRunning with Docker Compose
A docker-compose.yml is included in the server repository for containerized deployments. Copy the environment variable template and update the values:
cp .env-example .envOpen .env and set the following variables:
PORT=8080
DOMAIN=expose.yourdomain.com
ADMIN_USERNAME=your_admin_username
ADMIN_PASSWORD=your_admin_password
Start the server:
docker-compose up -dThe server will start in the background. You can verify it is running with docker-compose ps and check logs with docker-compose logs -f.
Keeping the Server Running with Supervisor
In production, you want the Expose server process to start automatically and restart if it crashes. Supervisor is the recommended solution on Linux.
Install Supervisor:
# Debian / Ubuntu
apt install supervisor

# Red Hat / CentOS
yum install supervisor
systemctl enable supervisord
Create a process configuration file at /etc/supervisor/conf.d/expose.conf:
[program:expose]
command=/usr/bin/php /home/expose/expose-server serve my-domain.com
numprocs=1
autostart=true
autorestart=true
user=www-data
Load and start the process:
supervisorctl update
supervisorctl start expose
Verify the server is running:
supervisorctl statusAdding SSL with Nginx
The Expose server communicates over plain HTTP by default. To enable HTTPS, place an Nginx reverse proxy in front of the server. This approach lets Certbot or any other ACME client manage your SSL certificates while Nginx handles termination.
Install Certbot and obtain a wildcard certificate for your domain (a wildcard is required because each tunnel uses a unique subdomain):
certbot certonly --manual --preferred-challenges dns \
  -d "expose.yourdomain.com" \
  -d "*.expose.yourdomain.com"
Create an Nginx server block at /etc/nginx/sites-available/expose:
server {
  listen        443 ssl;
  listen        [::]:443 ssl;
  server_name   expose.yourdomain.com *.expose.yourdomain.com;

  ssl                  on;
  ssl_certificate      /etc/letsencrypt/live/expose.yourdomain.com/fullchain.pem;
  ssl_certificate_key  /etc/letsencrypt/live/expose.yourdomain.com/privkey.pem;

  location / {
    proxy_pass             http://127.0.0.1:8080;
    proxy_read_timeout     60;
    proxy_connect_timeout  60;
    proxy_redirect         off;

    proxy_http_version 1.1;
    proxy_set_header Upgrade    $http_upgrade;
    proxy_set_header Connection 'upgrade';
    proxy_set_header X-Real-IP  $remote_addr;
    proxy_set_header X-Forwarded-For    $proxy_add_x_forwarded_for;
    proxy_set_header X-Forwarded-Proto  https;
    proxy_set_header Host               $host;
    proxy_cache_bypass $http_upgrade;
  }
}

server {
  listen      80;
  listen      [::]:80;
  server_name expose.yourdomain.com *.expose.yourdomain.com;
  return      301 https://$host$request_uri;
}
Enable the site and reload Nginx:
ln -s /etc/nginx/sites-available/expose /etc/nginx/sites-enabled/
nginx -t
systemctl reload nginx
Connecting a Client to Your Self-Hosted Server
On any machine where Expose is installed, publish the client configuration file:
expose publish-configOpen the published configuration file (typically at ~/.config/expose/config.php) and update the host and port values:
return [
    'host' => 'expose.yourdomain.com',
    'port' => 443,
    // ... other settings
];
From this point, all expose share commands on this machine will connect to your self-hosted server rather than the managed Expose network.
Administering the Self-Hosted Server
Navigate to http://expose.your-domain.com in a browser. You will be prompted for the username and password defined in the server configuration file. The admin interface provides three sections:
Users: A table of all registered users authorized to connect when token validation is enabled. Users are stored in a SQLite database. You can add new users with their authentication tokens and delete existing ones directly from this interface.
Shared Sites: A live list of all tunnels currently connected to your server, showing the original client host, the assigned subdomain, and the time at which the connection was established. You can forcibly disconnect any client from this view.
Settings: Runtime controls for authentication token validation, the message of the day displayed to connecting clients, the maximum connection duration, and the error messages shown for authentication failures and subdomain conflicts. Changes made here take effect immediately without restarting the server.
Per-Project Configuration
Rather than relying solely on command-line flags, Expose supports a project-level YAML configuration file that codifies tunnel settings alongside your source code. This is the recommended approach for any project that uses webhooks or needs consistent tunnel URLs across a development team.
Create an expose.yml file in the root of your project directory:
local-url: https://myapp.test/
subdomain: my-app
custom-domain: dev.mycompany.com
expose-server: eu-1
auth:
  username: reviewer
  password: pass1234
When any developer on the team runs expose from the project root, all of these settings are applied automatically. There is no need to communicate tunnel configuration through Slack or README notes, and no risk of a developer connecting to a different subdomain that breaks their webhook registration in a development third-party account.
The expose-server value can be set to any node in the Expose Pro network (such as us-1, us-2, eu-1, eu-2, ap-1) or to the hostname of a self-hosted server.
Use Cases
Webhook Development and Testing
This is the flagship use case for Expose and the one for which its tooling is most deeply optimized. When building integrations with payment processors like Stripe or Paddle, identity providers, CI/CD platforms like GitHub Actions, communication tools like Slack or Twilio, or any other service that pushes data to your application via HTTP, you need a publicly accessible endpoint during development.
Expose provides that endpoint instantly, and the request plugin system ensures that the most important information about each incoming webhook — the event type, the entity involved, the status — is surfaced immediately in both the terminal and the dashboard without requiring you to parse raw JSON payloads manually. The replay-with-modification feature means you can iterate on your handler logic rapidly without repeatedly triggering paid events or waiting for a third-party system to resend.
Client and Stakeholder Demos
When a client or project stakeholder wants to review work in progress, the traditional options are to deploy to a staging server (slow, expensive, potentially disruptive to a shared environment) or to schedule a screen share (which requires synchronizing schedules and does not give the client the ability to explore independently). Expose provides a third option: share a link.
The basic authentication feature lets you add a password to the shared URL so that only the intended recipient can access it. The tunnel stays open as long as your expose share command is running, and closing the command immediately revokes all access. No deployment, no staging server, no lingering access credentials.
Mobile and Cross-Device Testing
Testing a web application on a real mobile device from your local development machine has always required either connecting both devices to the same network or setting up a complex network configuration. Expose reduces this to scanning a QR code. Once the tunnel is open, the QR code in your terminal points directly to the public URL. Any device with a camera and a browser can access your local application from anywhere.
This is particularly valuable for testing responsive layouts, touch interactions, and mobile-specific browser behaviors that do not faithfully reproduce in browser developer tools emulation.
API Debugging and Third-Party Integration
When integrating with third-party APIs, understanding what your application is receiving — not just what you expect it to receive — is frequently the fastest path to solving integration bugs. The Expose dashboard gives you a complete record of every request and response exchanged through the tunnel, with all headers and payloads accessible in a clean, structured interface.
The catch-all command is particularly useful in the earliest stage of an integration when you want to confirm that events are being dispatched at all and examine their structure before writing any code. Running expose catch-all, configuring the third-party service to point to your tunnel URL, and triggering a test event gives you the complete payload within seconds.
Team Development with Consistent Tunnel URLs
For teams working on applications with extensive webhook integrations, having each developer configure their tunnel independently creates a coordination problem: webhook URLs registered in development third-party accounts (Stripe test mode, GitHub application settings, Slack app configuration) must be updated every time a developer connects with a different subdomain.
The expose.yml per-project configuration file combined with custom subdomains (either on a self-hosted server or via Expose Pro) eliminates this problem. Every developer runs expose from the project root and connects to the same subdomain. Webhook URLs are registered once and never need to change.
Laravel and PHP Application Development
Expose is a natural fit for the Laravel ecosystem. It is bundled directly with Laravel Herd, the official local development environment for Laravel. The automatic Vite detection introduced in Expose 3 means that the common pattern of running npm run dev alongside a PHP development server works correctly through an Expose tunnel without any special configuration. Teams building Laravel applications with webhook-driven workflows will find that Expose integrates more naturally into their stack than any alternative.
Expose Managed Network vs. Self-Hosted: Choosing the Right Path
| Consideration | Managed Free | Managed Pro | Self-Hosted |
|---|---|---|---|
| Cost | Free | Paid subscription | Infrastructure costs only |
| Setup time | Minutes | Minutes | Hours (with SSL/DNS) |
| Custom subdomains | No (randomized) | Yes | Yes |
| Custom domains | No | Yes (white-label) | Yes |
| Connection time limits | Yes | No | Configurable |
| Global server network | No (EU only) | Yes | Your servers |
| Data privacy | Traffic via Expose servers | Traffic via Expose servers | Traffic stays on your infrastructure |
| Admin control | None | Account portal | Full server admin interface |
| Maintenance burden | None | None | Your responsibility |
For individual developers building personal projects, the free managed tier is sufficient for most webhook development and demo scenarios. Teams with consistent subdomain requirements or privacy constraints will benefit from either Expose Pro or a self-hosted deployment. Organizations with strict data handling requirements or the need for deep customization should self-host.
Technology Overview
Expose is built entirely in PHP and leverages the event-driven architecture of ReactPHP for its asynchronous server and client components. This means the server and client are not traditional synchronous PHP scripts — they run as long-lived processes with a non-blocking event loop, which is how they maintain persistent WebSocket connections between the client and server.
| Component | Technology |
|---|---|
| Language | PHP 7.3+ (PHP 8.x recommended) |
| Async runtime | ReactPHP |
| Distribution format | PHAR (PHP Archive) |
| Package manager | Composer |
| Dashboard frontend | Web (HTML/CSS/JS) |
| Server storage | SQLite (user database) |
| License | MIT |
The choice of pure PHP is not incidental. It means Expose integrates naturally into any environment where PHP is already installed, requires no Node.js runtime, no Go binary, no additional language toolchain — only the PHP interpreter and Composer. For PHP developers who already have these tools, Expose adds zero new dependencies to their system.
Conclusion
Expose occupies a unique position in the tunneling landscape: it is the only mature, open-source, self-hostable tunneling service designed specifically with PHP developers in mind, backed by a thoughtful user experience that makes webhook development genuinely pleasant rather than merely functional. Its terminal UI, web dashboard, request replay with modification, request plugin system, Vite detection, per-project configuration, and full self-hosting capability represent a coherent and considered approach to the problem of sharing local services during development.
Whether you install it in seconds via the PHAR download, bundle it with Laravel Herd, or deploy your own server on a VPS behind Nginx and Let’s Encrypt, the result is the same: a publicly accessible URL for your local application, real-time request inspection, and the tools you need to move fast on webhook integrations and client demos without compromise.
Start by installing Expose today:
curl https://github.com/exposedev/expose/raw/master/builds/expose \
  -L --output expose && chmod +x expose && sudo mv expose /usr/local/bin/expose
Then share your first site:
expose share http://localhost:8000- GitHub Repository: github.com/exposedev/expose
- Official Website and Managed Network: expose.dev
- Documentation: expose.dev/docs
- Create a Free Account: expose.dev/register
- License: MIT License